
How to Install Floating Shelves Correctly in 5 Steps
Fasten Floating Shelves Securely From the Start
Fasten floating shelves by securing the concealed bracket directly into wall studs whenever possible, then sliding the shelf onto its support rods and tightening its underside set screws. Use a level before drilling, drive screws into the center of each stud, and keep heavy items close to the wall.
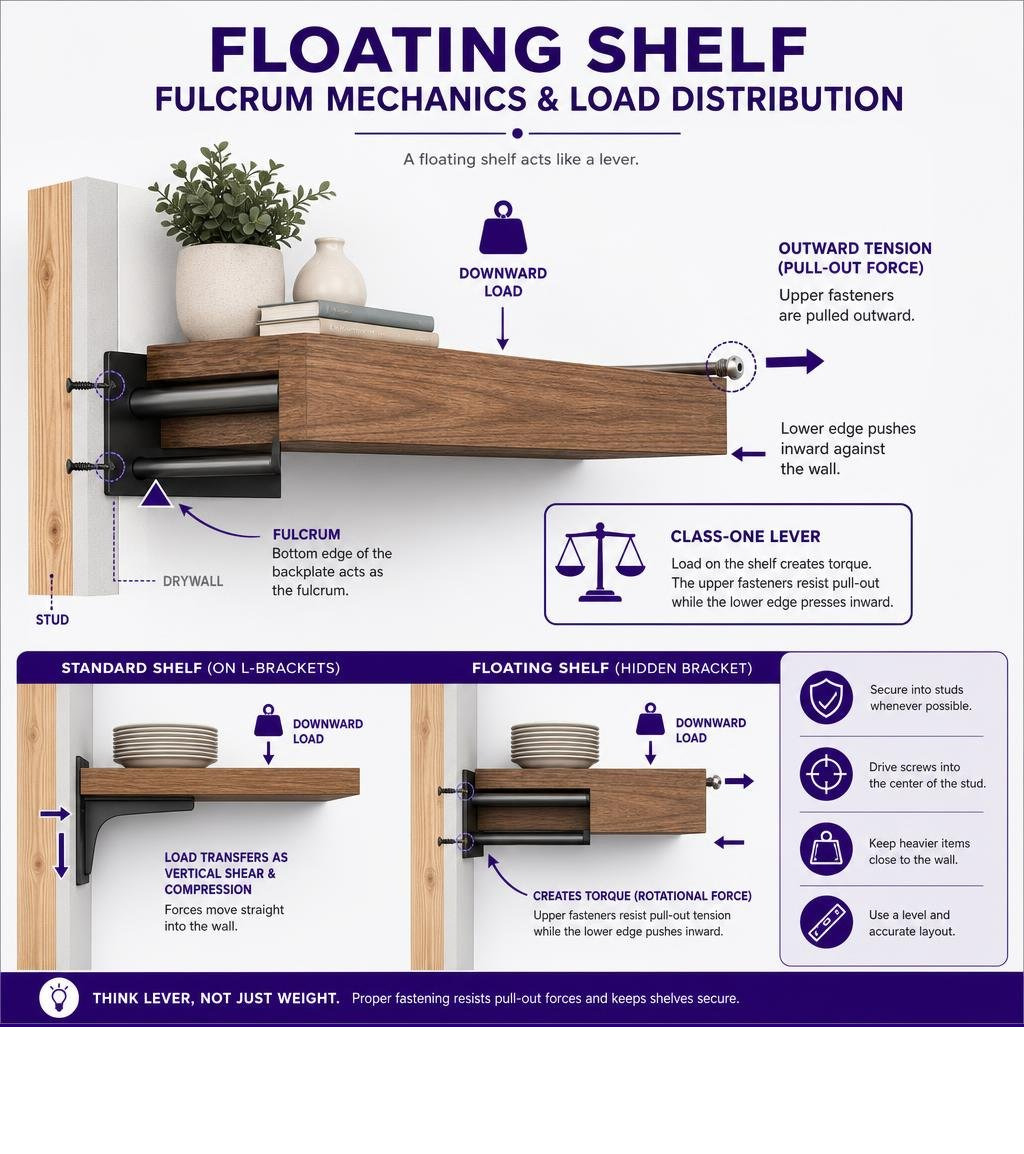
If studs do not line up with your shelf, use anchors designed for the exact drywall thickness and load. Do not rely on adhesive strips for a loaded floating shelf. A floating shelf acts like a lever: weight near its front edge creates outward pull at the upper fasteners, not just downward force. That is why a fastener’s published shear rating alone does not describe how well it will handle a deep, cantilevered shelf.
A solid bracket, accurate layout, and the right wall fastening method prevent the common failures: forward tilt, loose rods, cracked drywall, and sagging shelves.
I’m Trevor Jones, a building-hardware specialist with more than 16 years of experience focused on practical mounting and fastening problems. In this guide on how to fasten floating shelves, I’ll help you choose the right mounting approach and install it with fewer avoidable mistakes.
Floating Shelf Mechanics and Fastener Selection
Standard wall shelves sit on top of visible L-brackets. When you place a stack of dishes on an L-bracket shelf, the downward weight transfers into the wall as vertical shear and compressive force against the wall face.
A floating shelf behaves differently. Because the mounting rods and backplate are hidden inside the shelf body, the entire assembly acts as a class-one lever. The bottom edge of the shelf backplate acts as a fulcrum against the drywall. As weight is placed on the shelf, rotational torque exerts a continuous outward tension (pull-out force) on the upper fasteners while driving the lower edge of the plate inward.
Understanding this dynamic is central when learning How to Mount a Floating Shelf Without Sagging. The deeper the shelf, the greater the rotational leverage on your wall fasteners. For example, placing a 10-pound object on the outer edge of a 12-inch-deep shelf generates significantly more pull-out force at the top screw than the same 10 pounds placed on a 6-inch-deep ledge.
Because of these rotational mechanics, published anchor ratings require careful context. Hardware manufacturers publish static shear ratings (downward vertical load flush against the wall) and tensile ratings (straight pull-out force). When selecting hardware, never mistake a pure shear rating for the allowable cantilevered load.
| Fastener Type | Target Wall Substrate | Published Shear Capacity (Per Point) | Best Application | Mechanical Limitation on Drywall |
|---|---|---|---|---|
| Structural Wood Screws | Wood Wall Studs | 50–100+ lbs | Primary shelf support; heavy books & cookware | Must hit solid wood framing |
| Plastic Expansion Plugs | Solid Masonry / Plaster | 10–20 lbs in 1/2″ drywall | Lightweight picture frames only | Cone pulls straight out under rotational tension |
| Self-Drilling Zinc Anchors | 1/2″ to 5/8″ Drywall | 25–40 lbs shear | Small decorative ledges (<5 lbs total load) | Strips drywall core when torqued outward |
| Steel Toggle Bolts | 1/2″ to 5/8″ Drywall | 50–75 lbs shear | Medium hollow-wall loads | Requires large clearance cavity behind wall |
| GS1 Heavy-Duty Anchor | 1/2″ or 5/8″ Drywall | Up to 250 lbs shear | Hollow-bay floating shelf brackets | Requires 1-inch hole saw for installation |
| GS2 Heavy-Duty Anchor | 1/2″ or 5/8″ Drywall | Up to 1,000 lbs shear | Multi-rod heavy floating shelf backplates | Requires 2-inch hole saw for installation |
Standard plastic expansion anchors and self-drilling zinc plugs rely on friction or shallow threads bite into brittle gypsum. Under continuous rotational pull-out tension, the top of the bracket draws these fasteners forward, pulverizing the gypsum core and creating a permanent forward tilt.
Essential Tools and Materials for Installation
Gathering the proper tools before drilling prevents inaccurate hole placement and ensures the mounting bracket sits completely flush.
- Electronic Stud Finder: A multi-sensor scanner that detects stud edges, stud centers, and live AC wiring.
- 24-Inch Box Level: A long spirit level or laser level. Torpedo levels under 9 inches can introduce cumulative angle errors across longer shelves.
- Power Drill / Impact Driver: For boring pilot holes and driving structural screws.
- Substrate Drill Bits: High-speed steel bits for timber studs, standard masonry bits for brick/block, or a hole saw for specialized hollow-wall anchors.
- Tape Measure and Sharp Pencil: For accurate wall layout mapping.
- Painter’s Masking Tape: For marking stud boundaries without damaging wall paint.
- Center Punch or Awl: To create an indent that keeps drill bits from wandering on slick painted drywall.
- Hardware Fasteners: Minimum 2.5-inch to 3-inch structural wood screws for studs, plus heavy-duty mechanical anchors for hollow bays.
How to Fasten Floating Shelves: Step-by-Step Installation Guide
Most manufactured and custom floating shelves utilize a two-piece system: a welded steel backplate with protruding support rods, and a hollow-core or bored solid-wood shelf body that slips over the rods.
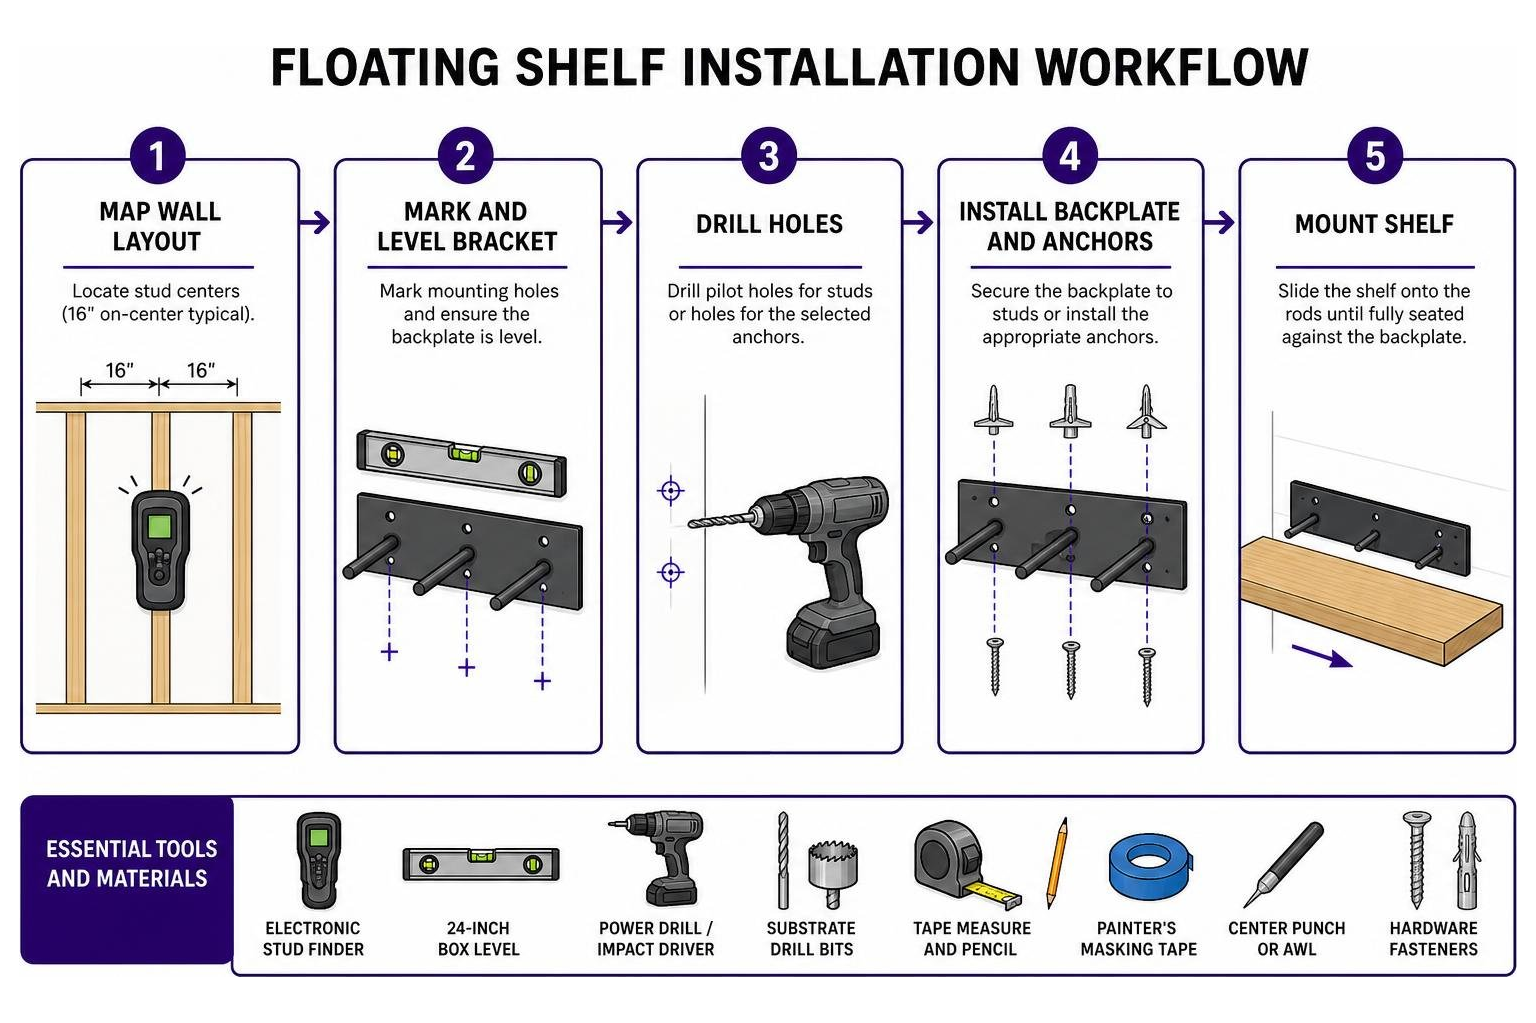
Follow this 5-step procedure to anchor the bracket backplate and mount the shelf.
Step 1: Map the Wall Layout and Locate Stud Centers
In standard North American residential construction, vertical timber studs are spaced 16 inches on-center (occasionally 24 inches in older builds or non-load-bearing partitions).
- Apply strips of blue painter’s tape across the installation zone.
- Calibrate your stud finder and slide it horizontally across the wall. Mark both the left and right edges of each stud on the tape.
- Measure the distance between edge marks to identify the exact 1.5-inch center of the 2×4 framing member.
- Check the wall area with an AC wire detector to confirm no electrical conduits run directly behind your target points.
Contractor Note: If your drill bit strikes a metal protective safety plate inside the wall bay, stop drilling immediately. These steel plates are installed by electricians and plumbers to prevent fasteners from piercing live wires and pressurized pipes. Relocate your shelf vertically by at least 2 inches.
Step 2: Level and Mark Bracket Hole Placements
A level bracket ensures items do not slide off your shelf. Following proven guidance on How to Hang Floating Shelves Perfectly Level Every Time avoids crooked bore holes.
- Measure up from the floor to your desired shelf height (standard eye-level display is typically 57 to 63 inches from the floor; kitchen backsplashes generally use 18 to 20 inches of clearance above countertops).
- Hold your steel bracket backplate against the wall at the layout line.
- Place a 24-inch box level along the top edge of the backplate. Adjust until the bubble rests perfectly centered between the indicator lines.
- Mark every mounting slot that aligns with a verified stud center.
- If the bracket extends past your studs or lands entirely within an open drywall bay, mark the outer mounting holes for mechanical hollow-wall fasteners.
- Press an awl or center punch into each pencil mark to create a starting pilot indent in the drywall surface.
Step 3: How to Fasten Floating Shelves into Studs
Fastening directly into solid wood framing provides maximum rigidity against rotational leverage. A quality 3-inch screw driven into a solid wood stud can support 50 to 100+ pounds of load capacity.
- Fit your drill with a wood bit sized slightly smaller than the root diameter of your screw (typically a 1/8-inch or 5/32-inch bit for #10 or #12 structural screws).
- Wrap a piece of painter’s tape around your drill bit 2.5 inches from the tip to serve as a visual depth stop.
- Drill pilot holes directly into the marked stud centers, keeping the drill perpendicular (90 degrees) to the wall.
- Align the steel backplate over the holes.
- Drive heavy-duty structural wood screws through the bracket mounting slots into the timber framing.
- Tighten the screws until the backplate is pulled flat and firm against the wall. Do not over-torque to the point of crushing the internal drywall core.
Step 4: How to Fasten Floating Shelves in Drywall Cavities
When decorative placement dictates that your shelf must sit where studs are unavailable, you must use heavy-duty hollow-wall anchors capable of clamping the drywall from behind.
- For high-load, stud-free installations in standard 1/2-inch or 5/8-inch drywall, cut the specified hole using a hole saw (a 1-inch hole saw for our GS1 anchor rated up to 250 lbs shear, or a 2-inch hole saw for the GS2 Drywall Anchor rated up to 1,000 lbs shear in 1/2-inch or 5/8-inch drywall).
- Insert the anchor body through the cutout, allowing its internal mechanism to bridge across the back face of the drywall panel.
- Secure the anchor flush against the wall according to the system specifications.
- Place the steel shelf bracket over the anchor’s central mounting point, insert the machine bolt, and torque it down until the bracket backplate is clamped rigidly against the wall face.
Substrate Limitation: GHOSTUD anchors are engineered strictly for drywall applications. If you are mounting shelves onto plaster and lath, masonry, brick, concrete, or tile over cement backer board, stop and switch to substrate-specific anchors. For solid brick or concrete block, use masonry drill bits paired with concrete expansion sleeve anchors or Tapcon fasteners driven directly into mortar joints.
Step 5: Mount, Adjust, and Secure the Shelf Body
With the bracket backplate secured to the wall, you can fit the shelf body onto the steel support rods.

- Inspect the protruding bracket rods with a small torpedo level. If your wall is bowed, place thin plastic or wooden shims behind the backplate to ensure the rods point straight out or tilt upward by a fraction of a degree (1 to 2 degrees of upward pitch compensates for natural rod deflection under load).
- Slide the shelf body over the support rods until the rear edge sits flush against the wall surface.
- If your shelf hardware utilizes eccentric offset cam rods, rotate the rods left or right using an open-end wrench to micro-adjust horizontal level before final seating.
- Locate the pre-drilled set screw holes on the underside of the shelf. Drive the included set screws upward against the steel bracket rods using a hand screwdriver or Allen key. This locks the shelf to the rods and prevents it from sliding forward off the wall.
- Perform a manual load check: press down gently on the front edge of the shelf. Observe the bracket and wall interface for any flexing, cracking, or movement before placing your display items.
Critical Mistakes That Cause Sagging and Shelf Failure
Floating shelf failures are almost always mechanical rather than cosmetic. Avoiding these common installation errors protects your walls and your belongings:
- Relying on Plastic Expansion Plugs in Drywall: Standard ribbed plastic plugs are designed for downward shear in solid substrates like concrete. When used in drywall under a cantilevered shelf load, the outward rotational pull pulls the plug out of the wall, enlarging the hole and dropping the shelf.
- Using Adhesive Strips for Floating Shelves: Double-sided mounting tapes rely on surface adhesion to drywall paint and paper. Adhesives possess zero resistance against rotational cantilever leverage; high ambient humidity or shear stress will cause the paint layer to delaminate, tearing the drywall face off completely.
- Misjudging Stud Centers: Drilling into the outer 1/4-inch edge of a timber stud causes the wood fibers to split when the screw is driven, eliminating structural holding power. Always locate both stud edges to find the exact center.
- Ignoring Drywall Bowing: Residential drywall is rarely perfectly flat. If a bracket is screwed tightly across a wall depression, the support rods will splay outward or point downward. Always check rod pitch and place shims behind the backplate at low spots.
- Overloading the Outer Shelf Edge: Placing heavy objects (such as stacks of ceramic dinnerware or reference books) on the front lip of a deep floating shelf magnifies rotational torque. Always place heavier items toward the rear center of the shelf, closest to the wall fulcrum.
Frequently Asked Questions About Floating Shelf Fastening
How much weight can floating shelves hold without hitting a stud?
When fastened purely into hollow 1/2-inch drywall without hitting structural studs, standard floating shelf setups should generally be limited to lightweight loads (under 20 to 25 pounds of evenly distributed weight).
Drywall gypsum is brittle and lacks structural tensile strength. While heavy-duty toggle anchors provide higher local shear resistance, continuous cantilever pull-out force can cause the gypsum panel around the bracket to crush over time if overloaded. For heavy storage—such as full sets of kitchen dishware (20+ lbs) or runs of hardcover books (80–140 lbs per 4-foot run)—fastening into structural wood studs or using wide-load distribution systems is mandatory.
Why do floating shelves sag over time and how do you fix it?
Floating shelves sag over time due to three primary mechanical issues: undersized bracket rods bending under continuous load, fasteners pulling out from soft drywall, or the bottom edge of the bracket backplate crushing inward into the gypsum core under rotational force.
To fix a sagging shelf:
- Remove all items and dismount the shelf body from the bracket rods.
- Check the bracket backplate against the wall. If the upper screws are pulling loose, replace them with heavy-duty mechanical anchors or relocate the bracket into wall studs.
- If the bracket backplate is compressing into the drywall, loosen the lower screws slightly and slide thin plastic horseshoe shims behind the lower edge of the backplate to restore a slight upward pitch (1–2 degrees).
- Re-tighten all mounting hardware, slide the shelf body back onto the rods, and lock the underside set screws.
Can you fasten floating shelves using adhesive strips or mounting tape?
No. Floating shelves should never be fastened using adhesive strips, foam mounting tapes, or construction glues.
A floating shelf acts as a lever that generates continuous outward peeling forces at the top edge of the mounting surface. Adhesive strips only hold effectively against light vertical shear on non-porous surfaces; they have virtually no resistance to rotational peel forces. Under load, the adhesive will separate from the wall or shear the paper facing directly off the drywall core, causing the shelf to fall and damaging the wall. All floating shelves require mechanical fasteners driven into studs or heavy-duty anchors.
Conclusion
Fastening floating shelves so they remain level, rigid, and safe requires understanding the rotational physics behind concealed bracket systems. By accurately mapping wall stud centers, using long box levels, driving structural screws into solid wood framing, and selecting appropriate heavy-duty mechanical anchors for hollow bays, you can eliminate forward tilt and drywall failure.
When wall studs do not align with your layout, our load-distributed hollow-wall anchors provide secure mechanical fastening in 1/2-inch and 5/8-inch drywall bays. Take the time to measure twice, drill straight, shim uneven walls, and lock your shelf with underside set screws for a dependable installation.