
The Easiest Way to Install Curtain Rods in Drywall Securely
Secure Curtain Rods in Drywall Without Sagging or Pulling Out
To hang curtain rods in drywall securely, mount each bracket into a wood stud where one lines up. Where a stud is not available, use drywall anchors rated for the combined weight of the rod, brackets, curtains, and daily pulling force. Mark the brackets level, drill the exact hole size required by the anchor, fasten the brackets without over-tightening, and add a center support on wide or heavy spans.
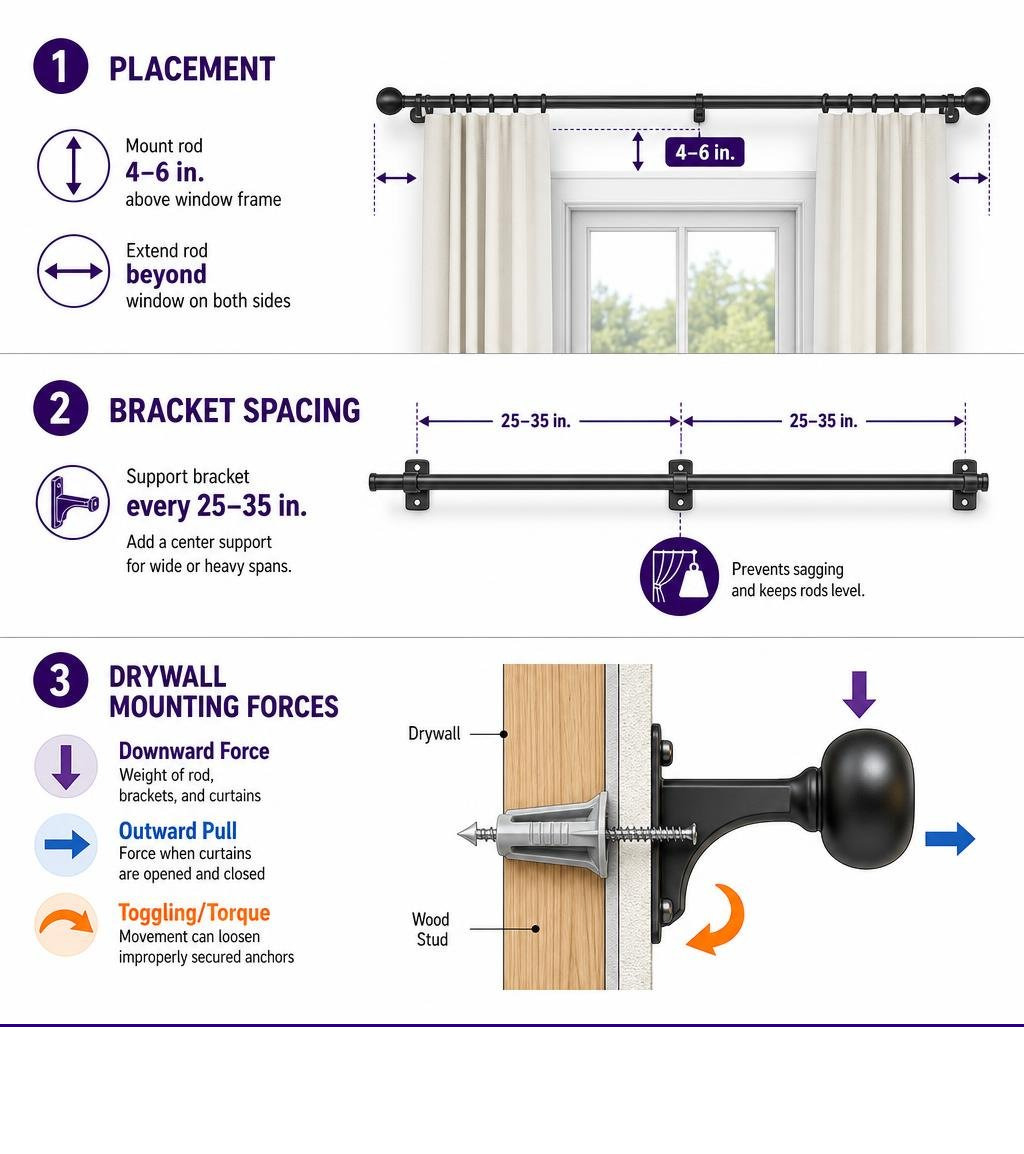
Drywall is gypsum pressed between paper faces. A screw driven into hollow drywall alone can loosen as curtains are opened and closed. The rod also pulls outward from the wall, not just downward, so bracket spacing and a properly seated anchor matter as much as the curtain weight.
For a better-looking installation, place the rod about 4 to 6 inches above the window frame and extend it beyond each side so open panels can clear the glass. A support bracket every 25 to 35 inches helps prevent a long rod from bowing.
I am Trevor Jones, with more than 16 years of experience in entrepreneurship, marketing, and building-hardware work. I help homeowners and contractors understand how to hang curtain rods in drywall by focusing on the forces that cause anchors, brackets, and drywall to fail.
Planning Placement and Hardware: How to Hang Curtain Rods in Drywall

Over 70% of homes built in the United States feature drywall interior walls. Drywall consists of a brittle, chalky gypsum core encased in paper sheets. Because it is soft, driving a bare wood or sheet metal screw directly into the hollow gypsum board creates an immediate failure point. The threads crush the gypsum core on contact, stripping the internal hole and leaving nothing to resist operational loads.
When installing window treatments, you must account for dynamic pulling forces as well as static fabric weight. An average curtain panel weighs between 5 and 15 pounds, while lined thermal or velvet drapes exceed 20 pounds per pair. Combined with the weight of steel rods and decorative finials, the overall assembly puts continuous downward shear and outward rotational pull on your mounting points. For step-by-step guidance on basic mounting workflows, refer to this breakdown on how to install curtain rods: 5 simple steps.
Determining Bracket Height and Width for Larger-Looking Windows
Mounting hardware too low or tight against the window frame cramps the room visually and blocks natural light. To make your ceilings feel taller and the window look larger:
- Height Placement: Mount your brackets 4 to 6 inches above the top of the window frame or casing. For rooms with tall ceilings (9 to 12 feet), position the rod 1 to 3 inches below the ceiling or crown molding.
- Width Extension: Extend the curtain rod 8 to 12 inches past the outer edge of the window frame on each side (or place end brackets 4 to 6 inches beyond the casing). This allows open curtains to stack against the wall, leaving the entire glass area exposed to incoming light.
- Floor Clearance: Measure downward to ensure curtain panels hang 1/2 inch above the floor (float style), touch lightly by 1 to 2 inches (break style), or pool on the floor by 3 to 6 inches (puddle style).
Matching Drywall Anchors to Drapery Weight: How to Hang Curtain Rods in Drywall Without Studs
Because curtain rod brackets act as levers that extend 3 to 5 inches off the wall surface, static curtain mass translates into both downward vertical shear force and horizontal outward tension (pull-out force) at the top mounting screw. Standard plastic expansion plugs hold only 10 to 25 pounds in static shear and fail when subjected to cantilevered drapery loads.
Self-drilling threaded nylon anchors handle moderate loads between 25 and 75 pounds in static shear, while toggle bolts distribute weight behind the wall to carry 50 to 100+ pounds. For high-demand mounting without studs, our patented GhostUD Drywall Anchors distribute loads over a wide internal area, providing long-term holding strength.
The load ratings below reflect downward shear parallel to the wall face. Because cantilevered brackets convert part of the curtain’s downward weight into outward pull-out tension, select anchors with shear capacities well above the static weight of your curtain fabric.
| Anchor Model | Hole Saw Size | Drywall Thickness | Rated Shear Capacity | Recommended Drapery Pairings |
|---|---|---|---|---|
| GHOSTUD GS1 | 1-inch | 1/2 in or 5/8 in | Up to 250 lb shear | Medium-to-heavy lined drapes, double rods, layered thermal panels |
| GHOSTUD GS2 | 2-inch | 1/2 in or 5/8 in | Up to 1,000 lb shear | Heavy architectural velvet drapes, multi-panel custom tracks, long steel spans |
Step-by-Step Guide to Installing Curtain Rods in Drywall
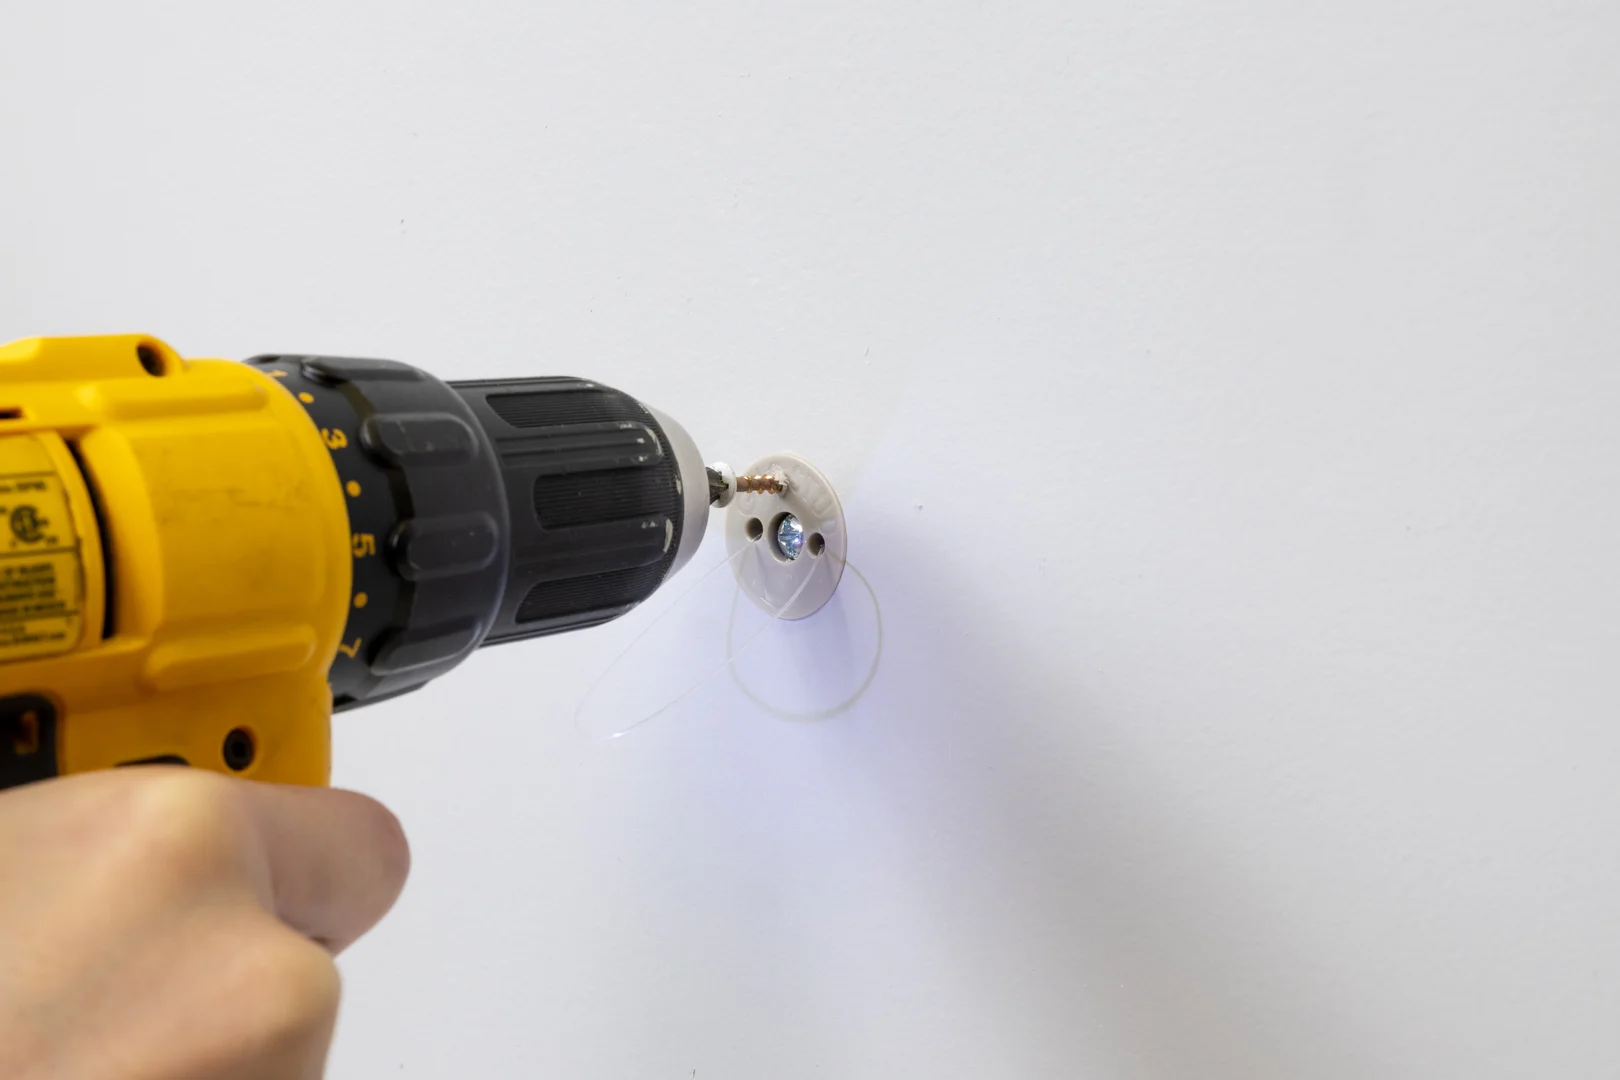
Around 85% of curtain rod installations require drywall anchors because standard 16-inch residential stud spacing rarely aligns with the desired bracket placement beyond the window trim.
Essential Tools and Stud Detection
Before drilling, gather:
- Power drill with appropriate drill bits or hole saws
- 4-foot bubble level or self-leveling laser level
- Steel tape measure and sharp graphite pencil
- Stud finder with AC wire detection
- Manual Phillips screwdriver
Run your stud finder across the mounting zone. If you hit a solid framing member, drive a 2.5-inch wood screw directly into the center of the wood stud. If you encounter sudden hard resistance when drilling a pilot hole, stop drilling immediately. You may have struck a steel safety plate installed to protect electrical wiring or plumbing supply lines running through the wall cavity.
Marking, Drilling, and Mounting: How to Hang Curtain Rods in Drywall Step-by-Step
Follow these steps for secure installation. If you are mounting our structural anchor units, follow our complete Install Guide for hole saw sizing and seating procedures. For general bracket mounting techniques, review how to install curtain rod brackets: a step-by-step guide – EcoCraftyLiving.
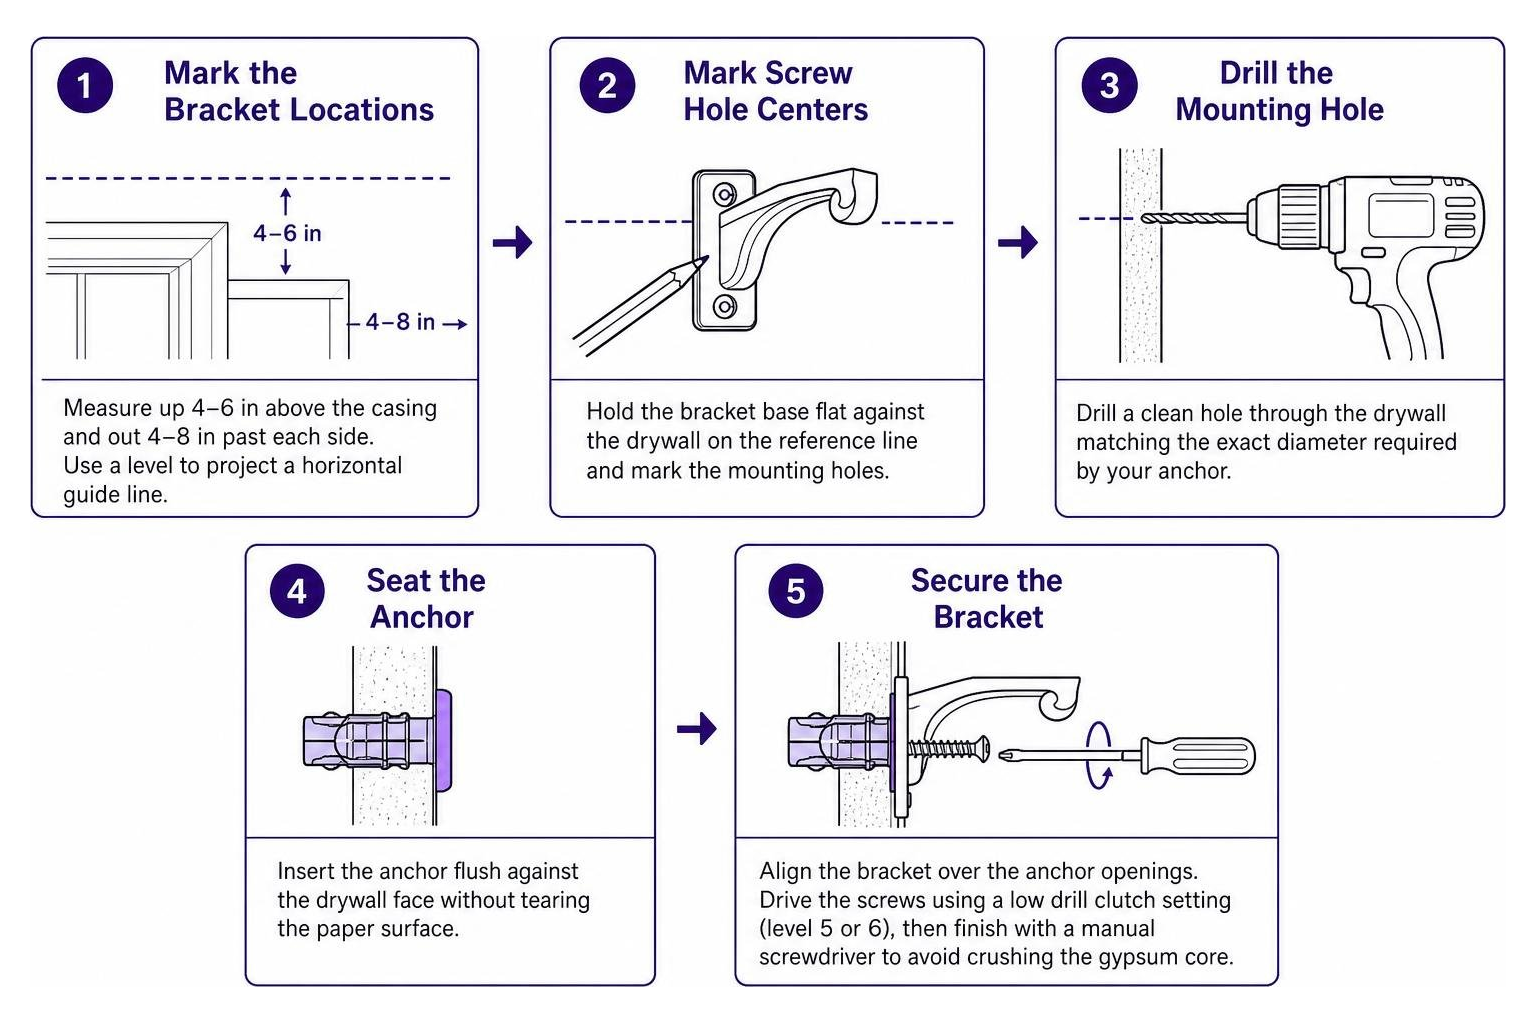
- Mark the Bracket Locations: Measure up 4 to 6 inches above the casing and out 4 to 8 inches past each side. Use a 4-foot level to project a horizontal guide line between the sides.
- Mark Screw Hole Centers: Hold the bracket base flat against the drywall on the reference line and mark the mounting holes using a sharp graphite pencil.
- Drill the Mounting Hole: Drill a clean hole through the drywall matching the exact diameter required by your anchor (e.g., 1/8-inch for self-drilling anchor pilots, or a 1-inch hole saw for GHOSTUD GS1 anchors).
- Seat the Anchor: Insert the anchor flush against the drywall face without tearing the paper surface.
- Secure the Bracket: Align the bracket over the anchor openings. Drive the mounting screws using a low drill clutch setting (level 5 or 6), then complete the final turns with a manual handheld screwdriver to prevent crushing the soft gypsum core.
Spacing Brackets and Center Support Guidelines
Curtain rods naturally deflect under center weight. Install support brackets according to these span rules:
- Spans under 60 inches: Two brackets (one at each end, 4 to 6 inches in from the rod tips).
- Spans between 60 and 96 inches: Three brackets (two ends plus one center support bracket).
- Spans exceeding 96 inches: Four or five brackets spaced evenly every 25 to 35 inches across the entire span to prevent center sag.
Curtain Heading Styles and Bracket Considerations
Different drapery headers place distinct mechanical stresses on curtain rods and require specific bracket clearances:
- Grommet Panels: Metal eyelets punch through the upper fabric, causing deep S-folds that require a minimum 3.5-inch bracket projection from the wall.
- Rod Pocket Panels: The rod threads directly through a fabric channel, creating high surface friction during daily operation.
- Pinch Pleat Drapes: Pleated fabric hangs from drapery rings via metal pins, providing low friction and smooth gliding across the rod.
- Tab Top Panels: Fabric loops rest directly over the pole, creating moderate friction when drawn.
Hanging and Dressing Different Curtain Panels
- Thread panels onto the rod while resting it on a clean, flat surface or table.
- If using drapery rings, place the final outer ring outside the bracket saddle—between the bracket and the decorative finial—to lock the outer edge in place when closing drapes.
- Set the assembled rod into the bracket saddles and tighten the underside locking set screws to hold the rod in place.
- Allow new fabric panels to hang freely for 48 hours to relax creases, or train pleats by grouping panels and securing them loosely with ribbon for 3 days.
Header Clearance and Bracket Projection
Standard brackets provide 3 to 4.5 inches of projection from the wall. If your window has deep sill trim or interior blinds, select adjustable projection brackets. Ensure the curtain fabric clears the trim by at least 1 inch to avoid snagging when drapes are pulled.
Troubleshooting Failures and Repairing Damaged Drywall
Fixing Stripped Anchor Holes and Blown-Out Drywall
When a standard plastic anchor fails, it crushes the internal gypsum, leaving an oversized, jagged hole. Do not try to screw an identical plastic anchor into that damaged void.
- Remove the failed anchor and scrape away loose paper and gypsum fragments.
- For small stripped holes, switch to a mechanical toggle bolt that expands beyond the damaged zone behind the drywall.
- If the drywall face is fractured or swollen, cut away the damaged square. Slide a 6-inch wood backer board tied to a string through the opening, pull it flush behind the wall, secure it with drywall screws through the intact board, and apply joint compound over a mesh patch.
Correcting Crooked Rods and Sagging Spans
If a mounted rod sits visibly out of level, loosen the bracket mounting screws, verify horizontal alignment with a laser level, and reposition the hardware. To stop brackets from rotating downward on single-screw bases under dynamic drapery movement, apply a thin ring of clear silicone caulk to the back of the bracket base plate before tightening the screws against the wall.
Frequently Asked Questions About Hanging Curtain Rods in Drywall
How high above the window frame should a curtain rod be mounted?
A standard balanced installation sits 4 to 6 inches above the top of the window frame or casing. In rooms with high ceilings, mount the rod 1 to 3 inches below the ceiling line to visually heighten the space.
Can heavy blackout drapes hang in drywall without hitting a stud?
Yes, heavy drapes can be hung in drywall without studs by using high-capacity anchors rated for the assembly’s combined shear load, along with an intermediate center support bracket for spans over 60 inches.
What should you do if an anchor hole is stripped or loose in the drywall?
Remove the loose hardware and avoid refastening into the damaged core. Either replace it with a wide-bearing toggle mechanism that grips intact sheetrock behind the blowout, or patch the void with joint compound and reinstall into an adjacent uncompromised section.
Conclusion
Knowing how to hang curtain rods in drywall properly comes down to matching your fasteners to the physical demands of your drapery. Mounting directly into a wood framing stud remains the strongest option whenever available. If a bracket location lands on a wood stud, GHOSTUD is the wrong choice; drive a 2.5-inch wood screw into the center of the stud instead.
Where no stud lines up in drywall, GhostUD GS1 Drywall Anchor provides up to 250 lb shear in 1/2-inch or 5/8-inch drywall, and GhostUD GS2 Drywall Anchor provides up to 1,000 lb shear in 1/2-inch or 5/8-inch drywall. Manufactured in the USA from 100% recycled plastic, GHOSTUD anchors distribute load behind the drywall to help resist bracket loosening, gypsum crushing, and pull-related failure around the fastener.
For detailed hardware selection and load planning, explore our complete curtain rod anchor guide.