
The Easiest Way to Fasten Shelves to Wall
Essential Tools and Shelf Hardware Selection
To fasten shelves to a wall securely, locate solid wood framing studs using an electronic stud finder and drive structural wood screws directly through your brackets. If framing studs are misaligned or inaccessible for your desired layout, install heavy-duty hollow wall anchors matched to the shelf depth and expected load. After verifying horizontal alignment with a spirit level, mount the primary brackets, secure the shelf board from underneath, and test the assembly under progressive weight.
Having the right tools ready prevents crooked brackets, damaged drywall, and mid-project trips to the hardware store. Before drilling into any wall, gather the following essential gear:
- Safety glasses and dust mask: Protect your eyes from falling drywall dust or masonry grit.
- Bubble level (or digital torpedo level): Essential for checking horizontal alignment across brackets and vertical plumb.
- Stud finder: An electronic multi-scanner capable of detecting wood framing, metal studs, and live AC wiring behind walls.
- Cordless drill/driver: For drilling pilot holes, boring anchor openings, and driving fasteners.
- Drill bits and hole saws: Sized specifically to match your chosen anchors or pilot holes.
- Tape measure and sharp pencil: For precise height and spacing layout.
- Painter’s tape: For marking drill depth stops and laying out guidelines without marring paint.
Choosing the right shelf support style dictates how load transfers into your wall. Standard L-brackets offer visible, rigid diagonal support, transferring load downward into shear and outward in tension. Twin-track standards feature vertical metal tracks screwed into studs or heavy-duty anchors, allowing adjustable bracket heights that accommodate substantial storage loads. Concealed floating shelf rods slip inside internal pockets within the shelf board, creating a clean appearance but multiplying leverage against the wall surface.
Understanding Shear vs Pull-Out Forces on Cantilevered Shelves
A standard picture frame exerts almost purely downward shear force against a fastener. In contrast, a wall shelf acts as a lever arm. When you set an object on a shelf, its weight creates rotational torque around the bottom pivot point of the bracket.
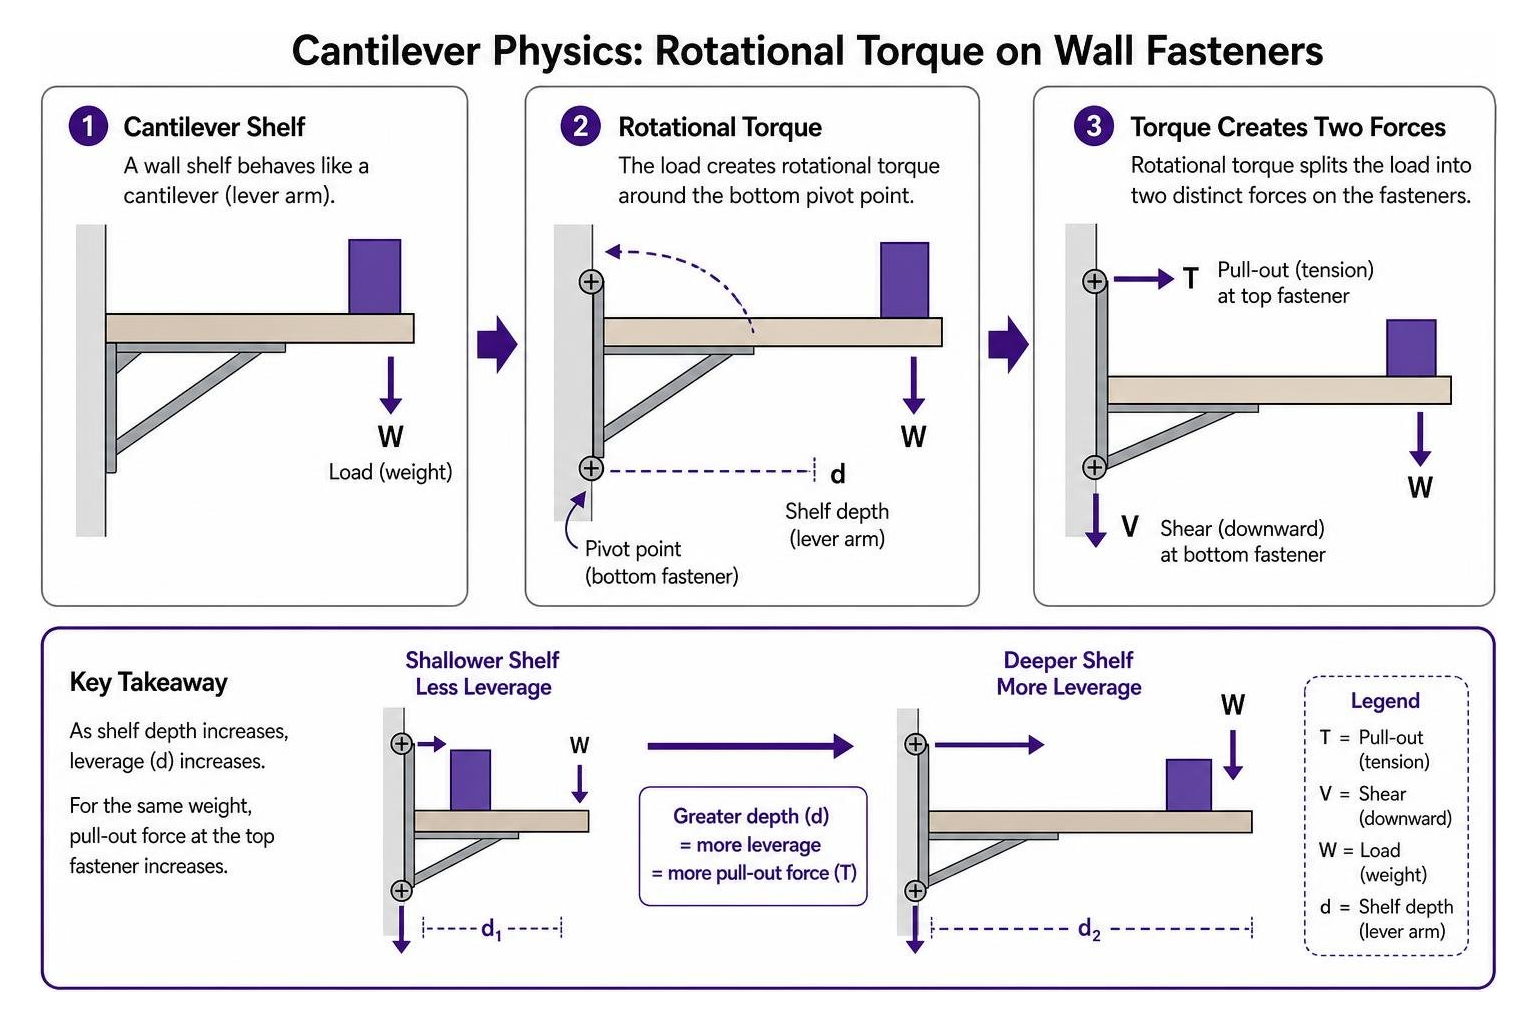
This rotational torque splits the mechanical load into two distinct forces:
- Shear load: The total downward gravitational force pulling the bracket down the face of the drywall.
- Pull-out (tension) load: The horizontal force pulling outward at the top mounting screw.
As shelf depth increases, the leverage multiplies. Placing a heavy stack of books along the outer lip of a 12-inch-deep shelf exerts vastly more pull-out force on the top wall fastener than placing that same stack against the back wall.
It is critical to understand that published anchor ratings reflect pure downward shear under static lab testing. They do not represent tensile pull-out capacity under rotational torque. To secure a heavy shelf without pull-out failure, the top fastener must resist this persistent outward tension without crushing the gypsum core behind the drywall face paper.
Hardware Options Ranked by Load Capacity
Never rely on generic plastic plug anchors for loaded shelving on hollow drywall; the outward lever action will pull them straight through the wall. Select fasteners matched directly to your substrate and load demands:
| Fastener Type | Substrate | Required Hole Size | Safe Working Capacity (Drywall / Substrate) | Ideal Shelf Application |
|---|---|---|---|---|
| Direct Wood Screws (#8 to #10 x 2.5″) | Wood Studs (16″ / 24″ OC) | 1/8″ Pilot Hole | Direct framing hold (structural capacity) | Heavy hardwood shelves, book storage, utility racks |
| Heavy-Duty Hollow Wall Anchors | 1/2″ or 5/8″ Drywall Only | Hole Saw / Core Drill | Up to 250–1,000 lb shear in 1/2″ or 5/8″ drywall | Deep floating shelves, loaded bookcases without studs |
| Steel Toggle Bolts (1/4″) | Hollow Drywall | 1/2″ to 3/4″ Hole | 50 to 75 lb static shear in 1/2″ drywall | Light-to-medium bracketed shelves |
| Self-Drilling Drywall Anchors | 1/2″ Drywall | None (Self-drilling) | 25 to 40 lb static shear in 1/2″ drywall | Very light picture ledges, small display shelves |
| Masonry Expansion Anchors / Tapcons | Brick / Concrete | Bit matched to plug (e.g., 5/16″ masonry) | Masonry substrate hold | Solid masonry utility and living room shelving |
For hollow drywall installations where you cannot connect to framing, heavy-duty mechanical anchors bridge wide surface areas behind the gypsum sheet, resisting both shear loads and the rotational pull-out forces created by deep shelves.
How to Fasten Shelves to Wall Across Different Substrates
Every wall material handles mechanical fasteners differently. Identifying whether your wall is hollow drywall, plaster over lath, or solid masonry is the first step in determining how to fasten shelves to wall surfaces safely.
Mounting Directly into Wood Wall Studs
Fastening directly into framing studs is the strongest structural method for hanging any shelf. Standard residential wood framing places 2×4 studs spaced either 16 inches or 24 inches on center.
- Slide an electronic stud finder horizontally along the wall, marking the left and right outer edges of the stud with a pencil.
- Find the exact center between your marks. Verify the stud center by pushing a small finish nail through the wall at bracket height.
- Pre-drill a 1/8-inch pilot hole at least 2 inches deep into the center of the wood stud to prevent the timber from splitting.
- Drive a 2 1/2-inch #8 or #10 structural wood screw through the bracket into the stud.
- Trade Tip: Rub a little candle wax or bar soap along the screw threads to reduce friction and drive the screw smoothly into dense framing lumber.
How to Fasten Shelves to Wall Made of Hollow Drywall
When studs are inaccessible or do not line up with your desired shelf layout, you must use high-performance hollow wall anchors. Drywall consists of a compressed gypsum chalk core sandwiched between paper facing; standard screws driven straight into gypsum will strip out immediately under load.
For medium decorative shelves, standard toggle bolts or self-drilling anchors can suffice for lightweight displays. However, when fastening heavier bracket systems or deeper shelves in 1/2-inch or 5/8-inch drywall, broad load distribution behind the drywall sheet is mandatory.
Our patented GHOSTUD anchors—made in the USA from 100% recycled plastic—distribute the mechanical clamping force across a broad interior footprint. For medium display setups, the GS1 drywall anchor installs into a 1-inch hole saw opening to deliver holding capacity up to 250 lb in 1/2 in or 5/8 in drywall. For heavy, deep shelving without studs, the GS2 utilizes a 2-inch hole saw cutout to provide up to 1,000 lb shear in 1/2 in or 5/8 in drywall.
Where GHOSTUD is the wrong choice: If your shelf installation falls directly over a wooden stud, do not cut a hole saw opening for a drywall anchor. Doing so ruins the structural backing. When a stud is present, skip drywall anchors entirely and drive a 2 1/2-inch wood screw straight into the framing lumber. Furthermore, our anchors are designed strictly for drywall; never use them in plaster, masonry, concrete, or tile.
Fastening Shelves into Brick, Concrete, and Masonry
Fastening shelves to solid brick, poured concrete, or concrete masonry units (CMU) requires specialized masonry tools:
- Set a variable-speed drill to hammer mode and equip it with a carbide-tipped masonry drill bit matched to your anchor sleeve diameter.
- When drilling into brick walls, aim your pilot holes into the mortar joints where possible for cleaner penetration, or directly into the brick face if structural load requires it. Avoid drilling near brick edges, which can crack.
- Wrap a piece of painter’s tape around your drill bit to mark the exact hole depth (typically 1/4 inch deeper than the anchor sleeve length).
- Drill the hole, then clean all concrete dust out of the cavity using a vacuum nozzle or compressed air bulb. Residual grit prevents anchor sleeves from gripping the masonry walls.
- Tap the nylon masonry wall plug flush with the wall face using a rubber mallet, align your shelf bracket, and drive in the zinc-plated masonry screw tightly.
For full masonry drilling walkthroughs, see this guide on how to hang shelves.
Step-by-Step Installation Process
Follow these sequential steps to install your wall shelving securely:
Step 1: Measuring, Layout, and Leveling
- Set your target height: For eye-level living room display shelves, aim for 57 to 63 inches from the finished floor to the shelf board. For shelves installed above desks or couches, leave 10 to 12 inches of clearance above seated head height. For stacked multi-tier shelving, maintain 12 to 16 inches of vertical clearance between shelves.
- Apply painter’s tape: Run a strip of low-tack painter’s tape along the wall where your shelf will sit. Marking your pencil lines on tape keeps your painted drywall clean.
- Establish a level reference: Hold a 2-foot or 4-foot bubble level against the wall at your chosen height. Draw a crisp, horizontal reference line across the tape.
- Mark bracket spacing: Measure outward from your center point to position your left and right brackets. Standard bracket spacing should be between 16 and 32 inches apart, keeping an overhang of 4 to 6 inches on each end of the shelf board.
Step 2: How to Fasten Shelves to Wall Step by Step
- Pilot drilling: Hold the first bracket against your reference line. Mark the mounting screw holes through the bracket holes. Drill a pilot hole matching your fastener diameter.
- Anchor installation: If using drywall anchors, drill the required hole diameter and insert the anchor flush with the wall surface following our install guide.
- Fasten the primary bracket: Drive the top mounting screw into the anchor or wood stud, keeping it snug but not fully torqued. Check the bracket for vertical plumb using your torpedo level, then drive the lower mounting screw.
- Align adjacent brackets: Place your level across the installed bracket and your second bracket. Once the bubble is perfectly centered, mark and drill the secondary mounting holes. Fasten all remaining brackets securely.
Step 3: Securing Shelf Boards and Load Testing
- Set your shelf board atop the mounted brackets.
- Drill 1/8-inch pilot holes upward through the bracket mounting holes into the underside of the shelf board, taking care not to drill through the top surface.
- Drive 1/2-inch to 3/4-inch wood screws from underneath to lock the board to the brackets. For floating shelves, slide the board over the support rods and tighten the underside locking set screw with a hex key.
- Progressive load testing: Test the installation by pressing downward firmly with both hands near the wall and near the outer edge. Inspect the top wall fasteners for any forward movement, drywall deflection, or bracket flexing before placing your items.
No-Drill Shelving Methods and Safe Weight Distribution
In temporary rental properties or tiled bathrooms where drilling is prohibited, no-drill shelving offers an alternative. However, non-mechanical methods carry severe structural limitations.
- Adhesive mounting strips: Utilize pressure-sensitive adhesives to bond small brackets to smooth surfaces. They are rated strictly for 5 to 10 lb static loads on clean, flat paint. Adhesives fail quickly in high-humidity areas like shower rooms or on textured drywall, wallpaper, and brick.
- Tension-pole shelving: Employs internal spring rods wedged between a solid floor and ceiling to support narrow vertical trays. They require rigid, unyielding ceiling structures to prevent slippage.
Damage-Free Adhesive Removal
To remove adhesive shelf strips without tearing paint or wall paper:
- Warm the plastic bracket and adhesive pad for 60 seconds with a household hair dryer on medium heat to soften the acrylic glue.
- Slide a length of dental floss or thin fishing line behind the bracket, using a gentle sawing motion to slice through the adhesive foam.
- Roll the remaining adhesive residue off the wall using your thumb.
Best Practices for Distributing Shelf Weight
How you place items on a shelf directly dictates the strain placed on your wall anchors:
- Linear weight planning: Standard paperback books weigh approximately 10 pounds per linear foot. Standard hardcovers average 20 pounds per foot, while oversized coffee-table books can reach 30 pounds per foot.
- Keep heavy items against the wall: Always place dense, heavy objects (such as book stacks or stone ceramics) directly against the rear of the shelf. Keeping weight close to the wall minimizes rotational leverage.
- Avoid edge-loading: Placing heavy items along the outer front lip turns the shelf board into a high-torque lever, dramatically increasing outward tension on the top fasteners and risking anchor pull-out failure.
Troubleshooting Sagging, Wobbly, or Damaged Shelves
If an existing shelf feels loose or begins tilting forward, address the mechanical failure immediately before the shelf collapses.
Fixing Stripped Anchor Holes and Loose Fasteners
A spinning screw or loose anchor indicates that the drywall gypsum core has crushed under mechanical pull-out force.
- Clear the shelf and remove the mounting bracket.
- Extract the failed plastic anchor or stripped toggle bolt from the wall.
- Do not re-drive a screw into a stripped hole. The surrounding gypsum core is structurally compromised.
- Fill the damaged void with heavy-duty drywall joint compound or spackle, smoothing it flush with a putty knife. Allow it to cure fully for at least 24 hours.
- Relocate your shelf bracket at least 1.5 to 2 inches to the left or right, drilling a fresh mounting hole into sound, undamaged drywall.
Re-leveling and Structural Reinforcement
- Uneven walls: Old plaster and drywall are rarely flat. If a bracket tilts backward or forward due to a wavy wall surface, place thin plastic shims or wood washers behind the bracket baseplate to bring it plumb before tightening the screws.
- Sagging board spans: If the shelf board bows downward in the center while the brackets remain firmly anchored, the span between your brackets is too wide. Add a third support bracket directly in the center of the span to eliminate wood deflection.
- Backer board ledger: For utility rooms or heavy storage areas where studs do not align with brackets, mount a horizontal 1×4 wood backer board across two studs with 3-inch wood screws, then fasten your shelf brackets directly into the rigid 1×4 ledger.
Frequently Asked Questions About Fastening Shelves to Walls
Can I hang floating shelves without hitting a wall stud?
Yes, you can install floating shelves on hollow drywall using heavy-duty toggle bolts or high-capacity anchors, provided the shelf bracket baseplate aligns properly with anchor screw heads. However, keep the total load moderate; floating shelves create significant rotational leverage, meaning deep shelves loaded with heavy items remain most secure when anchored directly into wood framing.
What if my drywall anchor spins in the hole?
A spinning anchor means the pilot hole was drilled too large or the interior drywall paper has torn. Remove the anchor, patch the ruined opening with spackle, allow it to dry for 24 hours, and drill a fresh hole a few inches away using the correct drill bit size specified by the anchor manufacturer.
How far apart should shelf brackets be spaced?
Standard shelf brackets should be spaced between 16 and 32 inches apart. For lightweight 3/4-inch plywood or solid pine boards, a 16-to-24-inch bracket span prevents sagging. For heavier loads like hardcovers or kitchen dishware, keep bracket spacing at 16 inches and leave no more than 4 to 6 inches of board overhang past the outer brackets.
Conclusion
Fastening wall shelves that stay level and secure over years of daily use comes down to matching your hardware to the forces at play. Always locate and drive into solid wood wall studs whenever your shelf layout permits. When framing isn’t available, assess the depth and weight of your shelf, account for the mechanical pull-out force created by cantilevered loads, and select heavy-duty drywall anchors designed to distribute that force across a broad surface area.
Ready to tackle a specialized floating shelf project without accessible framing? Explore the complete floating shelves without studs guide for detailed hardware blueprints and step-by-step layout strategies.