
Beginner Heavy Mirror Hanging Mistakes and How to Avoid Them
Pre-Installation Assessment: Substrate, Weight, and Framing
To hang a heavy mirror on plasterboard safely, locate the vertical timber wall studs to drive heavy-duty wood screws directly into solid framing whenever possible. When studs do not align with your desired layout, install high-capacity, load-distributing mechanical drywall anchors paired with two-hole strap hangers mounted directly to wall fixings—never rely on picture wire or standard friction-fit plastic wall plugs. Always determine the mirror’s true weight and verify your wall substrate before drilling.
Plasterboard consists of an inner layer of compressed gypsum mineral sandwiched between two sheets of thick lining paper. While the outer paper provides tensile strength, the soft gypsum core possesses low shear strength and will crush under concentrated, unanchored point loads.
To determine the mirror’s true weight, do not guess based on catalog estimates. Use the bathroom scale subtraction method:
- Step onto a digital scale and record your baseline weight.
- Step onto the scale while holding the mirror with its attached brackets and framing.
- Subtract your baseline weight from the combined total.
For mirrors weighing under 5 kg, basic spiral nylon anchors are generally sufficient. For pieces between 5 kg and 15 kg, hollow-wall anchors or toggle fixings provide basic mechanical clamping. For mirrors exceeding 15 kg, standard lightweight drywall fasteners must be avoided in favor of load-distributing mechanical anchors or direct structural stud framing.
Internal residential walls typically feature vertical timber framing. In modern construction, vertical timber studs are spaced at either 400 mm or 600 mm (16-inch or 24-inch) centers. Use an electronic stud finder or a strong neodymium magnet to locate the drywall screws driven into these studs. If your mirror’s hanging brackets line up directly with a convenient wooden stud, drive heavy-duty wood screws directly into the center of the framing for the highest load capacity. However, visual balance often dictates placing a mirror where no framing exists. Reviewing Step-by-step guidance on wall substrate testing will help you identify the framing layout before purchasing hardware.
Mistake 1: Underestimating Mirror Weight and Frame Weaknesses
A common installation error is focusing solely on the wall while ignoring the structural integrity of the mirror itself. A heavy glass mirror held inside a softwood or polyresin frame places substantial stress on the frame’s corner miter joints.
Before mounting, lay the mirror face down on a clean, padded blanket. Inspect the factory-installed D-rings or strap hangers. Check whether the screws securing the D-rings penetrate deeply enough into solid frame timber without poking through the front face. If the factory hardware relies on single-hole D-rings held by short screws, replace them with heavy-duty two-hole strap hangers to halve the pull stress per screw on the frame joints. Never mount a mirror if the frame corners pull apart under light manual pressure.
Wall Preparation: How to Hang a Heavy Mirror on Plasterboard vs Solid Walls
Identifying your wall composition prevents anchor failure. Plasterboard partitions sound distinctly hollow when tapped with a knuckle, whereas masonry, concrete, and solid brick sound dull and solid. You can confirm hollow drywall by performing a pin-push test in an inconspicuous spot; a steel pin presses through soft gypsum plasterboard with minimal resistance, whereas solid plaster or masonry stops the pin immediately.
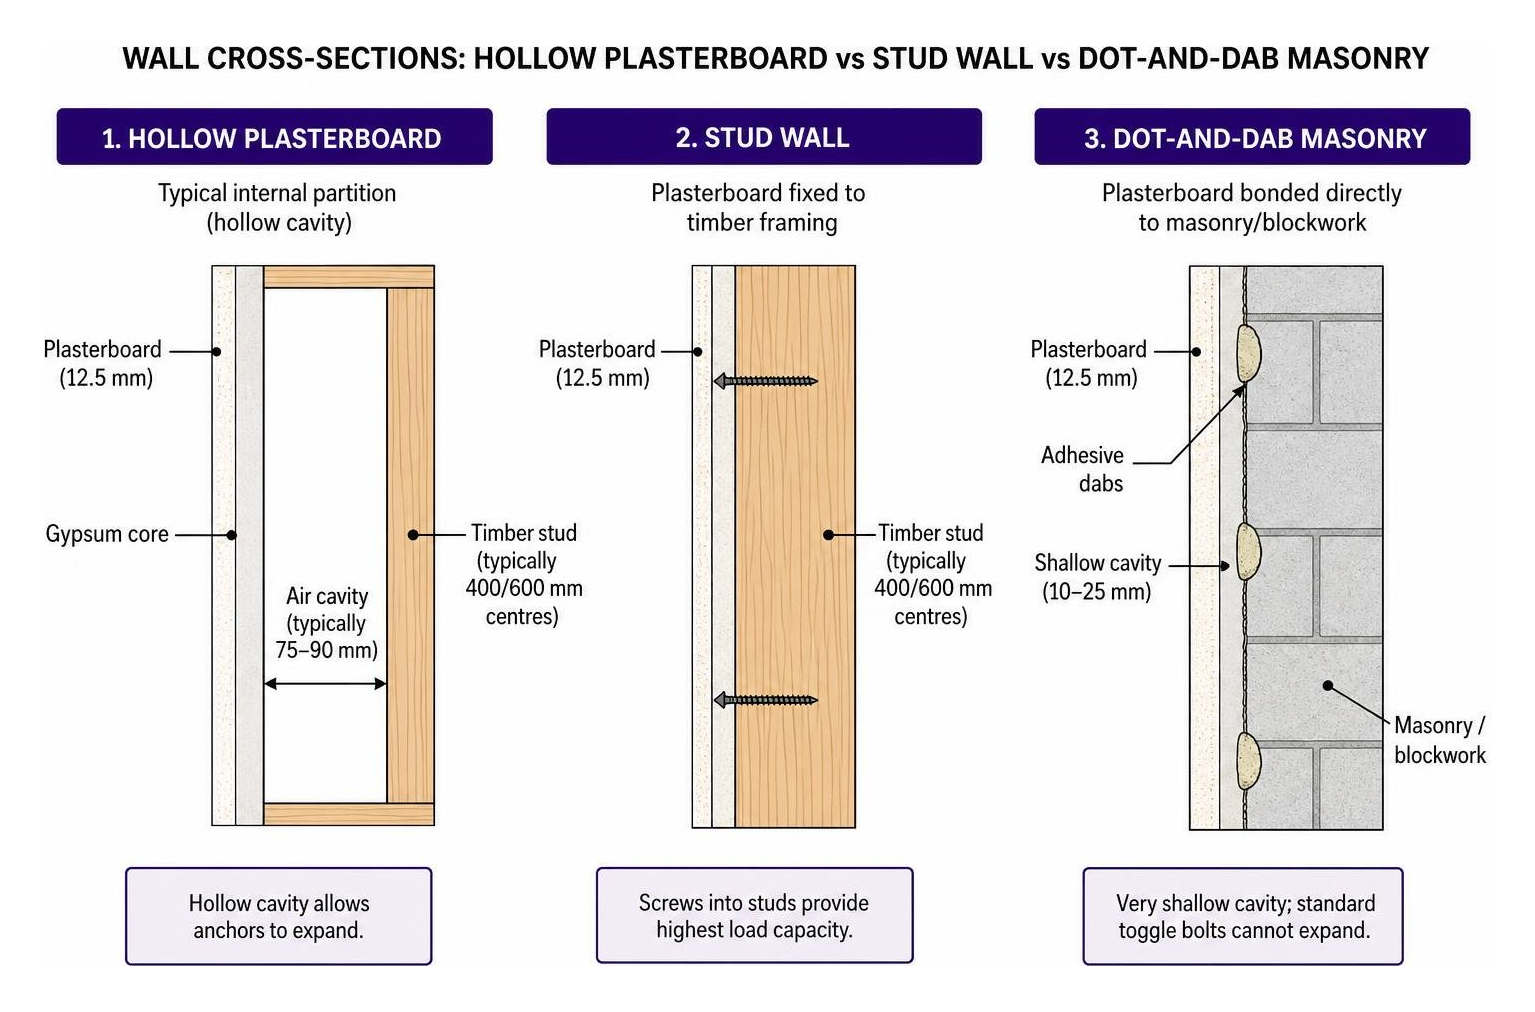
In dot-and-dab masonry walls, plasterboard sheets are bonded directly to blockwork using thick adhesive compound dabs. This leaves a shallow cavity of only 10 mm to 25 mm between the plasterboard and the block behind it. Standard spring-wing toggle bolts cannot expand in this restricted space because the metal wings hit the solid masonry behind the board. If your drill bit strikes masonry immediately after penetrating 12.5 mm of drywall, you must use masonry expansion anchors seated into the solid blockwork, or use an undercutting tool to clear the cavity before inserting specialized winged fixings. Review safety guidelines for heavy wall decor to determine clearance depth before proceeding.
Hardware Guide: How to Hang a Heavy Mirror on Plasterboard Safely
When hanging a flat mirror against a vertical wall, the primary force exerted on the fastener is downward shear load. As long as the mirror hangs flush against the wall, pull-out tension (the force pulling the fastener straight out perpendicular to the wall) remains minimal. However, if the top of the frame leans forward, leverage creates outward rotational torque, translating shear load into direct pull-out force.
| Anchor Class | Minimum Hole Size | Drywall Thickness Range | Verified Maximum Shear Rating | Primary Mechanical Mechanism |
|---|---|---|---|---|
| Standard Metal Toggle Bolt | 1/2 in (13 mm) | 3/8 in to 5/8 in | Up to 100 lb (45 kg) | Spring-loaded wing clamping rear drywall surface |
| Heavy-Duty Strap Toggle | 1/2 in (13 mm) | 3/8 in to 5/8 in | Up to 238 lb (108 kg) | Solid steel channel ratcheted flush against board |
| GHOSTUD GS1 Anchor | 1 in (25 mm) | 1/2 in or 5/8 in | Up to 250 lb (113 kg) shear | Patented wide-flange load-distribution plate |
| GHOSTUD GS2 Anchor | 2 in (51 mm) | 1/2 in or 5/8 in | Up to 1,000 lb (453 kg) shear | Heavy-duty load-spreading mechanical plate |
Note: All load ratings listed in this table represent pure shear force parallel to the wall face. They do not represent pull-out capacity for cantilevered shelves, dynamic loads, or items extending outward from the wall plane.
When structural wall studs are unavailable at your desired installation location, choosing the right heavy-duty drywall anchors is necessary to distribute high shear loads across the gypsum core without crushing the board.
Mistake 2: Relying on Standard Plastic Wall Plugs and Picture Wire
Standard plastic expansion plugs are designed strictly for solid masonry. In hollow drywall, they expand inside the brittle gypsum core, concentrating the entire downward load onto a few millimeters of soft plaster. Under continuous static weight, the gypsum core slowly crumbles into powder. This mechanical degradation causes plastic plugs to slide outward over several months—a gradual failure mode known as “creeping.”
Hanging mirrors with braided picture wire is equally problematic for heavy pieces. Hanging wire introduces three distinct mechanical failure points:
- Tension sag: Wire stretches under heavy loads, causing the mirror to drop 3 to 5 inches below the intended line.
- Inward vector stress: As the wire pulls tight between side anchors, it exerts inward lateral forces that can collapse frame side rails.
- Rotational torque: The single wire apex pulls the top of the frame forward away from the wall, transforming downward shear force into outward pull-out tension that can pry wall anchors straight out of the drywall.
High-Capacity Load-Distributed Drywall Anchors
To hang heavy mirrors without studs, mechanical anchors must distribute shear forces across a wide surface area of the plasterboard. When a stud is directly behind your mounting point, always drive a wood screw directly into the timber. However, when framing is absent, high-capacity mechanical anchors solve the challenge of studless mounting.
For mirrors weighing up to 250 lb, the GS1 Ghostud Drywall Anchor utilizes a 1-inch hole saw cutout to seat an engineered plate that clamps the drywall, achieving a load rating of up to 250 lb shear in 1/2 in or 5/8 in drywall. For extra-large framed architectural mirrors, the GS2 Drywall Anchor uses a 2-inch hole saw cutout to provide a load rating of up to 1,000 lb shear in 1/2 in or 5/8 in drywall. Both systems are manufactured from 100% recycled plastic in the USA and are sold in 2-packs and 20-packs.
Important Wall Restriction: GHOSTUD anchors are engineered strictly for 1/2-inch and 5/8-inch drywall. If your wall consists of traditional lath and plaster, solid brick, concrete block, or tile over cement backer board, GHOSTUD is the wrong choice. In those situations, stop drilling immediately, evaluate your wall substrate, and switch to specialized masonry anchors, brick sleeve anchors, or direct timber screw mounting.
Step-by-Step Mounting: Preventing Alignment and Drilling Errors

Hanging heavy mirrors requires accurate layout work and the proper tools:
- Digital scale (for accurate mirror weighing)
- Multi-detector (cable and pipe scanner)
- Spirit level (minimum 60 cm length) or cross-line laser level
- Tape measure and fine pencil
- Drill and correct-sized drill bit or hole saw
- Painter’s tape and manual hand screwdriver
Consult our complete step-by-step install guide for detailed cutout instructions and tool alignment techniques before setting hardware into the wall.
Mistake 3: Drilling Blindly Near Concealed Utilities
Modern building standards run electrical conduit and water pipes vertically and horizontally from wall fixtures. Drilling blindly into hollow partition walls creates severe shock or flood hazards.
Always sweep the wall surface with a multi-detector before drilling. Avoid drilling directly above, below, or in horizontal alignment with light switches, power outlets, or plumbing fixtures. When drilling through plasterboard, ensure your power drill is set strictly to standard rotary mode. Never use hammer drill mode on plasterboard, as high-frequency impact will shatter the brittle gypsum core and cause immediate structural blowout on the reverse side of the board.
Execution Steps: How to Hang a Heavy Mirror on Plasterboard With Precision
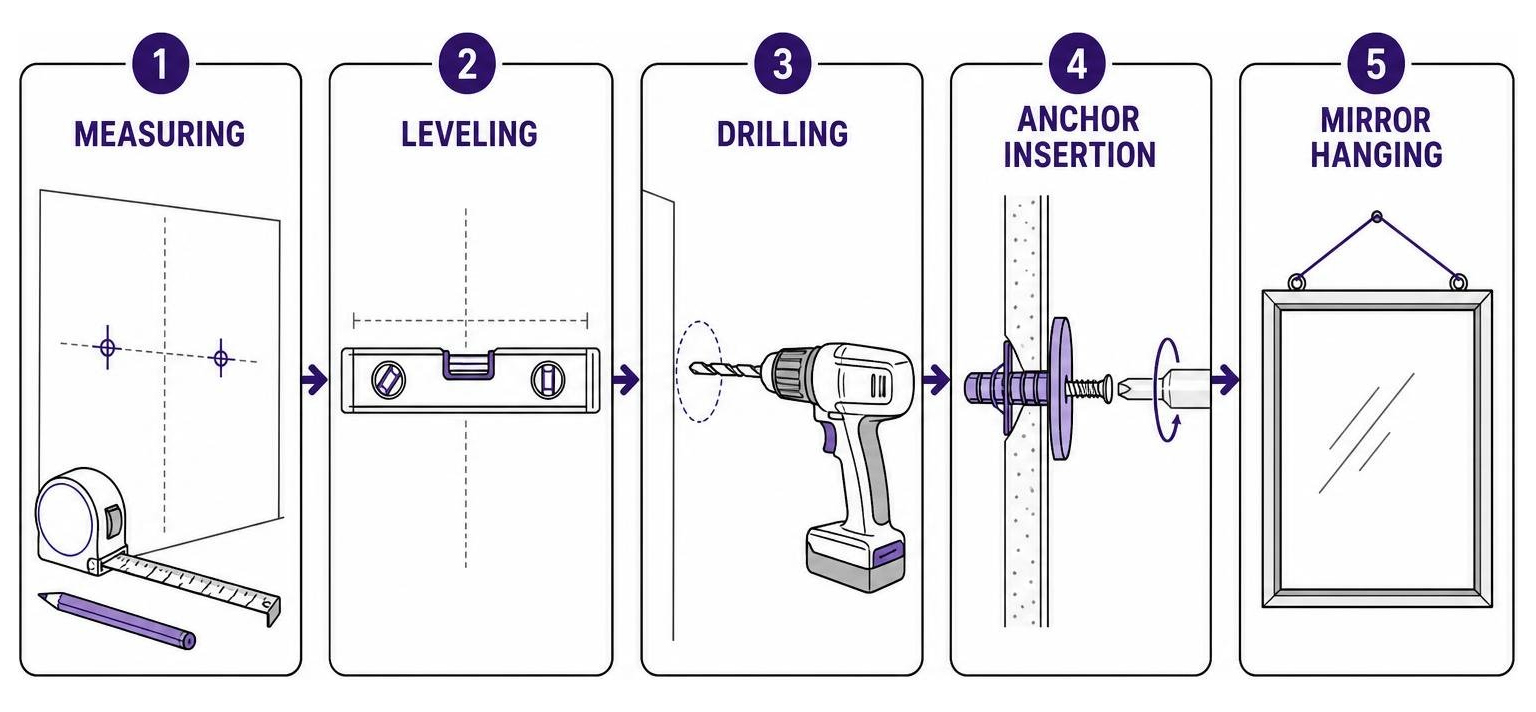
- Map the Mirror Placement: Determine the desired position on the wall. Standard visual placement aligns the center of the mirror at roughly eye level (145 cm to 152 cm from the finished floor), or 15 cm to 20 cm above a console table. Apply blue painter’s tape along the top edge to visualize layout.
- Measure Hardware Drop: Lay the mirror face down on a soft surface. Measure the exact horizontal distance between the centers of both D-rings. Next, measure the vertical distance (the “drop”) from the top edge of the frame to the apex of the D-ring attachment hooks.
- Transfer Marks to the Wall: Using your spirit level, draw a horizontal line matching your spacing marks on the wall. Fold a strip of painter’s tape into a V-shaped trough and stick it directly beneath the mark to catch falling drywall dust.
- Drill the Mounting Openings: Drill pilot holes or use the exact hole saw diameter specified by your anchor hardware. Maintain light forward pressure at steady drill speed to cut cleanly through the paper face without tearing the gypsum.
- Install and Tighten Anchors: Insert your chosen wall anchors. If installing strap toggles or GHOSTUD units, ensure the internal load-bearing plate seats flat against the back of the board. Tighten screws manually with a hand screwdriver until secure to avoid stripping the anchor housing with high-torque power drivers.
- Lift and Seat the Mirror: With a helper on the opposite side, lift the mirror using a firm side-grip under the bottom frame corners. Lower the mirror’s D-rings directly onto the wall screws, confirming positive engagement before releasing weight.
- Stabilize Lower Frame: Check the top edge with your spirit level. Stick small self-adhesive rubber bumpers or felt pads to the lower reverse corners of the frame. This keeps the mirror parallel to the wall surface, preventing bottom kick-in and eliminating forward pull-out torque.
Frequently Asked Questions About Mirror Installation
For additional hardware dimensions, load capacities, and cavity clearance specifications, explore our comprehensive hollow wall mounting FAQ.
Can plasterboard hold a heavy mirror without hitting a wooden stud?
Yes, plasterboard can support heavy mirrors without hitting a wooden stud if you use high-capacity, load-distributing mechanical drywall anchors rated for the specific load. While standard drywall screws pull out under loads as low as 10 to 15 pounds, mechanical strap toggles and wide-flange anchors like the GS1 (rated up to 250 lb shear in 1/2 in or 5/8 in drywall) safely spread the downward shear force across a broad section of the drywall sheet.
Why shouldn’t hanging wire be used for heavy decorative mirrors?
Hanging wire concentrates the entire mass of the mirror onto a single apex point while generating strong inward tension against the side frame rails. This inward pull can bow or separate the frame’s corner miter joints. Furthermore, picture wire allows the mirror to tip forward at the top, which creates outward cantilevered torque that pulls mechanical drywall fixings perpendicular to the wall plane rather than keeping them under simple downward shear. Always mount heavy mirrors directly from two independent D-rings or an interlocking aluminum French cleat.
What should be done if a drilled anchor hole becomes oversized?
If a drill bit wanders or tears the plasterboard paper, leaving an oversized, loose hole, do not attempt to tighten a mechanical fastener inside the damaged area. If the anchor wobbles, remove it immediately. You must either move your mounting location at least 50 mm horizontally to drill into undamaged gypsum, or repair the oversized opening by scraping away loose debris, filling the cavity with structural gypsum wall filler, allowing it to cure completely, and redrilling cleanly.
Conclusion
Hanging heavy glass requires structural discipline and the right mechanical hardware. Never guess mirror weights, rely on friction-fit plastic plugs, or use hanging wire that introduces rotational leverage against hollow drywall. When wooden studs are positioned conveniently behind your layout, always drive heavy-duty screws directly into the framing. When studs are unavailable, select load-distributing mechanical anchors rated with a 2:1 safety factor relative to the mirror’s weight to ensure your mirror stays firmly on the wall.