
How to Anchor a Shelf Without Studs Fast by Using Toggle Bolts
Anchor Types and Weight Capacities for Hollow Walls
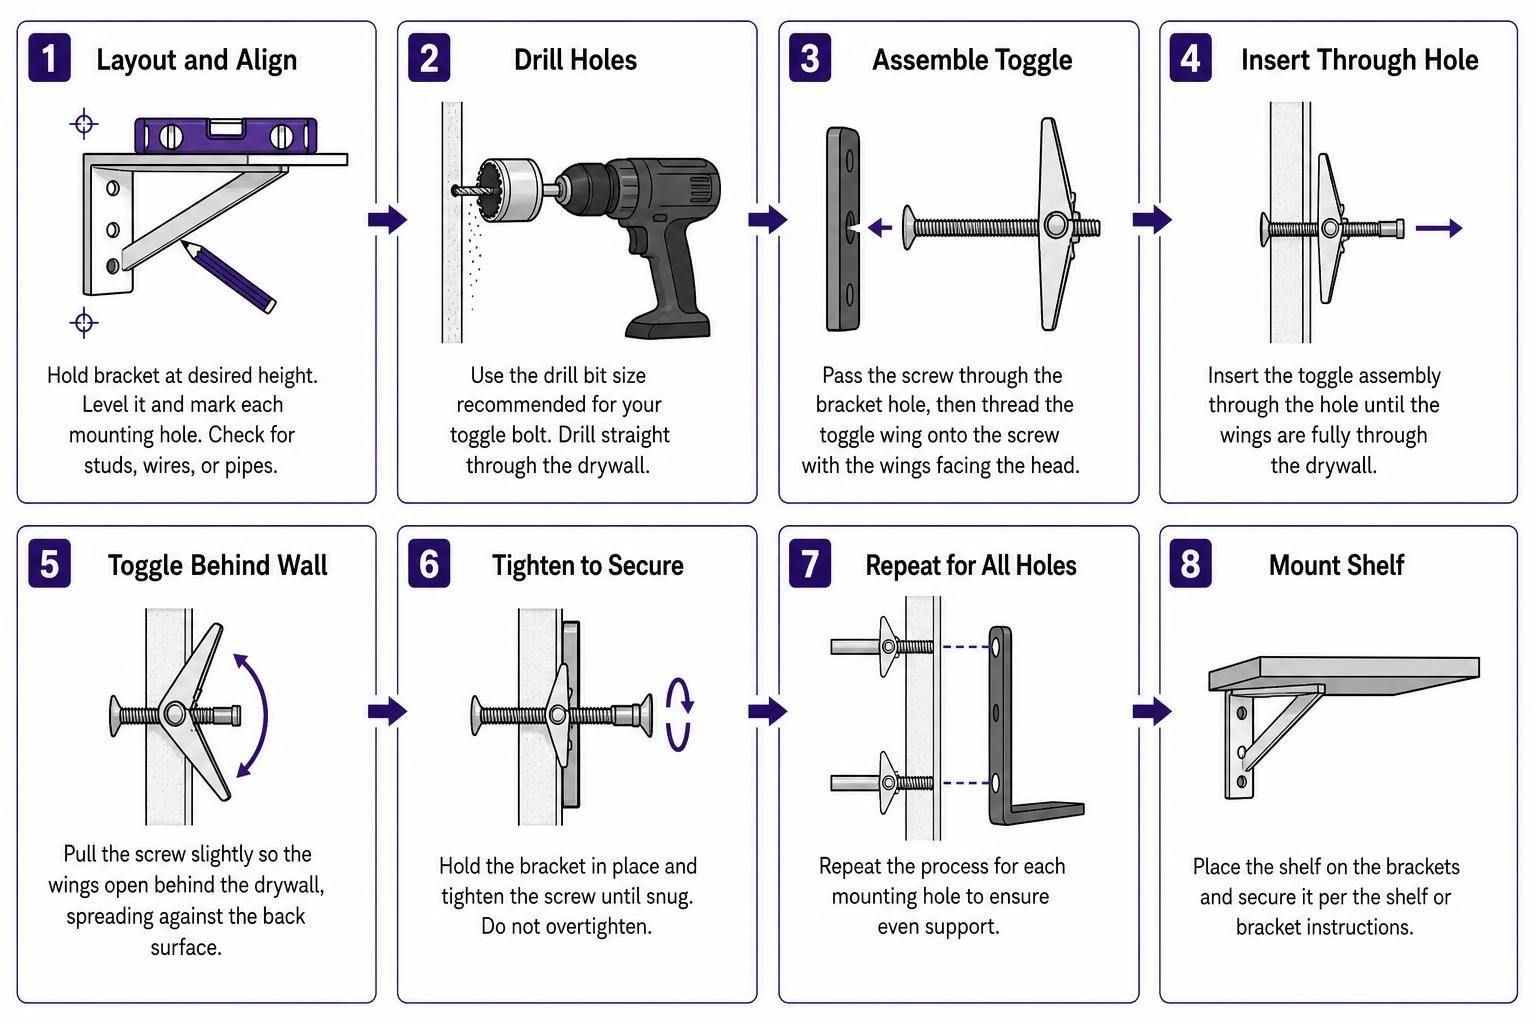
To anchor a shelf without studs fast, use spring toggle bolts or strap toggles. Mark bracket holes on the wall using a bubble level, scan for hidden wiring or pipes, and drill clearance holes through the drywall sized to the toggle wings (typically 1/2 inch). Insert the folded toggle wings through the holes until they spring open inside the hollow wall cavity. Pull outward to seat the wings flush against the rear drywall face, slide the bracket into place, and tighten the machine bolts with a manual screwdriver until snug. Finally, secure the shelf body onto the brackets.
When standard 16-inch stud spacing does not align with your intended shelf position, hollow-wall anchors transfer the load to the gypsum board. Understanding fastener holding mechanisms prevents wall failure.
| Anchor Type | 1/2-Inch Drywall Rating | 5/8-Inch Drywall Rating | Best Application |
|---|---|---|---|
| Standard Plastic Expansion | Up to 25 lb | Up to 35 lb | Lightweight decorative trim or art |
| Self-Drilling Threaded Anchor | 25–50 lb | Up to 135 lb | Small floating ledges, light items |
| Molly Bolt (Hollow Wall) | 30–50 lb | 30–50 lb | Medium-duty utility shelving |
| Standard Metal Spring Toggle | 50–75 lb | Up to 100 lb | Functional book and kitchen shelves |
| Strap/Snap Toggle | 80–100 lb | Up to 356 lb shear | Heavy decorative and solid wood shelves |
| Heavy-Duty Toggle Anchors | Up to 250–1,000 lb shear | Up to 250–1,000 lb shear | High-capacity heavy-duty installations |
Traditional plastic expansion anchors function by friction against the inner diameter of the drilled pilot hole. In solid material, this expansion wedges the plug tightly; in hollow gypsum drywall, the anchor pushes against brittle compressed plaster. Under continuous load, the drywall core crumbles, leading to loose anchors that pull free under minor tension.
Molly bolts and toggle bolts solve this problem mechanically. A molly bolt features an expandable metal sleeve. As the bolt is driven clockwise, internal flanges compress against the rear paper face of the drywall, creating a wider mechanical footprint.
Spring-loaded toggle bolts utilize metal wings that fold flat to clear a pre-drilled clearance hole (often 1/2 inch to 3/4 inch in diameter). Once inside the hollow wall cavity, an internal spring pops the wings open. Tightening the threaded bolt draws the metal wings flush against the backside of the drywall panel, converting direct outward pull into a clamped compression force across the panel face.

Choosing Hardware: How to Anchor a Shelf Without Studs Based on Weight and Wall Type
Selecting mounting hardware requires matching the anchor design to the wall substrate and load profile:
- Standard 1/2-inch or 5/8-inch Drywall: Modern interior walls consist of gypsum board over standard framing. Metal toggle bolts, strap toggles, or structural drywall fasteners provide the required clamping area behind the panel.
- Plaster and Lath: Older walls feature wooden lath strips covered with rough and finish plaster coats totaling roughly 7/8 inch in thickness. Standard self-drilling anchors will crack plaster. Spring toggles or molly bolts must be used, and pilot holes must be drilled slowly with a carbide or masonry bit to avoid cracking the surrounding plaster matrix.
- Tiled Drywall (Kitchens and Bathrooms): When mounting over backer board and ceramic tile, never anchor into grout lines. Drill through the tile with a diamond or masonry bit at low speed using water lubrication to prevent cracking, then insert toggle hardware into the hollow wall cavity behind the backer board.
For lightweight shelves under 25 pounds holding basic decor, standard self-drilling anchors or basic wall plugs provide sufficient hold without requiring oversized access holes in your drywall.
High-Capacity Anchoring for Heavy Shelving and Solid Wood
Heavy shelving—such as 2-inch thick solid butcher block, hardwood slabs, or utility shelves holding appliances—introduces substantial cantilever leverage. As shelf depth increases, downward gravity creates a rotational torque that attempts to pry the top mounting screws directly out of the wall in tension.
Standard toggle bolts concentrate tension on small metal wing tips. For high-demand residential or commercial mounting where studs are entirely inaccessible, load-distributing anchors disperse the rotational pull across a broad surface area on the rear face of the drywall board. These systems maximize holding power while preventing localized crushing of the gypsum core.
Step-by-Step Guide: How to Anchor a Shelf Without Studs Using Toggle Bolts
Installing a shelf into hollow drywall requires careful measurement, correct drill sizing, and deliberate torque control.
Tools and Materials Required
- Shelf and mounting brackets
- Toggle bolts or strap toggles (sized to your load requirements)
- Variable-speed power drill and appropriately sized drill bits
- Torpedo or 24-inch bubble level
- Measuring tape and carpenter’s pencil
- Handheld screwdriver (#2 Phillips or flathead matching the bolt)
- Electronic stud finder and voltage/pipe detector
Step 1: Layout and Alignment
- Determine the desired shelf height on the wall.
- Hold your mounting bracket against the wall at this height. Place a bubble level across the bracket to establish a horizontal baseline.
- Mark each mounting hole location through the bracket onto the drywall with a sharp pencil.
- Scan the marked points with an electronic stud finder and AC wire detector. If a stud lands on one of your marks, mark it to receive a standard wood screw instead of a toggle anchor. Always inspect for plumbing or electrical lines running behind the hollow drywall partition.
Drilling Pilot Holes and Inserting the Toggle Hardware
- Size the drill bit: Match the drill bit diameter to the clearance size listed on the anchor packaging. Traditional spring toggle bolts require a clearance hole large enough to pass folded wings (typically 1/2 inch to 3/4 inch), while strap toggles generally require a 1/2-inch hole.
- Drill perpendicular to the wall: Hold the drill level and steady. Drill slowly through the 1/2-inch or 5/8-inch drywall. Do not force the bit; heavy forward pressure can blow out the paper backing on the inside face of the wallboard, reducing holding capacity.
- Assemble standard spring toggles: Pass the machine screw through the shelf bracket mounting hole first, then thread the spring wing onto the bolt threads with the wing tips facing the bolt head.
- Insert into the wall cavity: Squeeze the toggle wings completely flat between your fingers and push the assembly through the pre-drilled drywall hole until the wings clear the drywall back and spring open. Pull outward gently on the screw head to seat the open wings firmly against the inner drywall paper.
- Install strap toggles (if using modular hardware): Slide the metal channel flat along its plastic pull straps through the drilled hole. Pull the ring handle toward you until the metal channel sits flat against the back of the drywall. Slide the plastic collar flange down the straps until it seats flush against the outer wall surface, then snap the plastic straps off flush at the wall face.
Mounting the Shelf Bracket and Securing the Shelf Body
- Tighten the mounting hardware: Drive the bolt into the toggle channel using a manual screwdriver or a drill on a very low torque clutch setting.
- Maintain tension during tightening: With spring toggles, keep continuous outward pulling pressure on the bracket while turning the screw so the wings do not spin freely inside the hollow cavity.
- Hand-tighten the final turns: Stop driving the fastener immediately once the bracket meets the drywall surface. Hand-tighten the final quarter-turn to prevent crushing the soft gypsum core.
- Slide and lock the shelf: Seat the floating shelf body or solid shelf plank over the mounted brackets. Drive the underside set screws to lock the shelf body firmly to the metal bracket arms.
- Verify stability: Check alignment with your bubble level and apply gentle downward pressure with both hands across the shelf surface before loading items.
For more technical installation procedures and best practices, consult our Install Guide.
Structural Alternatives, Deep Shelves, and No-Drill Limitations

While hollow-wall anchors handle moderate static loads, specific shelf designs exceed the mechanical strength of gypsum wallboard alone.
High-Capacity Load-Distributed Drywall Fasteners
When standard framing cannot be reached and load requirements exceed traditional hardware limits, patented load-distributed anchors made from 100% recycled plastic in the USA provide an engineered solution. GHOSTUD anchors distribute rotational tension across a wide surface area on the rear face of drywall panels.
The GS1 model installs with a 1-inch hole saw and provides up to 250 lb of holding power in 1/2-inch or 5/8-inch drywall. For extreme loads, the GS2 utilizes a 2-inch hole saw to achieve up to 1,000 lb shear capacity in 1/2-inch or 5/8-inch drywall. Both models are available in 2-packs and 20-packs. These published ratings measure downward shear load directly against the wall surface, not the outward tension load generated by deep, cantilevered shelves.
Where GHOSTUD is the wrong choice: If your mounting surface consists of plaster and lath, masonry, brick, concrete, or tile over cement backer board, our anchors must not be used. In those substrates, pivot your approach: switch to masonry sleeve anchors for solid brick/concrete, or use long traditional toggle bolts that span the full depth of plaster and lath framing. Additionally, GHOSTUD is never a substitute for mounting directly into a stud when an accessible stud is present.
Intermediate Mounting Boards (Ledgers)
If you want to mount heavy butcher block or utility shelving between misaligned studs, install a finished 1×4 or 3/4-inch plywood ledger board horizontally across the wall. Fasten this structural board directly into two adjacent studs using 3-inch wood construction screws.
Once the ledger board is mechanically secured to structural framing, mount your shelf brackets directly to the ledger at any spacing. This eliminates drywall pull-out forces entirely while providing symmetrical aesthetic placement.
Internal Framing Blocking
For concealed 2-inch thick floating shelves designed to hold dense rows of books (which weigh approximately 10 to 12 kg per meter) or heavy cookware, internal 2×4 blocking is the safest method.
This process involves cutting a neat horizontal channel in the drywall between two studs, toenailing or pocket-screwing horizontal 2×4 lumber between the studs, and patching/painting the drywall. The floating shelf bracket rods can then be bolted directly into solid structural timber.
The Limits of No-Drill Mounting Methods
Renters often explore non-invasive, no-drill methods such as adhesive strips or double-sided mounting tape. While helpful for small picture ledges, their structural limits must be respected:
- Adhesive Strips: A large Command strip pair is rated for roughly 4 lbs (1.8 kg). Four pairs can hold up to approximately 15 lbs (7 kg) under optimal laboratory conditions.
- Adhesive Degradation: Adhesives rely entirely on the tensile strength of the wall paint layer. High ambient humidity in kitchens and bathrooms softens acrylic adhesive bonds, resulting in sudden shear failure.
- Cantilever Pull: Adhesives cannot counter the rotational pull of a deep shelf. Placing an object toward the front edge of an adhesive-mounted shelf multiplies peeling forces on the top edge of the tape, causing the paint to delaminate from the gypsum board.
Functional shelves intended for dishware, books, or electronics always require mechanical fasteners that bridge through the wallboard.
For additional strategies and advanced hollow-wall configurations, see our comprehensive guide on floating shelves without studs.
How to Anchor a Shelf Without Studs and Avoid Common Installation Mistakes
- Spinning Anchors: A toggle or anchor that spins freely during driving indicates an oversized pilot hole or a blown-out drywall core. Never attempt to add glue or oversized screws into a failed hole. Back the fastener out, patch the drywall completely, and drill a fresh hole offset at least 2 inches horizontally or vertically from the failed spot.
- Overtightening Fasteners: Driving anchors with high-torque impact drivers crushes the gypsum interior of drywall. Once crushed, the panel loses up to 80% of its shear strength. Always finish fastening with a manual screwdriver.
- Ignoring Cantilever Leverage: A 12-inch deep shelf generates twice the rotational pull-out force at the top anchor compared to a 6-inch deep shelf carrying the exact same weight. Place your heaviest items toward the back of the shelf against the wall to minimize rotational torque.
- Asymmetrical Weight Clustering: Distribute books, jars, and decorative items evenly along the horizontal shelf span rather than stacking heavy items on an unsupported end.
How to Remove Anchors and Repair Drywall Holes
When moving out or reconfiguring a room, properly removing hollow-wall anchors prevents extensive drywall tearing.
Anchor Removal Techniques
- Self-Drilling Anchors: Insert a screwdriver into the drive head and turn counter-clockwise with gentle pressure until the anchor threads back out of the drywall.
- Traditional Toggle Bolts: Remove the machine screw completely. The internal metal wings will drop harmlessly down into the hollow wall cavity between the studs.
- Strap Toggles and Molly Bolts: For strap toggles with plastic collar flanges, pry the outer plastic rim gently with a flat screwdriver or use a needle-nose plier to snap the face ring off. For stubborn molly bolt collars, place a larger drill bit over the center screw hole and drill gently at low speed to shear off the outer mushroom head, allowing the inner casing to fall behind the wall.
Step-by-Step Drywall Patching
- Clean the Hole: Use a utility knife to bevel the outer edges of the hole inward slightly, removing any protruding paper burrs or loose gypsum dust.
- Apply Joint Compound: For holes under 1 inch in diameter, press lightweight spackling paste or joint compound into the opening using a flexible 2-inch or 4-inch putty knife. Slightly overfill the depression to account for compound shrinkage as water evaporates.
- Use Mesh Patching for Large Holes: If a high-capacity anchor left a 1-inch to 2-inch opening, apply a self-adhesive fiberglass mesh patch over the hole before applying joint compound in two thin coats.
- Sand Smooth: Allow the compound to dry fully (typically 4 to 24 hours). Sand the repair flat using 120-grit to 150-grit sandpaper wrapped around a sanding block. Check flatness by holding a flashlight at a low angle across the wall surface.
- Prime and Paint: Apply a coat of drywall primer over the raw patch to seal the compound, followed by computer-matched touch-up paint using a small foam roller to blend the surface texture.
For complete hardware options, explore how to mount with our full line of anchors or browse our product lineup when you visit the GHOSTUD Shop.
Frequently Asked Questions About Shelf Anchoring
Can I install a heavy 2-inch thick floating shelf on drywall alone?
You can install medium-weight floating shelves on drywall alone using heavy-duty toggle bolts or strap toggles, provided the combined weight of the shelf and contents does not exceed the safe working load of the anchors (typically under 40 to 50 lbs total). However, thick 2-inch hardwood floating shelves carrying dense loads (like full sets of dishware or reference books) generate extreme outward leverage on internal bracket rods. For high-mass floating installations, internal 2×4 framing blocking or bridging adjacent studs with a mounting board is strongly recommended.
What is the difference between shear capacity and pull-out weight ratings?
Shear capacity measures the downward, vertical load an anchor can support when a fixture is clamped flush against the wall surface (such as a flat picture frame or bracket backplate). Pull-out capacity measures the tensile force required to pull an anchor straight out of the drywall horizontally. Cantilevered shelves exert both forces simultaneously: gravity pulls down in shear, while the shelf depth acts as a lever arm that exerts continuous pull-out tension on the upper mounting anchors. Published anchor ratings almost universally reflect downward shear capacity unless specifically noted otherwise.
Why do functional wall shelves require mechanical fasteners instead of no-drill methods?
Functional shelves designed to hold dynamic, changing loads require mechanical fasteners because adhesive systems rely entirely on surface paint adhesion. Over time, constant downward shear force and cantilever leverage peel paint layers away from the gypsum core. Furthermore, seasonal humidity and temperature fluctuations degrade adhesive polymers, leading to sudden wall failures without warning. Mechanical toggle fasteners clamp completely through the wallboard, ensuring the physical drywall panel carries the load.
Conclusion and Best Practices for Studless Shelf Mounting
Mounting shelves when studs are unavailable is a straightforward DIY task when you respect wall physics and select the right hardware. Drywall is a non-structural gypsum panel, but mechanical anchors allow you to safely distribute both shear and tensile loads across the board’s surface.
Always calculate the total anticipated weight of your shelf plus its contents, divide that figure by your anchor mounting points, and select anchors that provide at least a 2x safety rating multiplier. Keep shelf depths modest to reduce leverage forces, hand-tighten all screws to protect the drywall core, and stage weight gradually. When planned carefully, toggle anchors provide long-lasting stability for your wall storage projects.