
How to Insert an Anchor into a Wall in 5 Easy Steps
Install a Wall Anchor Securely in 5 Steps
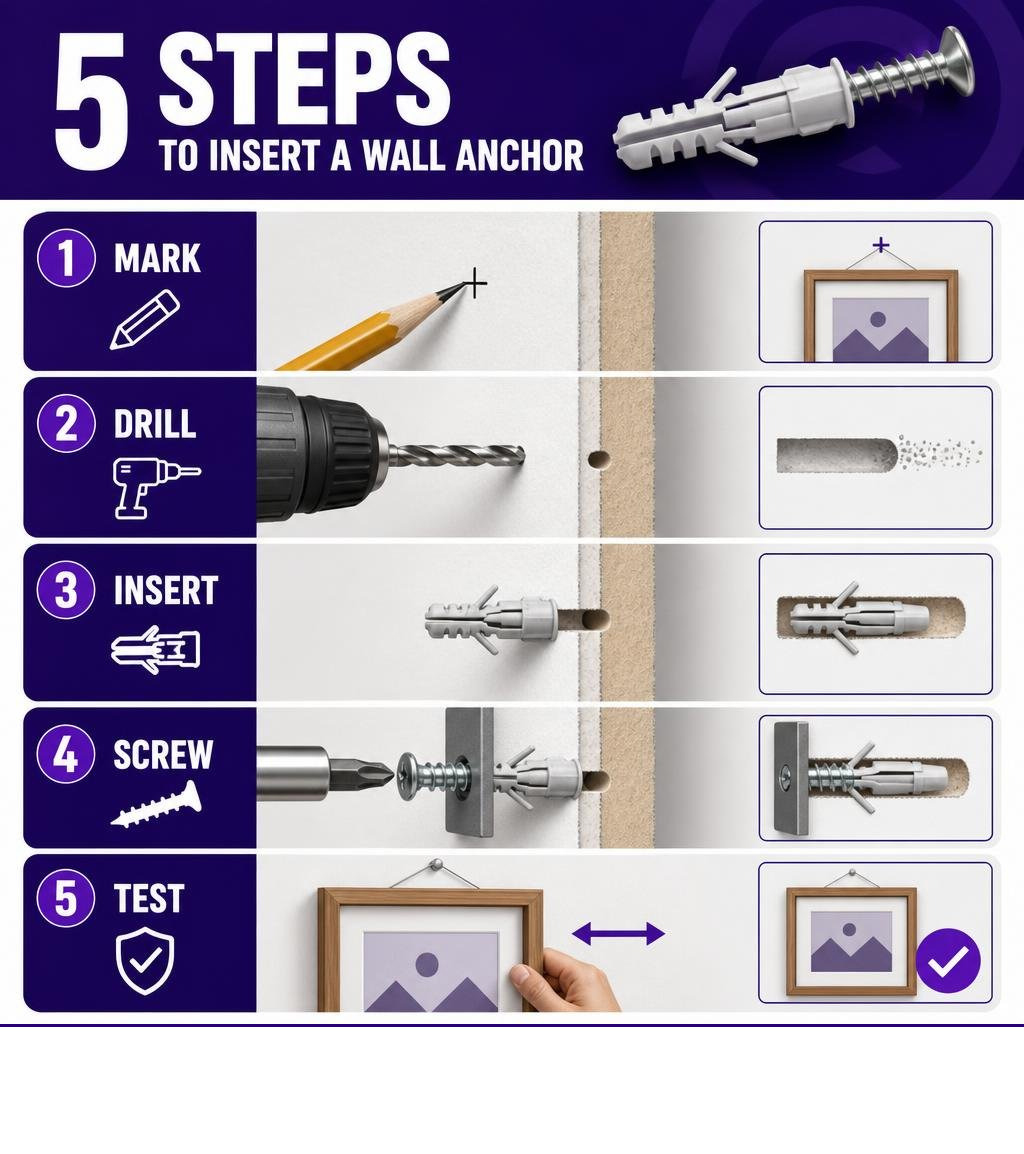
To insert a wall anchor into drywall, first check for a stud and mark the mounting point. If there is no stud, choose an anchor rated for your fixture and wall condition, drill the package-specified pilot hole if needed, seat the anchor flush with the wall, then drive the matching screw through your mounting hardware until snug.
Do not force an anchor into a too-small hole or overtighten the screw. Both can crush the gypsum core, strip the hole, or leave the anchor spinning. For heavy items, deep shelves, or mounts that project away from the wall, the hardware sees more than simple downward weight: it also faces pull-out force and rotational torque. A stud is still the strongest choice when one is in the right location.
This guide covers standard anchors for drywall, including plastic expansion anchors, self-drilling anchors, molly bolts, and toggle-style fasteners. You will learn how to make a clean hole, engage the anchor correctly, and avoid the common mistakes that cause a fixture to loosen.
I am Trevor Jones, with more than 16 years of experience in entrepreneurship, marketing, and technology focused on practical building-hardware solutions. I will walk you through how to insert an anchor into wall surfaces correctly, starting with the basic steps that apply to most drywall projects.
Understanding Wall Types and Selecting the Right Anchor
Before drilling, you must identify your wall material. Standard drywall consists of a compressed gypsum core faced with paper on both sides, typically found in 1/2-inch or 5/8-inch thicknesses in modern residential framing. Plaster walls, common in homes built before 1960, consist of brittle lime or gypsum plaster layered over horizontal wood lath strips. Solid masonry includes poured concrete, cinder block, and clay brick.
To test your substrate, press a pushpin into an inconspicuous area:
- Drywall: The pin enters smoothly with firm thumb pressure and leaves a soft chalky residue.
- Plaster: The pin resists penetration entirely or crumbles the brittle surface layer without sinking in.
- Masonry: The pin will not penetrate at all.
For a comprehensive breakdown of wall materials, consult this guide to choosing wall anchors for wall types and loads.
| Anchor Type | Base Material | Typical Shear Range (Drywall) | Pilot Hole Required |
|---|---|---|---|
| Plastic Expansion / Ribbed | Drywall, Masonry | 5 to 20 lb | Yes (1/8 in to 1/4 in) |
| Threaded Self-Drilling | Drywall only | 25 to 75 lb | No (Self-tapping) |
| Molly Bolt (Hollow Wall) | Drywall, Plaster | 40 to 100 lb | Yes (1/4 in to 3/8 in) |
| Snap Toggle / Steel Toggle | Drywall, Hollow Block | 100 to 265 lb | Yes (1/2 in) |
Matching Fixture Weight and Shear vs Pull-Out Forces
Mounting loads act on fasteners through two distinct mechanical forces: shear load and tensile pull-out load.
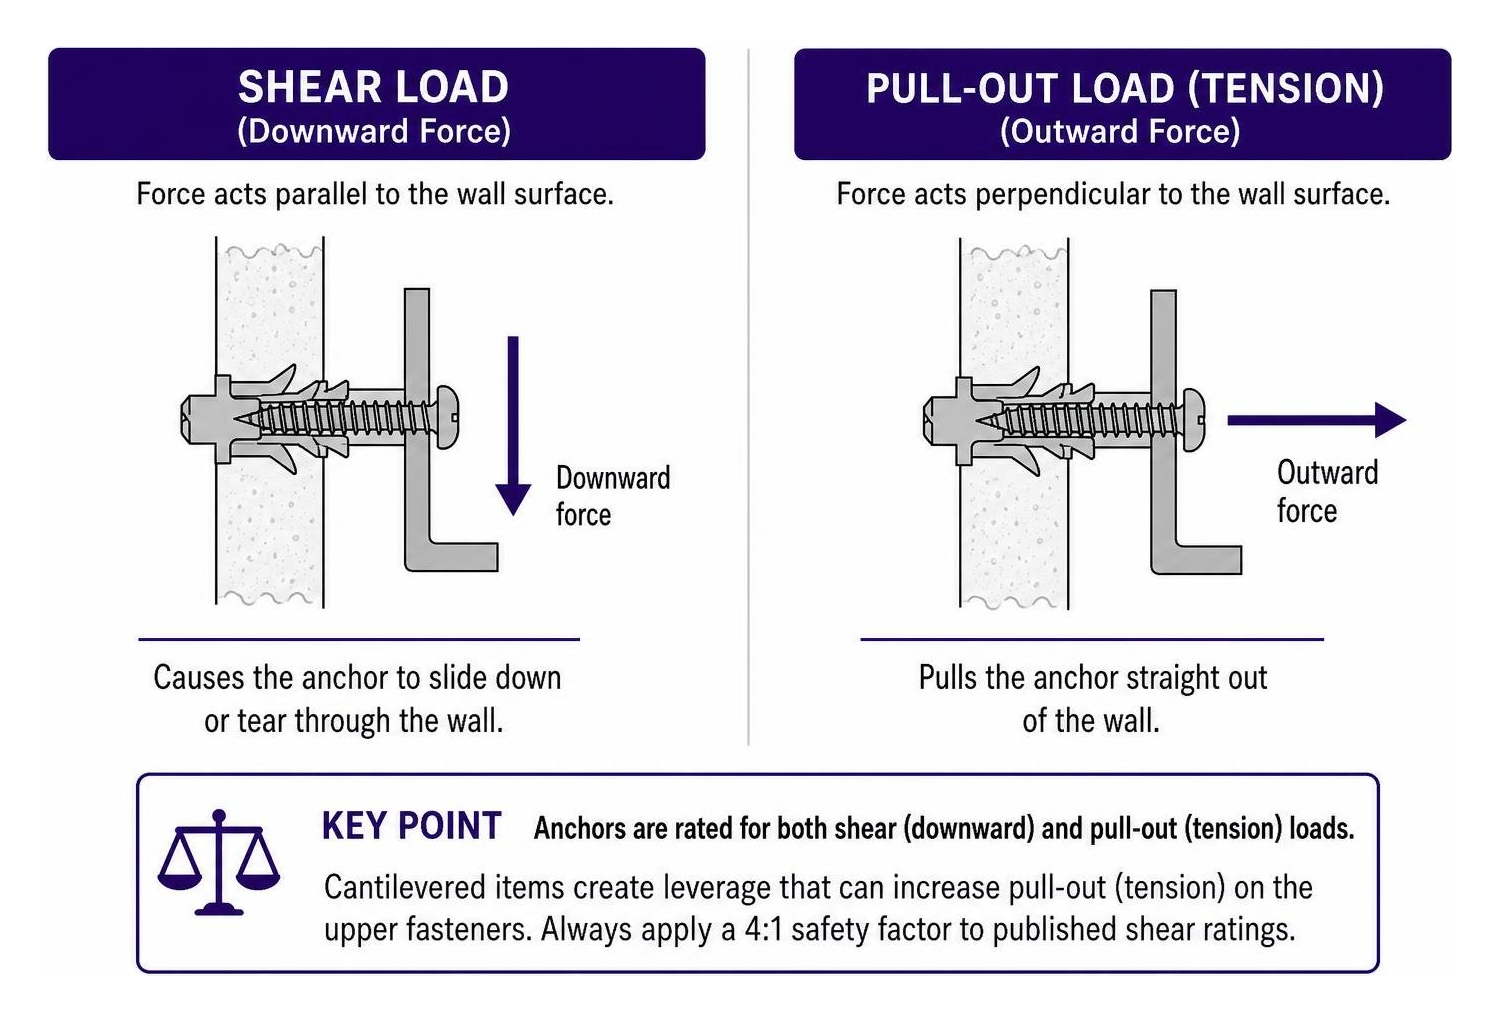
- Shear load is the downward vertical force exerted parallel to the wall surface by flat, flush-mounted objects like picture frames.
- Pull-out load (tension) is the horizontal force pulling the fastener straight out perpendicular to the wall plane.
When mounting cantilevered items such as deep display shelves or floating brackets, the downward weight combines with leverage to generate rotational torque. This rotational force levers the top of the mounting plate away from the drywall, converting vertical mass into direct pull-out tension on the upper fasteners. Published anchor capacities reflect static shear strength under laboratory testing. Always apply an industry-standard 4:1 safety factor (operating at 25% of the maximum published shear rating) to ensure safe working load capacity.
Drywall Anchor Types and Mechanical Grip Mechanisms
Hollow-wall anchors rely on distinct physical mechanisms to hold inside gypsum board:
- Plastic Expansion and Ribbed Anchors: Inexpensive split-shank sleeves that expand outward against the interior walls of a pilot hole as the screw threads in. The holding strength relies entirely on radial friction against the weak gypsum core.
- Threaded Self-Drilling Anchors: Wide-diameter nylon or zinc bodies featuring aggressive exterior threads that cut directly into gypsum. They distribute shear over a broader surface area than smooth plugs.
- Molly Bolts (Hollow Wall Anchors): Slotted metal sleeves that deform when tightened. As the bolt draws forward, the casing collapses into four lateral legs that clamp firmly against the back face of the drywall.
- Toggle Bolts and Snap Toggles: Metal channels or spring-loaded wings that pivot through a pilot hole and flatten against the blind side of the drywall. They transfer load mechanically to the rear paper-and-gypsum matrix over a broad footprint.
Tools, Bit Sizing, and Hole Preparation
Gather the proper tools before starting:
- Variable-speed cordless drill or driver
- ANSI-compliant drill bits (standard twist bits for drywall; carbide-tipped masonry bits for brick/concrete)
- Manual #2 Phillips and flathead screwdrivers
- Rubber mallet or screwdriver handle
- Electronic stud finder
- Torpedo level and pencil
- Safety glasses and dust mask
Sizing the Pilot Hole Accurately
The primary mechanical failure mode of expansion anchors is an oversized pilot hole, which eliminates contact friction and causes the anchor to spin.
To size a twist bit for a ribbed plastic anchor without packaging specifications, align the drill bit directly in front of the fastener shank. The bit must match the solid central core diameter while leaving the external raised ribs or wings fully exposed. When you drill into pre-1978 painted walls, use a HEPA-filtered vacuum at the entry point to contain older paint dust.
How to Insert an Anchor into Wall: The 5-Step Process
Following a systematic installation method prevents wall blowout and ensures the fastener engages securely. Review this step-by-step guide on using drywall anchors correctly to visualize core techniques.
Step 1: Locate Studs and Mark Anchor Placement
Scan the target area with an electronic stud finder. Standard wood wall framing studs (1.5 inches wide) are spaced 16 to 24 inches apart on center. If your layout aligns directly over solid wood, drive a standard wood screw directly into the stud; no drywall anchor is necessary or recommended. If no stud is present at the required fixture position, hold your mounting bracket in place, align it using a torpedo level, and mark the screw centers onto the drywall with a pencil crosshair.
Step 2: Drill the Perpendicular Pilot Hole
Chuck the correct bit into your drill. Position the bit tip precisely on your pencil crosshair, maintaining a strict 90-degree perpendicular angle to the wall. Run the drill at medium speed with light forward pressure. Stop immediately once the bit breaks through the back paper layer of the drywall (typically 1/2 inch to 5/8 inch deep). Reverse the drill to withdraw the bit cleanly without wallowing or ovalizing the entry hole.
Step 3: How to Insert an Anchor into Wall Surfaces Flush
Seat the fastener into the prepared opening based on its mechanical style:
- Plastic expansion/ribbed anchors: Push the tip into the hole using thumb pressure. If resistance occurs near the collar, tap the outer lip gently with a rubber mallet until the rim rests flush against the drywall surface. Do not use a steel hammer; striking an undersized hole with a steel hammer will crush the drywall paper and mushroom the anchor flange.
- Self-drilling threaded anchors: Place the sharp point directly against your drywall pencil mark. Apply firm, steady forward pressure with a manual #2 Phillips screwdriver and rotate clockwise until the wide threads bite and seat the head flush with the wall face.
- Snap toggles / toggle bolts: Slide the metal toggle channel through the 1/2-inch pilot hole until the wing flips flat against the hidden rear wall surface. Pull the plastic straps taut to seat the metal channel securely, slide the plastic cap snug against the front wall face, and snap off the excess plastic straps flush with the wall.
Step 4: Mount Hardware and Drive the Screw
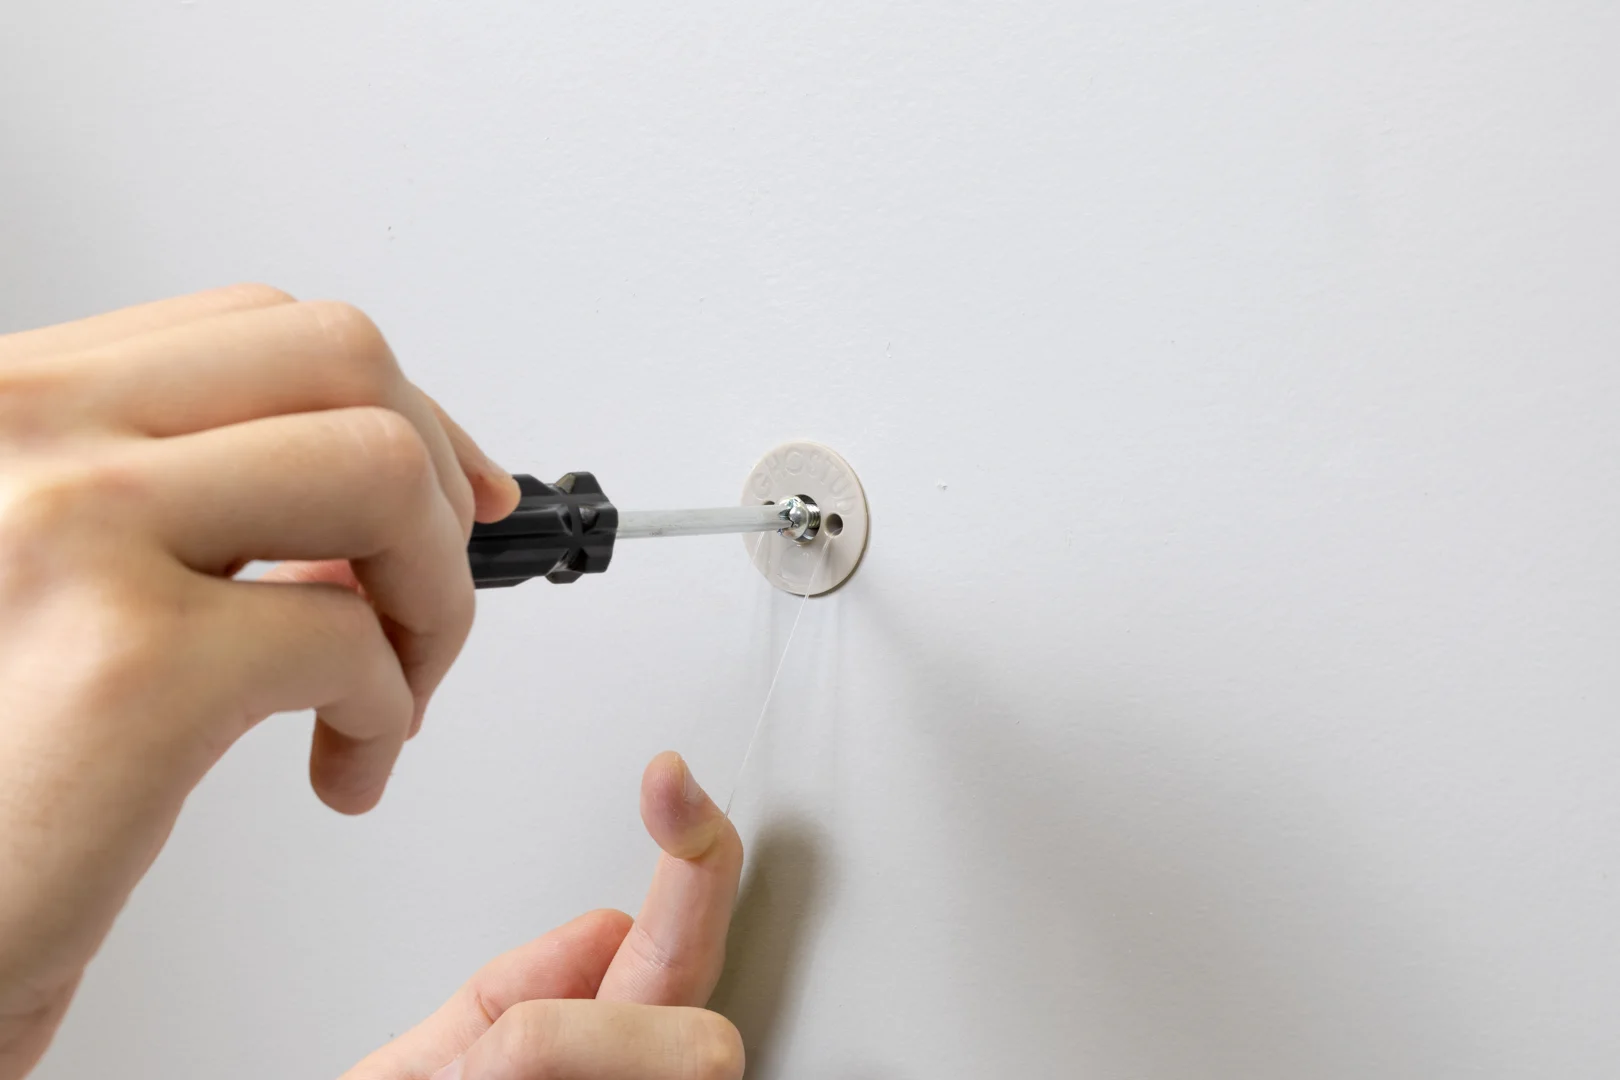
Pass the specified mounting screw through the hole in your fixture or bracket, then align the screw tip with the anchor opening. Drive the fastener clockwise using a manual screwdriver.
As the screw advances through a plastic anchor, its threads force the split legs to splay outward inside the gypsum. For toggle bolts, the machine screw threads into the metal backplate, clamping the drywall in compression between the bracket and the rear channel. Tighten until the bracket is firmly seated. Stop turning immediately once snug—over-torquing will strip the plastic internal threads or grind the gypsum core into loose powder.
Step 5: Verify Anchor Engagement and Fixture Stability
Inspect the perimeter of the installed bracket to confirm the drywall face did not crush or buckle during fastening. Apply gentle downward hand pressure to verify that the assembly holds the static shear load without slipping, flexing, or pulling away from the drywall plane.
Anchoring Heavy Loads and Solid Substrates
Hollow-wall fasteners are mechanically unsuited for solid masonry, brick, or poured concrete foundations. For detailed technical protocols on drilling and fastening into solid masonry, review this complete walkthrough for installing concrete anchors.
How to Insert an Anchor into Wall Concrete and Brick Substrates
Solid masonry requires mechanical expansion shields, sleeve anchors, or self-tapping concrete screws (such as Tapcons):
- Drill with a rotary hammer: Chuck an ANSI carbide masonry bit into an SDS rotary hammer drill. Set the depth gauge 1/4 inch to 1/2 inch deeper than the intended anchor embedment depth (minimum 1-inch embedment for light concrete screws; 2 to 4 inches for structural wedge/sleeve anchors).
- Execute the Blow-Brush-Blow cleaning protocol: Drilling masonry creates dense, fine silica powder. If left inside the hole, this dust acts like miniature ball bearings, preventing expansion sleeves from gripping the hole walls and reducing pull-out strength by over 30%. Blow compressed air into the cavity, scrub the hole walls with a wire bottle brush, and blow it out with compressed air a second time.
- Drive and torque the anchor: Insert the concrete screw or sleeve anchor through your fixture into the hole. Tap gently with a mallet until seated, then tighten with a calibrated torque wrench or hand socket. Standard 1/2-inch concrete wedge anchors typically require 40 to 50 ft-lbs of torque to expand their internal steel clips fully.
High-Capacity Hollow Drywall Mounting Solutions
Standard expansion sleeves support light frames under 10 pounds, and standard toggle bolts handle moderate loads up to 50 pounds per pair. However, when you must mount heavy items like large mirrors, floating shelving, or flat-panel television wall brackets onto hollow 1/2-inch or 5/8-inch drywall where framing studs do not align with bracket holes, standard point-contact anchors carry serious failure risks.
Standard anchors concentrate all shear and tensile load onto a tiny perimeter of fragile gypsum paper. If that narrow boundary fails, the entire anchor pulls through, tearing a crater in the wallboard.
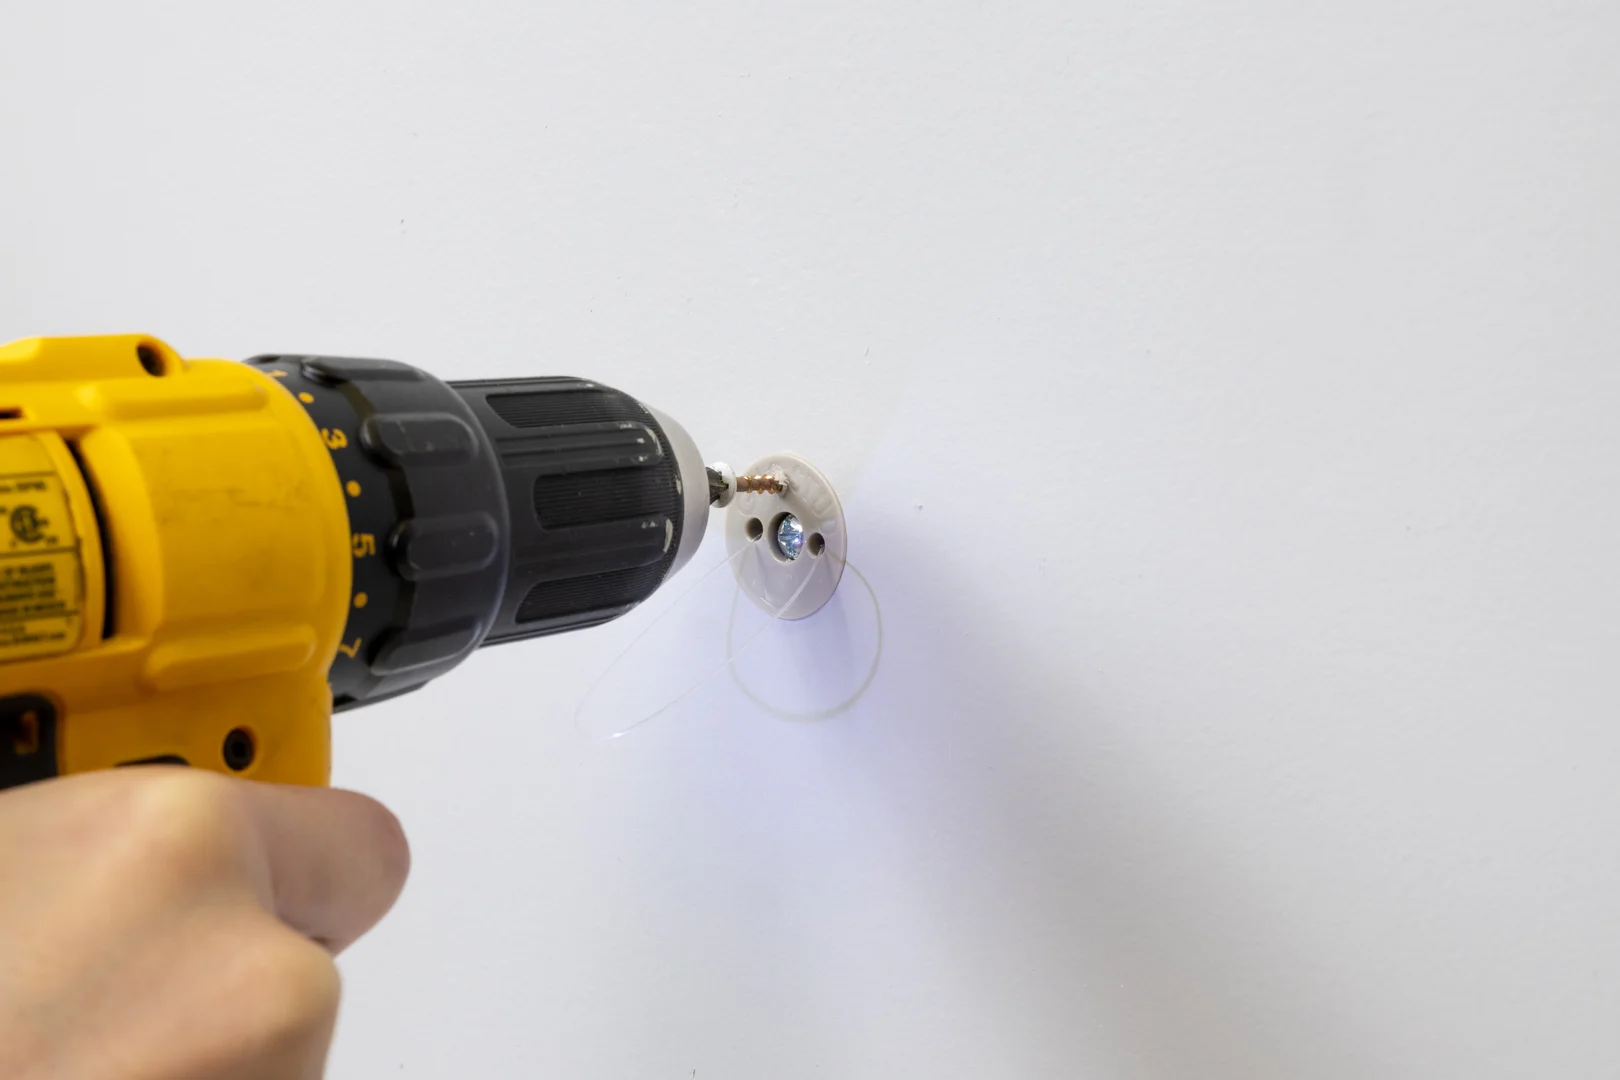
For high-capacity drywall mounting without studs, our products utilize a patented, load-distributed mechanical design manufactured in the USA from 100% recycled plastic. The GHOSTUD GS1 installs via a 1-inch hole saw and provides up to 250 lb shear capacity in 1/2-inch or 5/8-inch drywall, while the GHOSTUD GS2 installs via a 2-inch hole saw to deliver up to 1,000 lb shear capacity in 1/2-inch or 5/8-inch drywall by transferring stress across an expansive internal bearing plane.
Note on structural limitations: GHOSTUD anchors are designed strictly for hollow drywall installations. GHOSTUD is the wrong choice when mounting into plaster, wood lath, masonry, brick, concrete, stucco, tile backer boards, or metal studs. If you encounter these materials behind your wall surface, stop immediately and switch to substrate-matched masonry fasteners, sleeve anchors, or toggle channels designed specifically for that structural base. Furthermore, never use hollow-wall anchors as a substitute when a wooden framing stud is directly accessible, and never use drywall anchors for grab bars, safety handrails, ADA fall-prevention equipment, or furniture anti-tip restraints.
Troubleshooting Mistakes and Safe Anchor Removal
When anchor installations run into issues, apply these corrective actions:
- The anchor spins freely in the drywall: This occurs when the pilot hole is reamed too wide or the internal gypsum has pulverized. Back out the screw. If using plastic plugs, remove the spinning sleeve and upgrade to a larger toggle bolt or a wide self-drilling metal anchor that can bite into fresh drywall beyond the damaged hole diameter.
- The screw binds and will not seat fully: The pilot hole depth is too shallow, or drywall debris has packed the bottom of the anchor sleeve. Back out the screw, insert a thin nail or drill bit to clear out the packed gypsum core, and re-drive the screw manually.
- Removing old or damaged plastic anchors: Do not pull violently on the anchor with pliers, as this will tear a large hole through the front paper facing. Instead, insert the tip of a utility knife behind the raised outer plastic collar and slice the flange off flush with the wall surface. Take a screwdriver and push the remaining plastic body backward so it drops harmlessly down inside the hollow wall cavity. Fill the slight surface depression with spackle, sand flat when dry, and repaint.
Frequently Asked Questions about Wall Anchors
What size drill bit should I use for a wall anchor?
Always check the diameter stamped on the anchor body or listed on its packaging. If the packaging is missing, measure the solid inner shank of the anchor (excluding the outer expansion ribs or threads) and match that diameter to your twist drill bit—typically 3/16 inch to 1/4 inch for standard plastic anchors and 1/2 inch for heavy-duty toggle bolts.
What should I do if the anchor spins in the drywall?
A spinning anchor indicates the pilot hole is oversized or the gypsum core has stripped. Stop driving the screw. Remove the loose fastener and replace it with a mechanical spring toggle bolt or snap toggle, which anchors against the solid back face of the drywall board rather than relying on hole friction. Alternatively, patch the stripped hole with spackling compound and drill a fresh hole at least 2 inches away.
Can I reuse a wall anchor after removing the screw?
No. Standard plastic expansion anchors deform their polymer structure permanently during initial screw insertion, eliminating their radial tension grip. Molly bolts and toggle wings permanently collapse or detach behind the wall cavity once backed out. Always install a new anchor when re-mounting hardware.
Conclusion
Securing hardware to interior walls requires matching the fastener’s mechanical holding mechanism to your specific wall substrate and load profile. Always prioritize fastening directly into center-aligned wood framing studs whenever possible. For hollow drywall sections where studs are unavailable, select appropriate hardware based on static shear requirements, apply a 4:1 safety factor, and drill clean, perpendicular pilot holes. For step-by-step guidance on heavy-duty installations, refer to our install guide to ensure proper alignment and lasting stability on every project.