
How to Install Anchors into Drywall Without a Drill
Essential Hand Tools and Hardware for Manual Installation
To put anchors into drywall without a drill, use a manual #2 Phillips screwdriver to turn self-drilling threaded anchors directly into the wallboard, or bore a pilot hole with a scratch awl for plastic expansion sleeves. Hand tools manually cut or displace soft gypsum without the core blowout and over-spinning risks common with high-speed power tools.
Gather these essential tools before starting:
- Phillips Screwdriver (#2 head): The primary tool for driving self-drilling threaded anchors and tightening mounting screws.
- Scratch Awl or Sturdy Finishing Nail: Used to pierce the front paper facing and bore a controlled starter hole for expansion sleeves.
- Claw Hammer or Rubber Mallet: Used for light, controlled tapping on manual push-in or expansion anchors.
- Torpedo Level and Pencil: Essential for marking layout lines and keeping multi-point fixtures level.
- Painter’s Tape: Applied over the insertion point to prevent surface paper tearing and localized blowout during manual boring.
Selecting the right anchor determines whether a manual installation holds or strips out the drywall. For detailed specifications across various fastener formats, review the guide on how to install plastic anchors without a drill at Maden.co.
Different anchor styles behave differently under manual force:
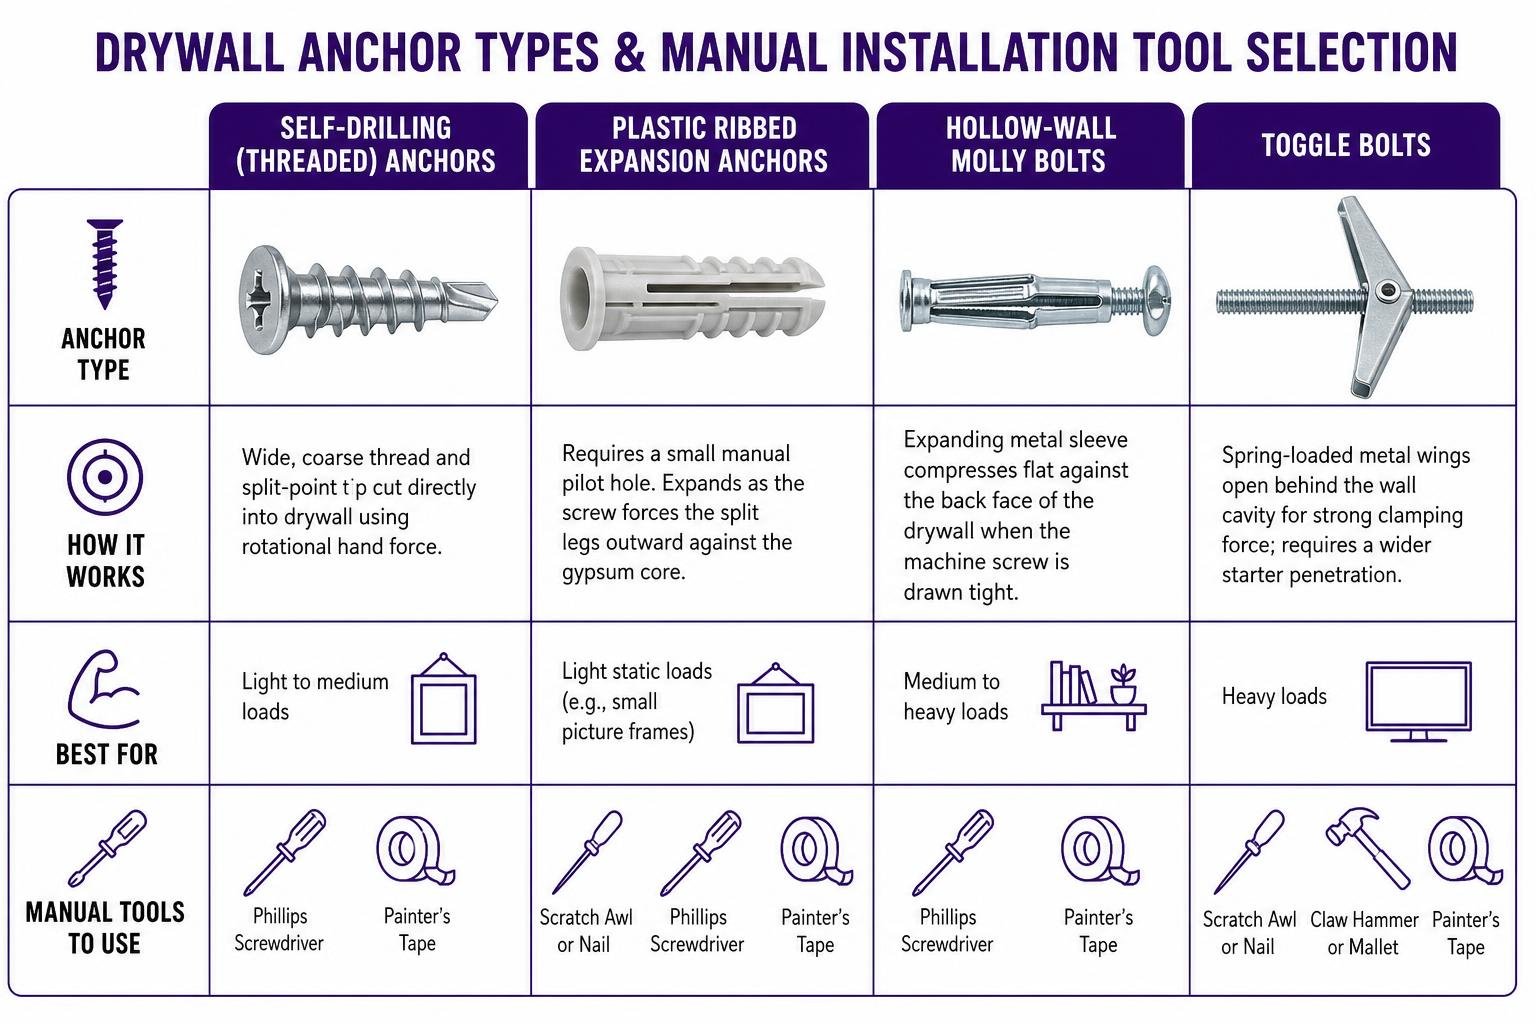
- Self-Drilling (Threaded) Anchors: Made of zinc or glass-filled nylon, these feature a wide, coarse exterior thread and a split-point tip that cuts directly into gypsum drywall using rotational hand force.
- Plastic Ribbed Expansion Anchors: Inexpensive sleeves intended for light static loads (such as small picture frames). They require a small manual pilot hole and expand as the screw forces the split legs outward against the gypsum core.
- Hollow-Wall Molly Bolts: Feature an expanding metal sleeve that compresses flat against the back face of the drywall when the machine screw is drawn tight.
- Toggle Bolts: Spring-loaded metal wings on a threaded machine bolt. They provide strong clamping force behind the wall cavity, but feeding the folded wings through manual holes requires a wider starter penetration.
Step-by-Step Guide: How to Put Anchors into Drywall Without a Drill
Installing anchors manually requires careful control. Power drills clear out gypsum as dust; manual installation displaces or cuts the gypsum directly. Excessive force can crush the core, leaving loose powder that cannot support weight.
Start by marking the target location with a pencil and checking alignment with a level. Check for framing studs behind the mark. Residential wall studs are typically framed on 16-inch or 24-inch centers with a 1-1/2-inch face width. Lightly tap the wall with your knuckles: a hollow, higher-pitched sound indicates an open drywall cavity, while a dull, solid thud indicates a stud. Check nearby electrical outlets and switch boxes, which are almost universally nailed to the side of a stud.
Safety Note: Never drive tools into drywall directly above or below electrical switches, outlets, or near visible plumbing lines.
Apply a small square of painter’s tape over your pencil mark to preserve the surface paper and prevent fracturing as you work.
Prepping Pilot Holes: How to Put Anchors into Drywall Without a Drill Using Hand Tools
Standard plastic expansion sleeves require a pilot hole to insert properly. Attempting to hammer a plastic sleeve directly into unpierced drywall will bend the anchor or crush a ragged hole in the wallboard.
- Place the sharp tip of a scratch awl (or a 2-inch finishing nail) squarely on the center of the pencil mark over the tape.
- Tap the rear of the awl handle gently with a hammer to pierce the front paper face.
- Apply firm, steady forward pressure while rotating the awl clockwise and counter-clockwise. The tapered metal shaft will bore out a smooth, round hole in the soft gypsum core.
- Control the penetration depth until the pilot hole matches the narrowest inner diameter of the plastic sleeve. Keep the hole slightly undersized; an oversized pilot hole allows the anchor collar to spin freely when the screw is inserted.
- Remove the awl and clear loose gypsum dust from the rim of the hole.
Installing Self-Drilling Screws: How to Put Anchors into Drywall Without a Drill Safely
Self-drilling threaded anchors bypass the need for a separate pilot hole because their tips are engineered to cut their own path.
- Position the pointed tip of the threaded zinc or nylon anchor directly on the center mark.
- Insert a #2 Phillips screwdriver firmly into the head of the anchor.
- Apply forward pressure perpendicular to the wall plane and turn the screwdriver slowly clockwise.
- Allow the cutting threads to bite into the drywall. Do not strike the anchor with a hammer; impact fractures the internal drywall core and destroys the threads’ grip.
- Continue rotating the screwdriver until the wide outer flange of the anchor sits flush with the front paper surface.
- Stop rotating immediately once flush. Overtightening will strip the soft gypsum threads, leaving the anchor spinning freely with no mechanical holding strength.
Setting Expansion Anchors and Toggles Manually
Once starter holes are prepared, install your mechanical fasteners:
- For Plastic Ribbed Anchors: Push the narrow tip of the plastic sleeve into the manual pilot hole. Tap the back collar with light, progressive mallet taps until the collar rests flat against the wallboard. Align your fixture over the center hole and drive the supplied sheet-metal screw clockwise until it draws tight against the bracket. As the screw threads enter the anchor, it forces the split legs apart, wedging them into the surrounding drywall.
- For Toggle Bolts: Pass the machine screw through the mounting hole of your fixture before assembling the hardware. Thread the spring-loaded toggle wings onto the end of the bolt with the wing points facing the screw head. Squeeze the metal wings completely flat with your fingers, push the assembly through your manual pilot hole until the wings clear the back side of the drywall, and listen for the spring wings to snap open inside the stud cavity. Pull back gently on the screw head to seat the metal wings against the interior drywall face, then tighten the bolt with your screwdriver until snug.
Load Limits and Safety: Shear Load vs. Pull-Out Capacity
Understanding fastener failure modes prevents wall damage and fallen fixtures. Drywall anchors experience two primary forces: shear load (downward force acting parallel to the wall face) and tension or pull-out load (outward force acting perpendicular to the wall face).
The structural holding power of a standard screw driven directly into hollow drywall with no anchor is near zero; the soft gypsum crumbles under minimal tension, allowing the screw to pull free by hand. Anchors resolve this by spreading load across a wider surface area of the gypsum or clamping against the rear paper face.
| Anchor Type | Installation Method | Working Shear Capacity (1/2″ Drywall) | Working Shear Capacity (5/8″ Drywall) | Ideal Use Case |
|---|---|---|---|---|
| Plastic Ribbed Anchor | Awl pilot hole + screwdriver | Up to 10 lbs per pair | Up to 15 lbs per pair | Small framed photos, light smoke detectors |
| Self-Drilling Zinc / Nylon | Screwdriver directly into wall | 25 to 50 lbs per pair | 35 to 65 lbs per pair | Clocks, decorative mirrors, light curtain rods |
| Hollow-Wall Molly Bolt | Awl/slotted opening + screwdriver | 40 to 75 lbs per pair | 50 to 90 lbs per pair | Towel bars, small wall sconces |
| Spring Toggle Bolt | Enlarged manual hole + screwdriver | 50 to 100 lbs per pair | 75 to 150 lbs per pair | Hanging planters, medium shelving units |
Safety Standard: Fastener manufacturers recommend operating at a safe working load limit of 25 percent of the maximum rated ultimate failure capacity. Dynamic forces—such as pulling a towel from a bar or bumping a shelf—apply sudden spikes in leverage that can dislodge anchors loaded near their maximum limits.
When mounting deep, cantilevered shelving where weight sits several inches away from the wall, downward force transforms into rotational leverage. This leverage exerts high tension (pull-out) force on the top mounting anchors. Published anchor ratings reflect shear loads applied flat against the wall plane, not pure pull-out resistance on cantilevered brackets.
For high-capacity structural mounting in hollow drywall where studs cannot be accessed, explore the Ghostud Drywall Anchors Category for engineered load-distribution hardware. However, GHOSTUD is the wrong choice if a solid wood stud is located directly behind your mounting mark, as hollow-wall anchors cannot deploy inside solid framing. In that situation, skip drywall anchors entirely and drive a standard #8 or #10 wood screw directly into the center of the wood stud.
Frequently Asked Questions
Can you install wall anchors into plaster without a drill?
Manual punch methods using awls, nails, or self-drilling anchors should not be used on traditional plaster and lath walls. Plaster is hard, dense, and brittle compared to gypsum drywall. Forcing an awl or self-drilling screw into plaster causes extensive surface cracking, spalling, and lath detachment behind the wall. Plaster requires low-speed masonry drilling to create clean holes without shattering the surrounding wall surface.
How do you remove a drywall anchor without power tools?
To remove a standard plastic expansion sleeve without a drill, back out the mounting screw two or three turns. Tap the screw head lightly with a screwdriver handle to push the expanded legs straight inside the wall cavity, then pull the screw and sleeve out with pliers. Alternatively, slice off the exposed outer collar flush to the wall using a sharp utility razor blade, push the remaining anchor body through into the wall cavity, and fill the small surface depression with spackling paste.
Why do screws pull out of hollow drywall?
Drywall consists of compressed gypsum plaster wrapped in heavy paper facing. Standard screws feature narrow metal threads designed to tap into dense wood fibers. When driven into bare gypsum, these fine threads pulverize the dry core into fine powder on contact. Without an expansion anchor to grip the core or a toggle wing to clamp the structural back paper face, the fastener slips out under minimal load.
Conclusion
Manual installation methods make it straightforward to secure lightweight and medium fixtures cleanly without power tools. Using self-drilling threaded fasteners or careful awl-punched pilot holes protects the fragile gypsum core from unnecessary damage.
For heavy-duty structural installations that exceed standard manual anchor limits, review the comprehensive install guide to ensure your mounting points are properly prepared and fully secured.