
One Simple Way to Install a TV Mount Without Studs
Safe Methods for Installing TV Mount on Drywall Without Studs
When installing a TV mount on drywall without studs, secure a low-profile fixed or tilting wall bracket using heavy-duty hollow-wall anchors engineered for shear load distribution. Screws driven into drywall alone support only 5 to 10 lbs before tearing through the gypsum core, so mounting safely requires mechanical fasteners that grip the rear paper facing across a wide surface area. Always avoid full-motion articulating mounts on hollow drywall, as extended cantilever arms generate severe outward leverage.
Selecting the right system requires matching your television’s total hanging weight to an anchor array that prevents local paper failure. For lightweight frames, standard plastic expansion plugs or self-drilling metal anchors might suffice, but for television brackets holding significant static mass, high-capacity mechanical fasteners are essential. Reviewing a practical guide to molly bolt vs toggle bolt comparisons highlights how mechanical toggle wings spread downward force far more effectively than friction-based plugs.
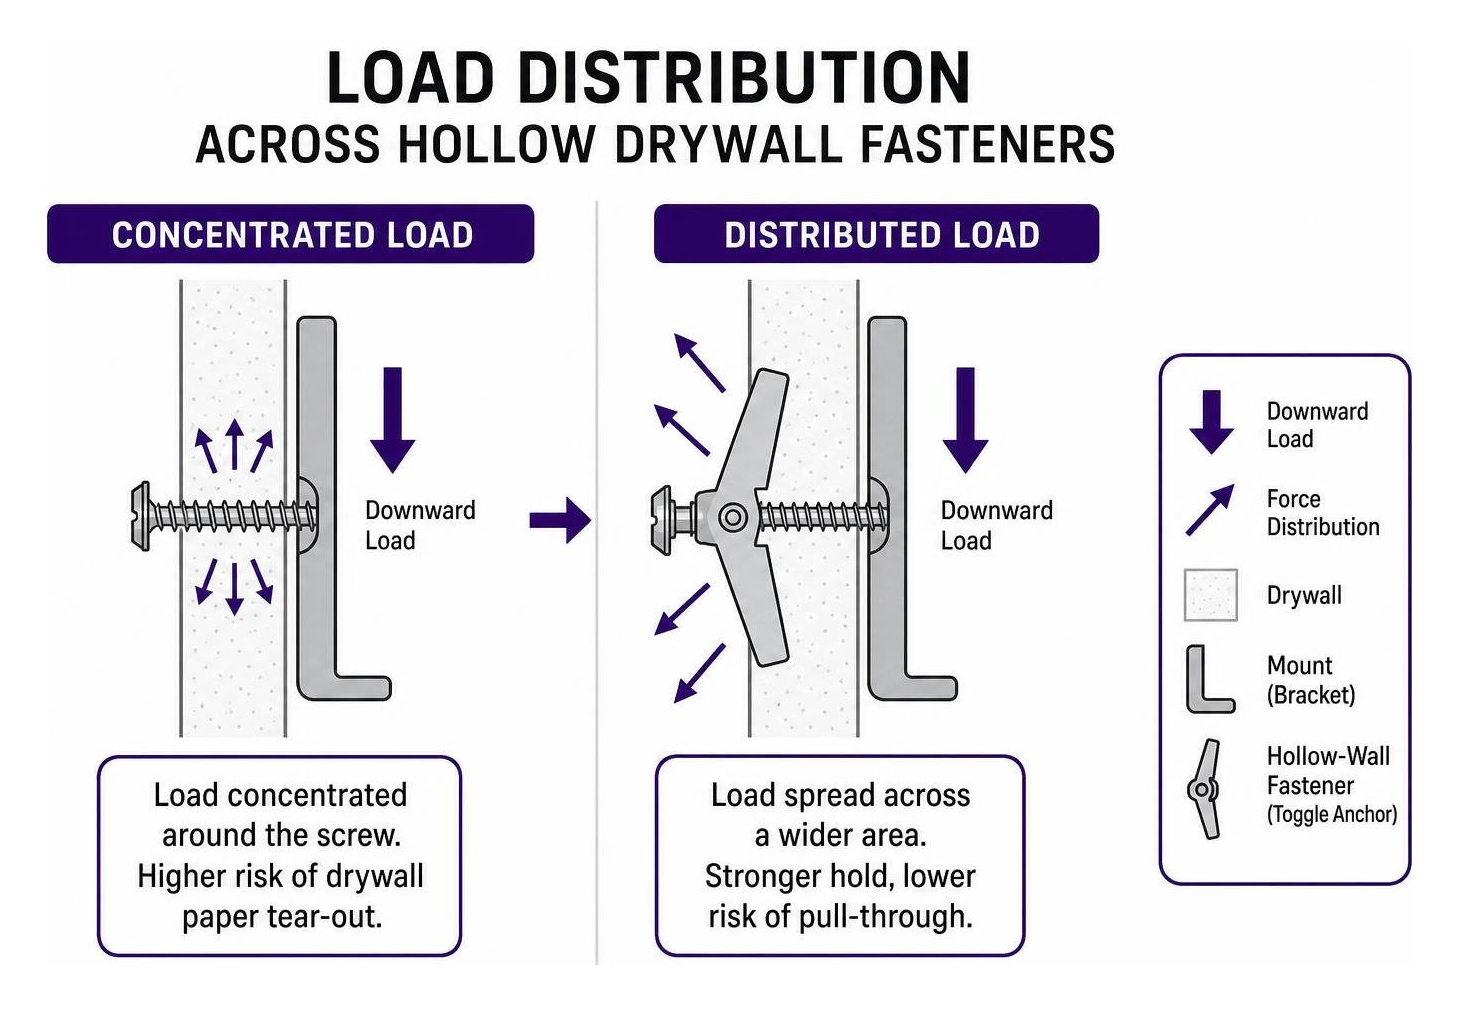
Understanding Shear vs. Pull-Out Forces
When mounting hardware flush against a vertical partition, two primary mechanical forces act on the drywall substrate:
- Shear Load (Downward Force): This is the direct downward gravitational pull exerted parallel to the wall surface. Gypsum boards exhibit substantial resistance to vertical shear when paired with broad-flange anchors.
- Tensile Pull-Out Load (Outward Force): This is the horizontal tension acting perpendicular to the wall, trying to yank the anchor straight out through the drywall face.
A standard flat-screen television on a flush, fixed bracket exerts almost pure shear load on the wall assembly. However, moving the screen away from the wall introduces a cantilever effect. The extended distance creates a rotational moment arm (torque = weight × distance).
This mechanical leverage shifts the load dynamically: the top anchors experience extreme outward tensile pull-out forces, while the bottom of the mounting plate drives compressive forces into the lower gypsum core. If the top fasteners fail in tension, the upper paper tears, leading to a catastrophic hinge-point blowout.
Industry standards recommend engineering your mounting hardware array with a 4× safety factor (or at minimum a 1.5× margin above the combined television and bracket weight) to absorb everyday vibrations, cord adjustments, and minor physical contact.
Pre-Installation Planning and Wall Assessment
Before making any holes in the wall, verify the structural integrity and thickness of your sheetrock. Standard residential walls use 1/2-inch panels, whereas commercial partitions and fire-rated assemblies typically use 5/8-inch board. You can measure your wall thickness directly by removing an electrical outlet cover plate and using a small ruler along the exposed drywall edge.
Scan the intended mounting zone using a multi-mode stud finder:
- Check for live AC wiring paths.
- Scan for hidden plumbing lines or copper pipes.
- Verify stud boundaries to ensure you have enough clearance for anchor installation behind the wall cavity.
For heavy assemblies where structural framing is inaccessible, load-distributed Ghostud Drywall Anchors made from 100% recycled plastic in the USA provide broad-flange mechanical anchoring.
| Anchor Model | Hole Saw Diameter | Rated Shear Capacity | Base Wall Substrate | Package Quantities |
|---|---|---|---|---|
| GHOSTUD GS1 | 1-inch | Up to 250 lb shear | 1/2-in or 5/8-in sound drywall | 2-packs and 20-packs |
| GHOSTUD GS2 | 2-inch | Up to 1,000 lb shear | 1/2-in or 5/8-in sound drywall | 2-packs and 20-packs |
Note: Published ratings reflect downward shear capacity in sound drywall. They do not represent tensile pull-out limits for cantilevered or dynamic articulating loads.
Substrate Limitations: GHOSTUD anchors are engineered strictly for drywall. They are not suitable for plaster and lath, brick, masonry, solid concrete, stucco, tile over backer board, or hollow metal studs. If your home features historic plaster-and-lath construction, stop: hollow-wall drywall anchors will crack the underlying wooden laths and crumble the historic plaster matrix. For masonry or concrete, shift your installation plan to dedicated sleeve anchors or masonry screws driven with a hammer drill.
Pre-Installation Checks Before Installing TV Mount on Drywall Without Studs
- Verify Screen Weight: Locate the manufacturer specifications on the rear label of the TV. Note the net weight without the tabletop stand attached.
- Determine VESA Geometry: Measure the horizontal and vertical distance between the threaded mounting holes on the back of the television according to standard VESA mounting standards (common patterns include 200×200 mm, 400×400 mm, and 600×400 mm).
- Establish Seated Viewing Height: For ergonomic viewing that prevents neck strain, position the vertical center of the screen 42 to 48 inches from the finished floor.
- Mark and Indent Mounting Holes: Hold the wall bracket against the wall at the calculated height, place a bubble level across its top edge, and mark drill points with a pencil. Make a small depression at each mark using a center punch to prevent your drill bit from wandering. For precise clearance parameters, reference our complete Install Guide.
Mount Types: Fixed vs. Tilting vs. Full-Motion
The physical profile of your mounting bracket directly governs the type of force applied to your hollow wall:
- Fixed Low-Profile Mounts: Keep the display 0.5 to 1.5 inches from the wall surface. This directs virtually 100% of the display’s mass straight down as shear force, maximizing anchor performance.
- Low-Profile Tilting Mounts: Allow a 5 to 12-degree downward screen angle. As long as the pivot point stays close to the wall face, tilting brackets introduce minimal pull-out force and remain safe for sound hollow drywall.
- Full-Motion Articulating Mounts: Extend the display on cantilevered arms 12 to 24 inches outward. A 50 lb television extended 18 inches generates substantial rotational pull-out force against the upper fasteners. Over time, recurring dynamic movements cause micro-fracturing in the drywall paper core, resulting in anchor pull-through. Do not use full-motion articulating mounts on hollow drywall without direct wood stud attachment.
How to Complete a Studless TV Mount Installation
Step-by-Step Process for Installing TV Mount on Drywall Without Studs
- Cut Clean Pilot Openings: Chuck the specified hole saw (1-inch for GS1, 2-inch for GS2) into your drill. Cut perpendicular holes through the drywall at your marked positions. Vacuum gypsum dust from inside the cavity.
- Inspect the Drywall Core: Examine the cutout hole edges. The gypsum core must be dry, dense, and firmly adhered to both face papers. If the core crumbles or shows evidence of past water leaks, relocate your installation.
- Seat the Load-Distributing Anchors: Insert the anchor assembly into the opening until the exterior mounting flange sits flat and flush against the front wall face.
- Align the Wall Plate: Position the steel TV mount bracket over the anchor center holes.
- Fasten Machine Bolts in a Cross Pattern: Thread the machine bolts through the wall plate into the anchors. Tighten in an alternating sequence (top-left, bottom-right, top-right, bottom-left). Tighten until the bracket is firmly seated against the wall. Do not over-torque, as crushing the drywall paper core degrades shear resistance.
- Perform a 30-Second Load Test: Before attaching the television, grip the secured wall bracket with both hands. Apply firm downward, outward, and rotational hand pressure for 30 seconds. If there is creaking, deflection, or loose play, stop immediately and inspect the substrate.
- Hang the Display: Attach the vertical VESA brackets to the rear of your television using the correct M6 or M8 screws and spacers. With a helper, lift the television onto the wall plate, center it, and lock the safety latches.
When to Use Structural Wood Backing Panels
When mounting screens over 75 inches (weighing 80 to 100+ lbs) or dealing with off-center stud layouts, bridging the wall with an external structural backer board offers substantial strength.
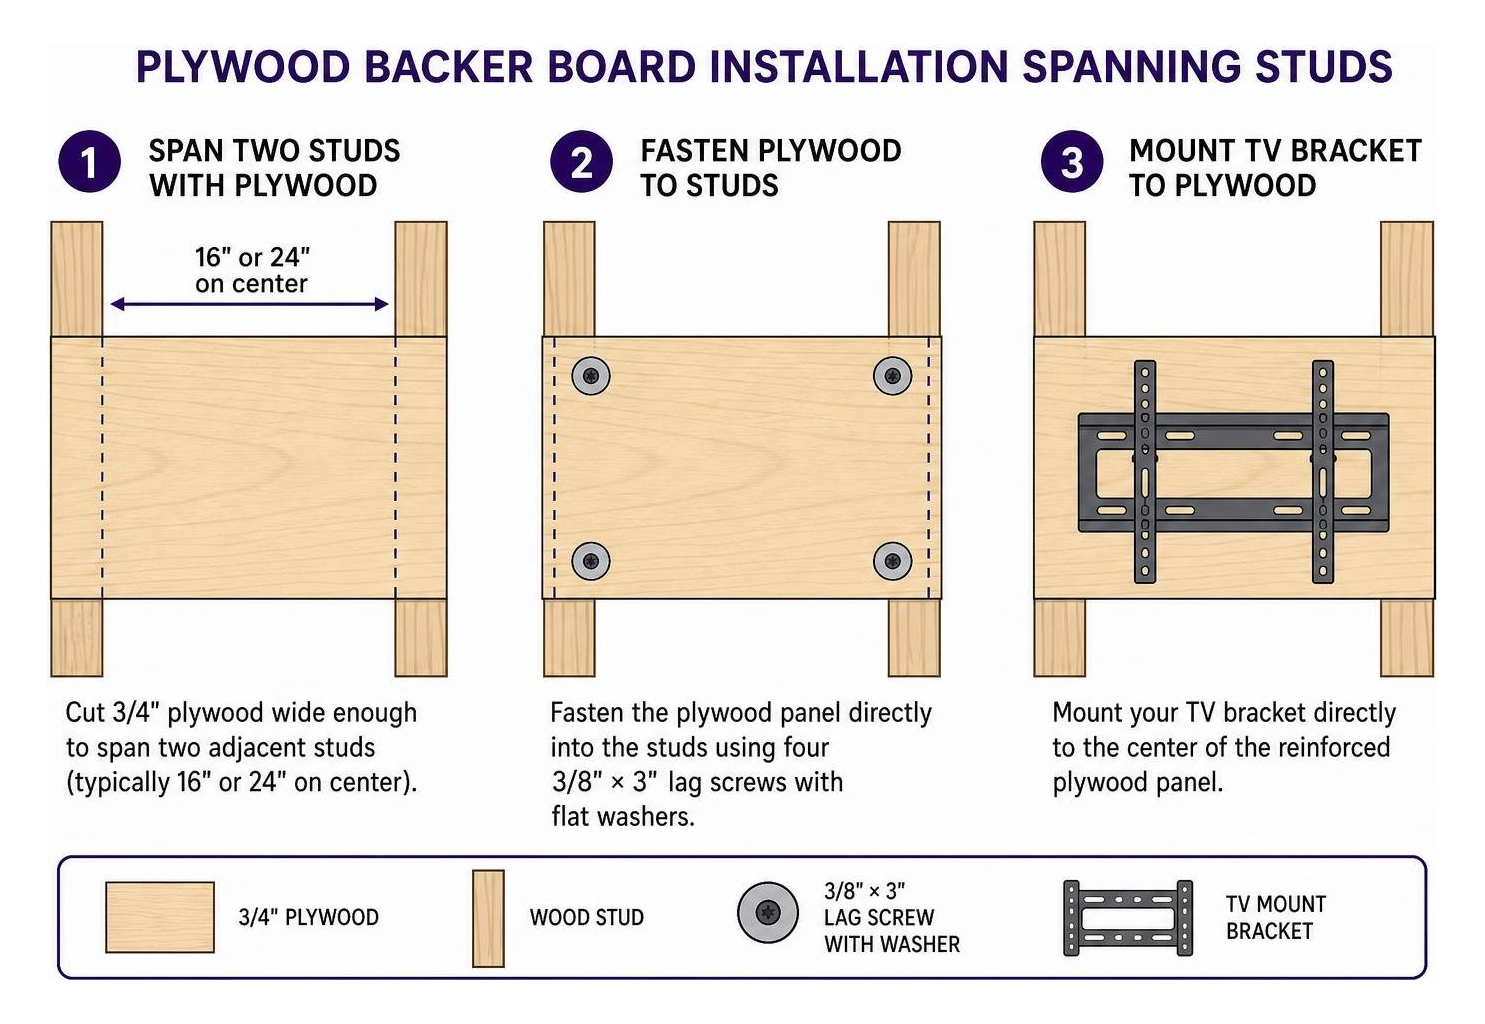
- Cut a sheet of 3/4-inch furniture-grade plywood wide enough to span two adjacent wood studs (typically 16 or 24 inches on center).
- Fasten the plywood panel directly into the studs using four 3/8-inch × 3-inch lag screws paired with flat washers.
- Mount your TV bracket directly to the center of the reinforced plywood panel.
This hybrid method transfers all rotational leverage directly to the building framing, similar to the techniques covered in how to anchor a shelf without studs fast by using toggle bolts.
Frequently Asked Questions About Mounting a TV Without Studs
For additional hardware details, load specifications, and installation tips, check our comprehensive FAQ page.
Can you safely mount a 65-inch TV on drywall without studs?
Yes, provided the screen is installed on a fixed or low-profile tilt bracket using high-capacity anchors installed in sound 1/2-inch or 5/8-inch drywall. Modern 65-inch televisions generally weigh between 40 and 60 lbs. When mounted flat against the wall, this weight translates almost entirely into downward shear load, which is safely handled by an array of heavy-duty mechanical fasteners. Always verify that your combined TV and mount weight remains well below your anchor system’s rated working load.
Can I use a full-motion articulating mount on hollow drywall?
No. An articulating arm creates a long mechanical lever. When extended 14 to 20 inches from the wall, the dynamic cantilever load dramatically increases the outward tensile pull on the top anchors. Drywall has poor resistance to tensile pull-out forces. Repeatedly extending, swiveling, or tilting the arm causes the gypsum core to fatigue and degrade, eventually pulling the anchors straight through the front paper facing. Articulating mounts should always be anchored directly into wood studs or structural backer boards.
What is the maximum weight drywall can hold without wood studs?
Drywall load limits depend on board thickness, fastener design, and load direction. Standard 1/2-inch sheetrock can support heavy loads in downward shear when paired with broad-flange structural fasteners. For example, our GHOSTUD GS1 anchor provides up to 250 lb of shear resistance, while the GS2 provides up to 1,000 lb of shear resistance in sound 1/2-in or 5/8-in drywall. However, drywall has minimal tensile pull-out strength; unanchored screws pull out at just 5 to 10 lbs of tension.
Conclusion

Installing a television mount on drywall without studs is an effective, practical solution when room layout or framing spacing prevents direct stud attachment. The key to long-term stability lies in understanding wall mechanics: choose a low-profile fixed or tilting bracket to keep forces purely in downward shear, inspect your drywall core for sound structural integrity, and use mechanical fasteners rated with an adequate safety margin.
When studs are missing and you need a high-capacity mounting base on 1/2-inch or 5/8-inch drywall, GHOSTUD anchors provide patented, USA-manufactured load distribution designed for permanent strength. For more step-by-step techniques and hardware breakdowns, explore our complete guide to mounting a TV without studs. Match your hardware to your wall type, follow verified load limits, and set up your entertainment system with total confidence.