
Mount Heavy Shelves With the Right Wall Support
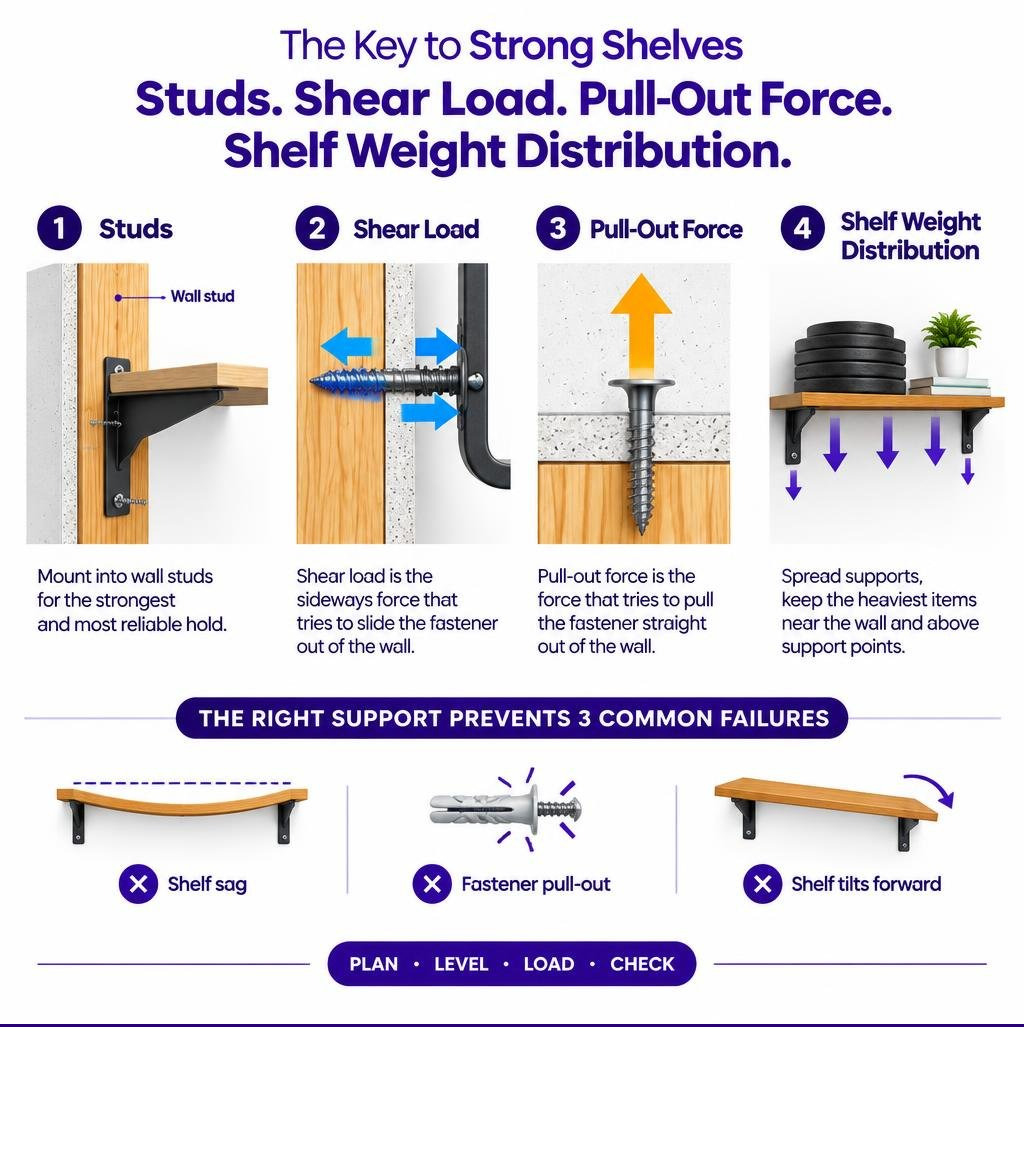
For the safest result, mount brackets or a French cleat into correctly located wall studs. Use a level, spread supports across the shelf length, and place the heaviest items near the wall and above support points. If studs are unavailable, match the anchor to the total static load, shelf depth, and drywall thickness – never assume an anchor’s shear rating equals pull-out resistance.
For drywall that is 1/2 in or 5/8 in thick, a high-capacity drywall anchor rated up to 250 lb can handle light shelving, while a model rated up to 1,000 lb in shear can handle shelving and other heavy static loads. These are drywall-only products, not substitutes for accessible studs, and they are not for plaster, lath, brick, concrete, masonry, tile over backer board, stucco, or metal studs.
A strong installation prevents three common failures: shelf sag, fastener pull-out, and a shelf that tilts forward under load. Plan the support system before drilling, then check the shelf for level again after you add weight.
This guide on how to mount heavy shelves covers choosing a mounting method that fits your wall, load, and shelf design. For more background, see our complete shelf mounting guide.
Helpful mounting resources:
- best wall anchor for heavy shelf
- how to anchor a shelf without studs
- how to mount a floating shelf on drywall
The Physics of Shelf Loading: Shear, Torque, and Deflection
Mounting a heavy shelf requires managing three physical forces: shear stress, pull-out force (rotational torque), and horizontal span deflection.
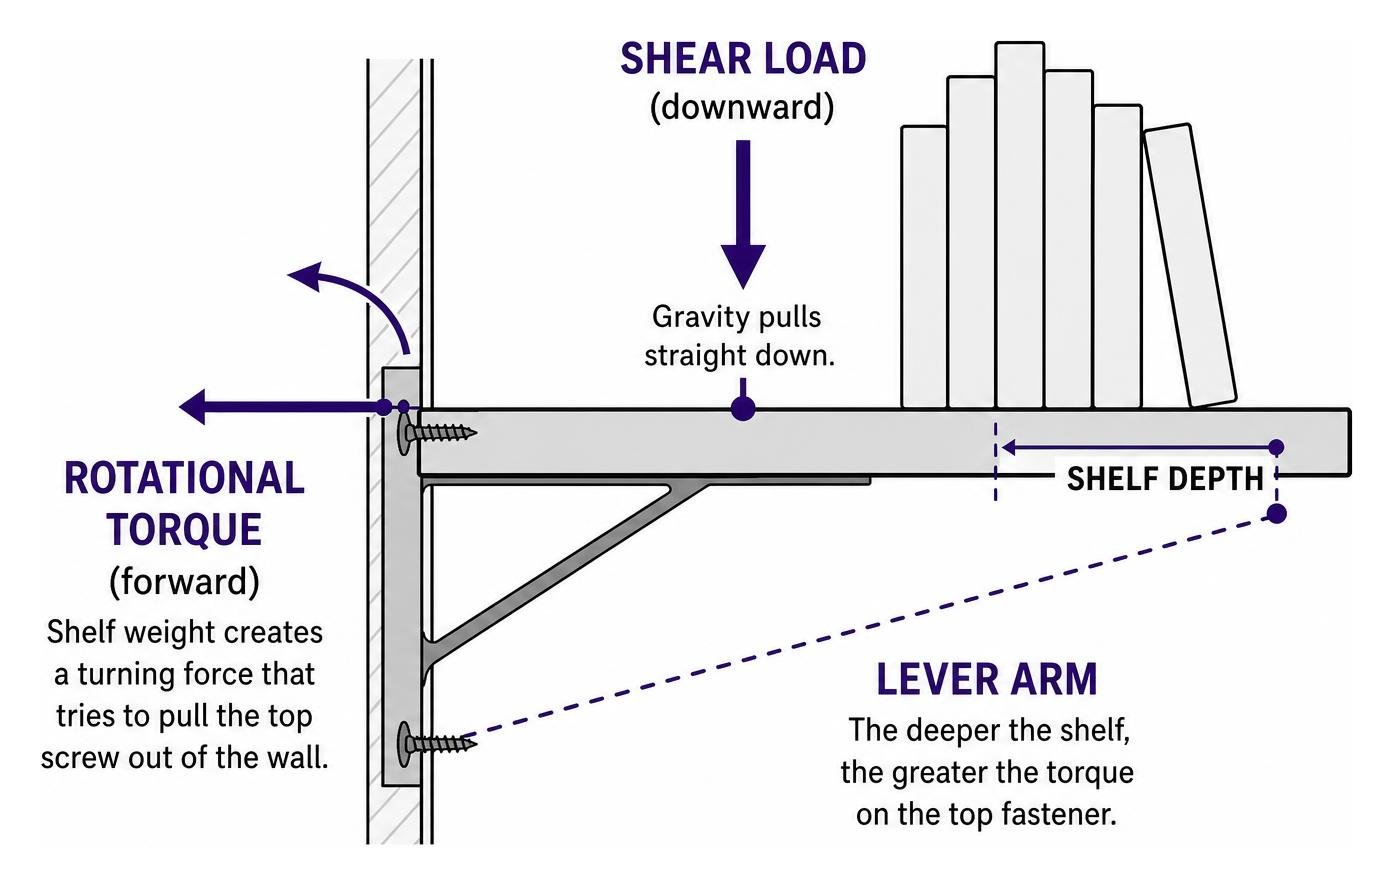
Shear stress is the straight downward load exerted by gravity. The fasteners transfer this vertical weight into the studs or the drywall core. Pull-out force occurs because a shelf acts as a lever arm. When you place a row of books on a 10-inch-deep shelf, gravity pulls downward on those items, creating a rotational moment around the bottom edge of the bracket. This rotation tries to pry the top screw straight out of the wall.
The deeper the shelf, the greater the rotational torque on the upper fastener. For instance, doubling shelf depth from 6 inches to 12 inches doubles the pull-out leverage exerted against the top fastener for the exact same object weight.
Calculating Weight Capacity and Deflection Limits
Shelf sag occurs when the material exceeds its structural bending stiffness under load. In woodworking and structural calculations, stiffness depends on the wood species’ Modulus of Elasticity (MOE) and the thickness of the board. Sag resistance scales with the cube of the board’s thickness. A 1-1/2-inch-thick shelf is eight times stiffer than a 3/4-inch shelf of the exact same wood species.
Calculate total load by combining dead load (the weight of the shelf plank, brackets, and hardware) and live load (the books, dishes, or equipment placed on top). Always add a conservative 20% safety margin. If your shelf must support 80 lb of books, design the structure to handle 100 lb.
Limit total deflection to span/360 (no more than 0.1 inches of sag across a 36-inch span) to protect joinery and wall anchors. Review our guide on how to secure a heavy shelf without pull out failure to match fastener spacing to high bending forces.
Step-by-Step Guide for Maximum Stability
Follow these clear, step-by-step instructions to achieve maximum stability and zero tilt when mounting heavy shelving.
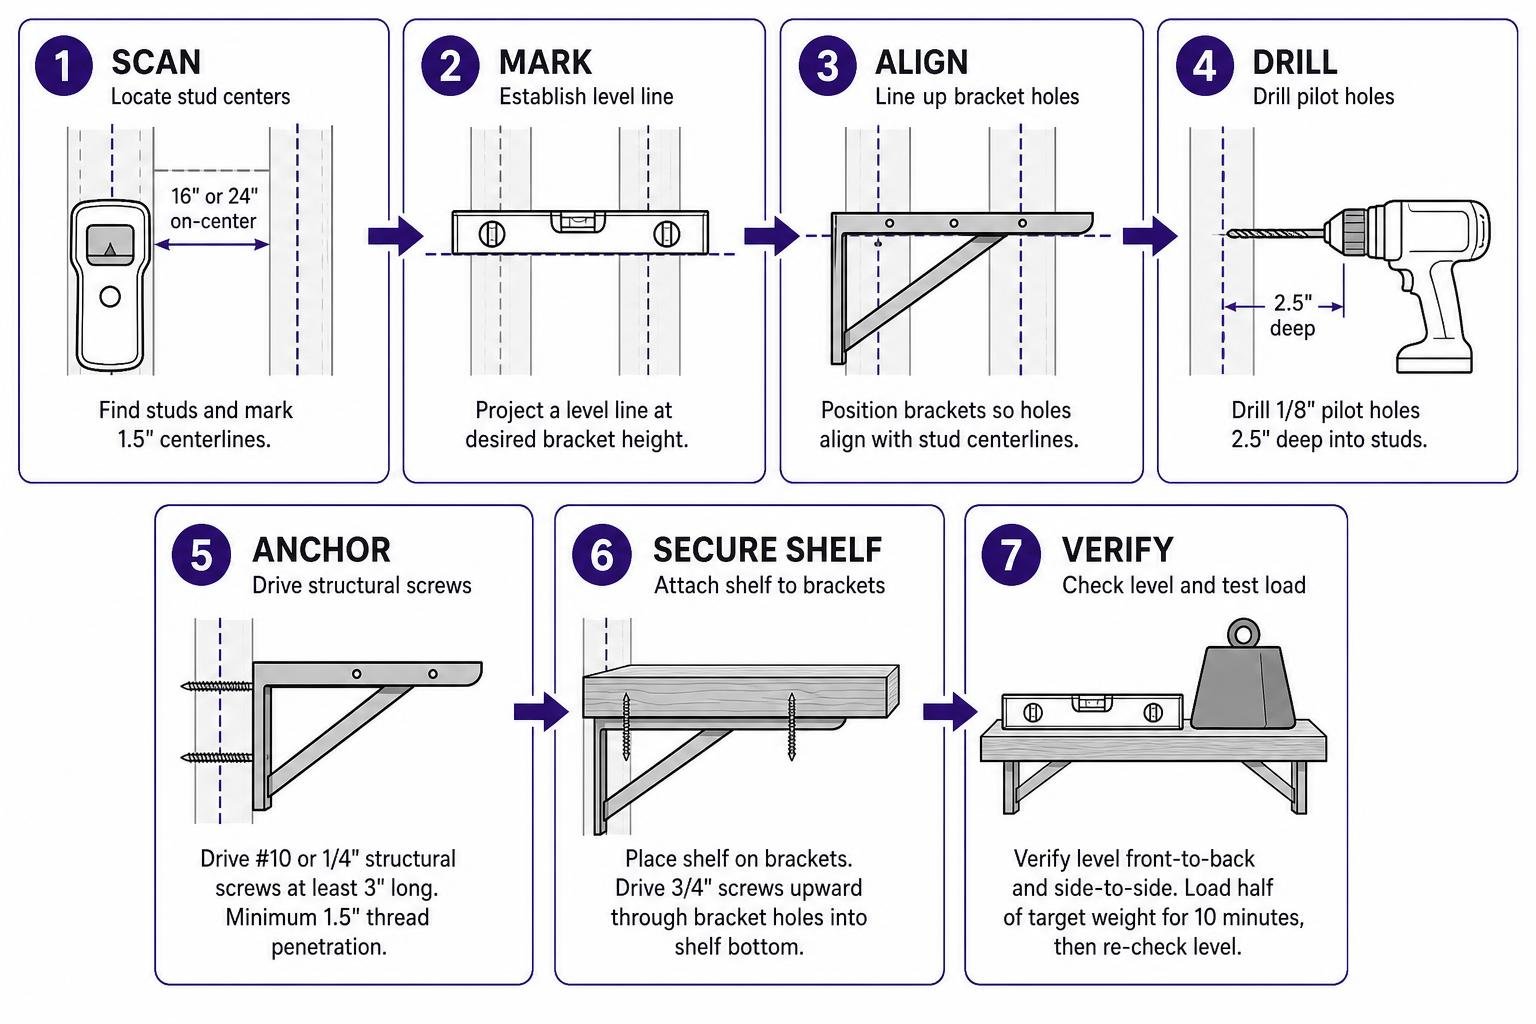
- Locate and map stud centers. Run an electronic stud finder across the target wall. Mark the edges of each stud on blue painter’s tape, then find the exact 1.5-inch stud centerline.
- Project a reference level line. Set a 24-inch spirit level or self-leveling laser level across the wall at your desired bracket height. Mark the level line directly on the painter’s tape.
- Align bracket mounting holes. Hold your shelf brackets or mounting cleat against the wall along the level line. Line up the primary mounting holes over the stud centerlines.
- Drill pilot holes into the studs. Chuck an 1/8-inch drill bit into your drill. Drill 2.5 inches deep into the center of each marked wood stud to prevent splitting the framing lumber.
- Drive structural wood screws. Secure the brackets using #10 or 1/4-inch structural wood screws at least 3 inches long. Drive them flush using a drill/driver, ensuring minimum 1.5-inch thread penetration into solid wood.
- Set and secure the shelf plank. Place the shelf onto the supports. Drive 3/4-inch wood screws upward through the bracket under-mount holes into the bottom of the shelf.
- Verify level and test the load. Set your level front-to-back and side-to-side. Place half of your target load on the shelf for 10 minutes, then re-check the level.
For a deeper look into alignment, review the easiest way to fasten shelves to wall surfaces using proper layout methods.
Locating and Fastening into Wall Studs
Residential wall framing in the United States uses vertical wood studs spaced 16 inches or 24 inches on-center behind drywall. Finding these studs is critical for heavy shelves because standard wood framing provides 300 to 600 lb of shear and withdrawal capacity per structural lag screw.
Locate studs with an electronic deep-scan stud finder. Verify the finding by tapping the wall with your knuckle; a hollow thud indicates an open stud bay, while a solid, sharp sound indicates a framing member. You can also slide a strong neodymium magnet over the wall to locate the drywall screws driven into the studs during construction.
Always drive fasteners into the center of the 1.5-inch stud face. If your screw catches only the outer 1/8-inch edge of the stud, the wood grain can split under load, causing sudden withdrawal. For large architectural spans, consult guides like how to support heavy fixtures to ensure your framing connections meet basic structural principles.
Leveling and Securing Structural Shelf Supports
Heavy shelving systems rely on three primary structural supports:
- L-Brackets with Gussets: Heavy-duty steel brackets with diagonal bracing handle substantial downward shear and resist bending moments.
- French Cleats: A two-part interlocking system where one 45-degree cleat mounts to the wall studs and the matching cleat mounts to the shelf back. A French cleat distributes weight continuously across multiple studs.
- Concealed Rod Brackets: Solid steel rods welded to a heavy backer plate that mounts to studs, sliding inside deep bores drilled into the shelf core.
Follow systematic leveling methods like how to install floating shelves correctly in 5 steps to guarantee your backer plates mount dead-level before you slide the wood plank home.
Selecting the Right Mounting Hardware by Load Capacity
Never rely on the cheap plastic expansion plugs supplied in retail shelf boxes for heavy loads. Evaluate your shelf’s total weight and choose fasteners matched to the wall substrate. For comprehensive comparisons, refer to how to select the right drywall anchor for your load requirements.
Essential Hardware Options by Weight Class
- Under 15 lb: Standard plastic wall anchors or self-drilling drywall anchors work well for lightweight frames or small display shelves.
- 15 lb to 50 lb: Steel toggle bolts and channel toggles bridge hollow drywall spans by clamping a steel channel behind the drywall board. Under cyclic loading or forward leverage, the steel channel can crush the gypsum core, widening the hole over time. Learn more about their operation in our overview on how to anchor a shelf without studs fast by using toggle bolts.
- 50 lb to 150+ lb: Direct attachment into wood studs using 3-inch #10 structural wood screws or 1/4-inch lag screws is the primary recommendation. When studs are inaccessible, choose high-capacity distributed anchors.
High-Capacity Drywall Anchoring for Stud-Free Zones
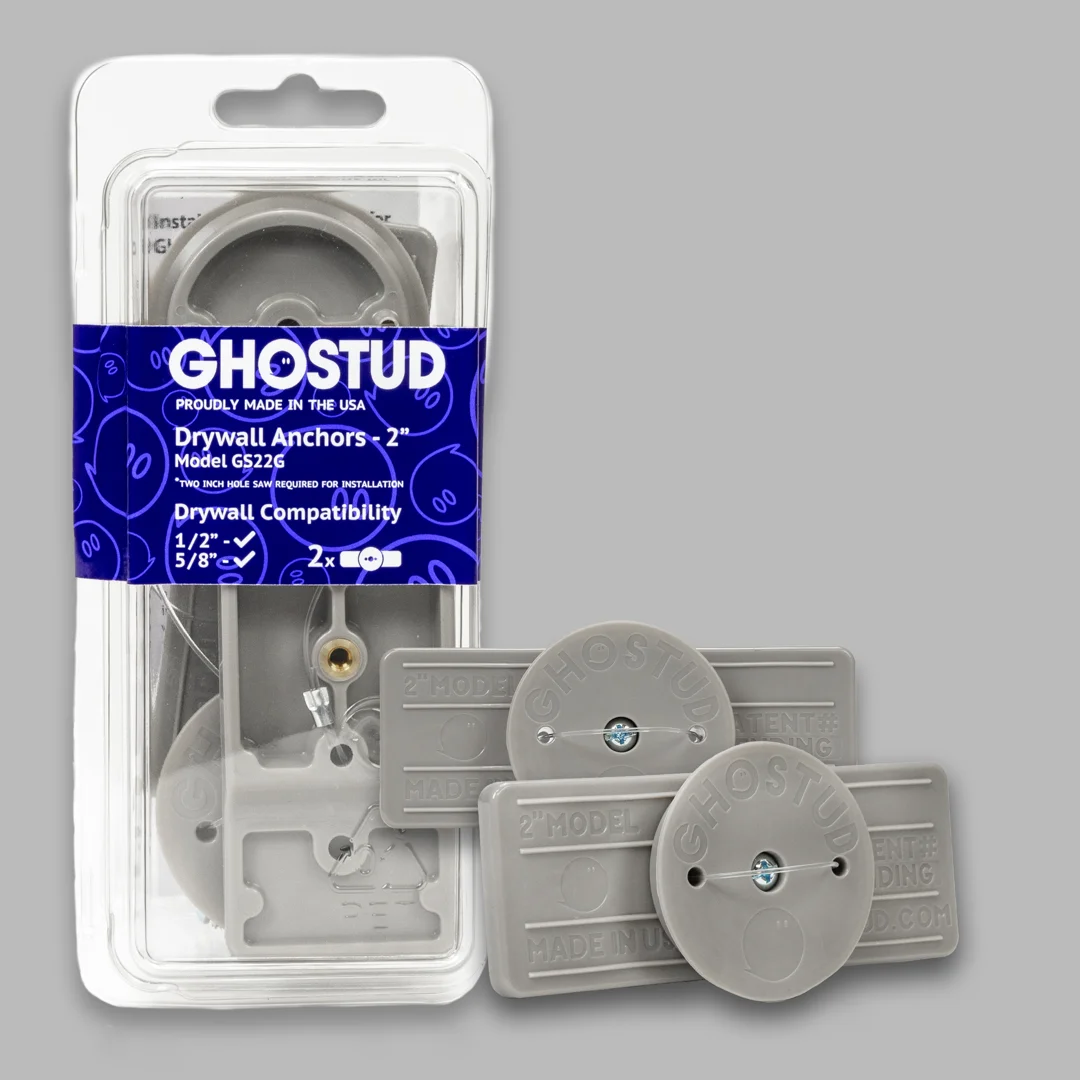
When shelf positioning does not line up with wall studs, standard drywall fasteners can fail through paper tear-out and gypsum core fracture. For hollow drywall installations, GHOSTUD manufactures high-capacity drywall anchors made in the USA from 100% recycled plastic.
- GHOSTUD GS1: Installs using a 1-inch hole saw. Rated up to 250 lb for 1/2 in or 5/8 in drywall. Designed for dynamic fixtures like towel bars, curtain rods, toilet paper holders, and light shelving.
- GHOSTUD GS2: Installs using a 2-inch hole saw. Rated up to 1,000 lb shear in 1/2 in or 5/8 in drywall. Designed for heavy static loads, wall cabinets, mirrors, and shelving.
Both models install by cutting a clean hole with a standard hole saw, inserting the load-spreading anchor body, and securing your hardware into its solid mounting core. The 1,000 lb rating on the GS2 is a shear rating; it measures resistance against straight downward gravitational pull. Because cantilevered shelves exert forward pull-out force, always use conservative load limits and keep heavy shelf depths reasonable.
Trade-offs to consider: GHOSTUD anchors require cutting a 1-inch or 2-inch hole in your wall, require a hole saw, carry a higher unit cost than commodity hardware, and represent a permanent mounting solution. Purchase GS1 and GS2 units in 2-packs and 20-packs at ghostud.com.
If you are setting up floating ledges without framing access, review how to mount a floating shelf on drywall 3 methods that guarantee results for safe installation practices.
Surface-Specific Limitations and Edge Cases
Every wall substrate responds differently to shear and pull-out stress:
- Drywall (1/2-inch and 5/8-inch): Gypsum sandwiched between paper lacks structural grain. Never exceed rated limits, and prioritize framing lumber for heavy loads.
- Plaster and Lath: Old plaster consists of brittle mortar over thin wooden lath strips. Plaster crumbles under vibration and rotary hole saws. GHOSTUD is not suitable for plaster and lath. Use traditional masonry fasteners into backing brick, or pre-drill small pilot holes through the lath to catch framing studs.
- Solid Concrete, Brick, and Masonry: Solid masonry provides exceptional compressive strength. GHOSTUD is not suitable for concrete, masonry, brick, or stucco. Use a hammer drill with a carbide masonry bit to install steel sleeve anchors, wedge anchors, or hardened masonry screws.
- Metal Studs: Thin 25-gauge commercial metal studs do not hold standard wood screw threads. GHOSTUD is not suitable for metal studs. Use heavy-duty toggle bolts designed for metal framing or install wood backing plates inside the wall cavity.
- Tile Over Backer Board: GHOSTUD is not suitable for tile over backer board. Drill tile using diamond-tipped core bits and anchor directly into solid framing behind the substrate.
Key Mistakes to Avoid When Installing Wall Shelving
- Missing the Stud Center: Screwing into the edge of a stud causes wood breakout and hidden fastener failure under load.
- Ignoring Forward Leverage: Treating an anchor’s vertical shear rating as its pull-out resistance leads to wall failure when using deep shelves.
- Over-Tightening Drywall Screws: Driving fasteners too hard into raw drywall crushes the gypsum core, stripping all holding power.
- Using Brittle Plastic Anchors for Heavy Loads: Conical plastic plugs pull straight out of drywall when loaded with more than 10 to 15 lb.
- Failing to Verify Level Under Load: Setting a shelf level when empty does not guarantee it stays level after loading; always re-test with weight on the shelf.
Frequently Asked Questions About Shelf Mounting
Can you mount heavy shelves into drywall without finding a stud?
Yes, but only within strict limits. If wall studs are inaccessible, use high-capacity anchors rated for your drywall thickness. GHOSTUD GS1 (rated up to 250 lb) and GS2 (rated up to 1,000 lb shear) install in 1/2 in or 5/8 in drywall for static shelving. Keep shelf depths shallow to minimize forward rotational pull-out leverage against the wall paper.
Why do floating shelves sag or tilt forward over time?
Floating shelves tilt forward when downward load creates rotational torque around the lower edge of the bracket. This pull-out force exerts continuous tension on the upper wall fastener. Over time, that tension crushes the internal gypsum core, widens hollow-wall holes, or stretches weak metal brackets.
How thick should a wood shelf be to prevent bowing under heavy loads?
For spans between 30 and 36 inches carrying heavy items like books or canned goods, use shelves at least 1-1/2 inches thick (or laminate two 3/4-inch boards together). Solid hardwoods like white oak or hard maple offer significantly higher stiffness than standard 3/4-inch softwood pine or particleboard.
Conclusion
Mounting heavy shelves safely requires matching your hardware to the wall framing, understanding the rotational leverage of wide shelf spans, and respecting material limits. Always mount into solid wood studs whenever they are accessible. For comprehensive techniques on hanging shelves without framing access, explore our complete guide to floating shelves without studs.
Pick up your stud finder, mark your wall layout on blue tape, and verify your fastener capacities before drilling your first hole.