
Understanding Wall Mechanics: Shear, Tension, and Safe Load Limits
The best way to install drywall anchors is to scan for framing studs first, select an anchor matched to the actual weight of your fixture, drill a perpendicular pilot hole sized to the anchor, and seat the fastener flush without over-torquing the screw. If a stud sits behind your layout mark, skip the anchor and drive a structural wood screw directly into the timber. For hollow cavities, match the anchor class to the load and the drywall thickness before you drill.
Drywall consists of a compressed gypsum chalk core wrapped between paper facing sheets. While it forms solid interior walls, bare gypsum has virtually no structural holding strength for standard screw threads. Drive a bare wood screw directly into 1/2-inch drywall without a stud, and pulling with only a few pounds of force will strip the soft gypsum, tearing a powdery hole.
Every mounted object exerts two distinct physical forces on your fasteners:
- Shear Force (Downward Pull): Gravity pulls the object straight down against the face of the wall. Drywall resists shear relatively well when an anchor spreads that load across a broader surface area.
- Tensile Force (Tension / Direct Pull-Out): The object pulls directly outward, away from the wall plane. Cantilevered fixtures like floating shelves, deep storage brackets, and extending television arms multiply tensile force via leverage.
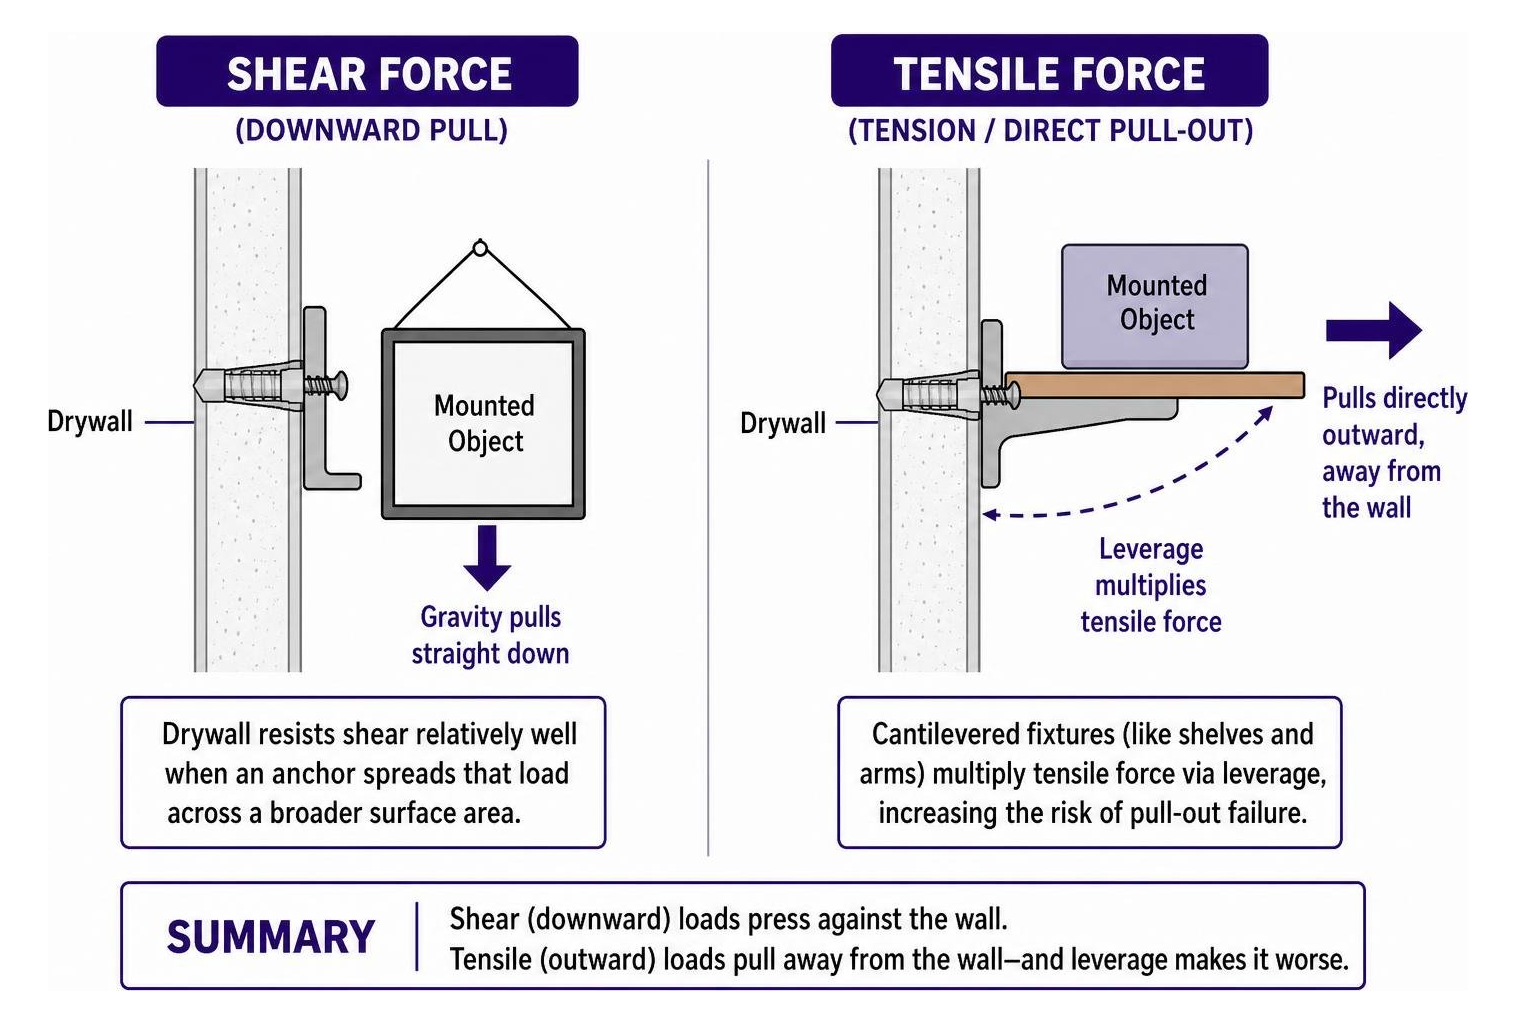
When an anchor fails mechanically, it typically causes core blowout or hole wallowing. Over-tightening or excessive tension crushes the chalky gypsum core, blowing out the back paper face. Similarly, dynamic, repetitive loads—such as pulling a bath towel or adjusting a curtain—gradually wallow out the hole as cyclic vibration breaks down the surrounding gypsum.
To keep mounts stable, follow industry safety standards and design around a Working Load Limit (WLL). Always apply the 25% safety rule: calculate your mounting needs so that the actual weight of the fixture does not exceed one-fourth (25%) of the anchor’s ultimate laboratory load rating. For critical hardware, calculating proper support by load ensures your fasteners handle both static weight and daily physical vibration without degrading the gypsum board.
The Best Way to Install Drywall Anchors: Step-by-Step Instructions
A clean installation prevents crushed wallboard and loose fixtures. Follow these steps to prepare, drill, and mount your hardware correctly.
Preparing the Wall and Avoiding Hidden Hazards
- Scan for framing studs: Run a reliable stud finder across the intended area. Standard residential wood studs sit 16 inches apart on center (occasionally 24 inches). If a stud sits directly behind your layout mark, stop and drive a wood screw directly into the timber.
- Check for hidden utilities: Scan the wall cavity for electrical wiring, plumbing runs, and HVAC ducting. Avoid drilling directly above or below outlets, light switches, and plumbing fixtures.
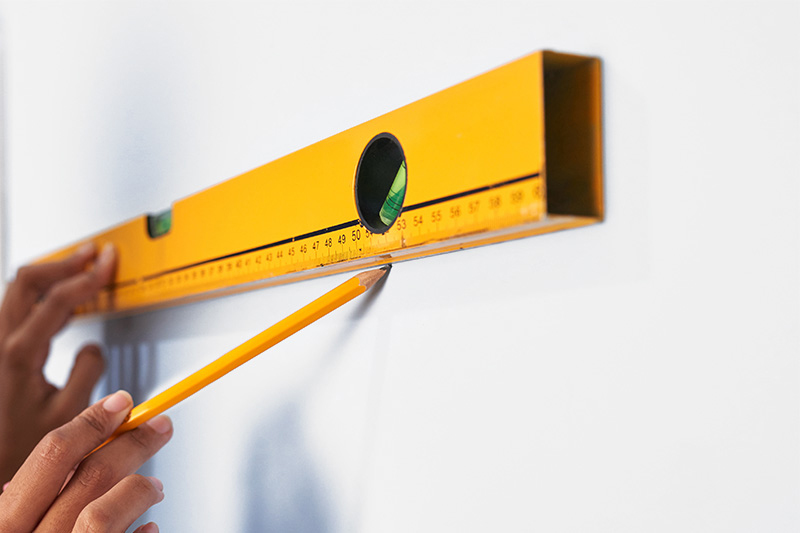
- Mark your layout: Hold your bracket or fixture against the wall. Use a torpedo level to confirm horizontal alignment. Mark the exact center of each mounting hole with a sharp pencil.
- Identify drywall thickness: Standard interior residential walls use 1/2-inch drywall; commercial walls, fire-rated partitions, and ceilings typically use 5/8-inch drywall. Confirm your fastener matches your wallboard depth.
Drilling and Mounting: Best Way to Install Drywall Anchors with a Drill
- Select the correct drill bit: Check the anchor packaging for the specified pilot hole diameter. Match the bit diameter precisely to the anchor shank (excluding the outer expansion wings or threads).
- Drill the pilot hole: Hold the drill perfectly perpendicular (90 degrees) to the wall surface. Run the drill at medium speed with light forward pressure. Stop immediately once the bit breaks through the backside paper.
- Insert the anchor: Push the anchor into the pilot hole. For plastic expansion sleeves and steel hollow-wall molly bolts, tap the collar gently with a rubber mallet until the rim sits dead-flush with the front paper. When setting molly bolts, using a dedicated setting tool collapses the metal legs behind the board without stripping the internal machine threads.
- Set toggle mechanisms: If installing standard spring toggle bolts, thread the bolt through the item’s mounting bracket first. Thread the spring wing onto the bolt end, compress the metal wings flat against the bolt, push the assembly completely through the pilot hole until the wings snap open behind the wall, pull outward on the bracket to hold tension on the wings, and drive the screw snug.
- Fasten the screw: Drive the mounting screw clockwise with a manual screwdriver or a clutch-controlled drill set to low torque. Stop driving as soon as the screw head seats firmly against the bracket. Avoid high-speed power drivers that over-rotate and strip drywall fibers.
Manual Tool Methods: Best Way to Install Drywall Anchors Without a Drill
You can complete clean anchor installations without power tools using budget manual installation techniques:
- Using Self-Drilling Anchors: Position the sharp tip of a zinc or nylon self-drilling anchor directly on your pencil mark. Press firmly inward using a manual #2 Phillips screwdriver. Turn clockwise with steady pressure. The split tip cuts its own entry hole while the wide outer threads pull the body into the gypsum. Stop turning the instant the collar sits flush.
- The Awl or Nail Puncture Method: For small expansion sleeves, press a scratch awl through your layout mark to create a clean starter hole. Alternatively, tap a finish nail partway through the board, pull it out, and use a screwdriver tip to ream the opening out to the exact diameter of the anchor sleeve.
- Seat the anchor: Push the anchor into the prepared opening. Tap the back of your screwdriver handle gently against the anchor head until it sits flush. Drive the mounting screw manually until snug.
Choosing the Right Fastener by Weight and Application
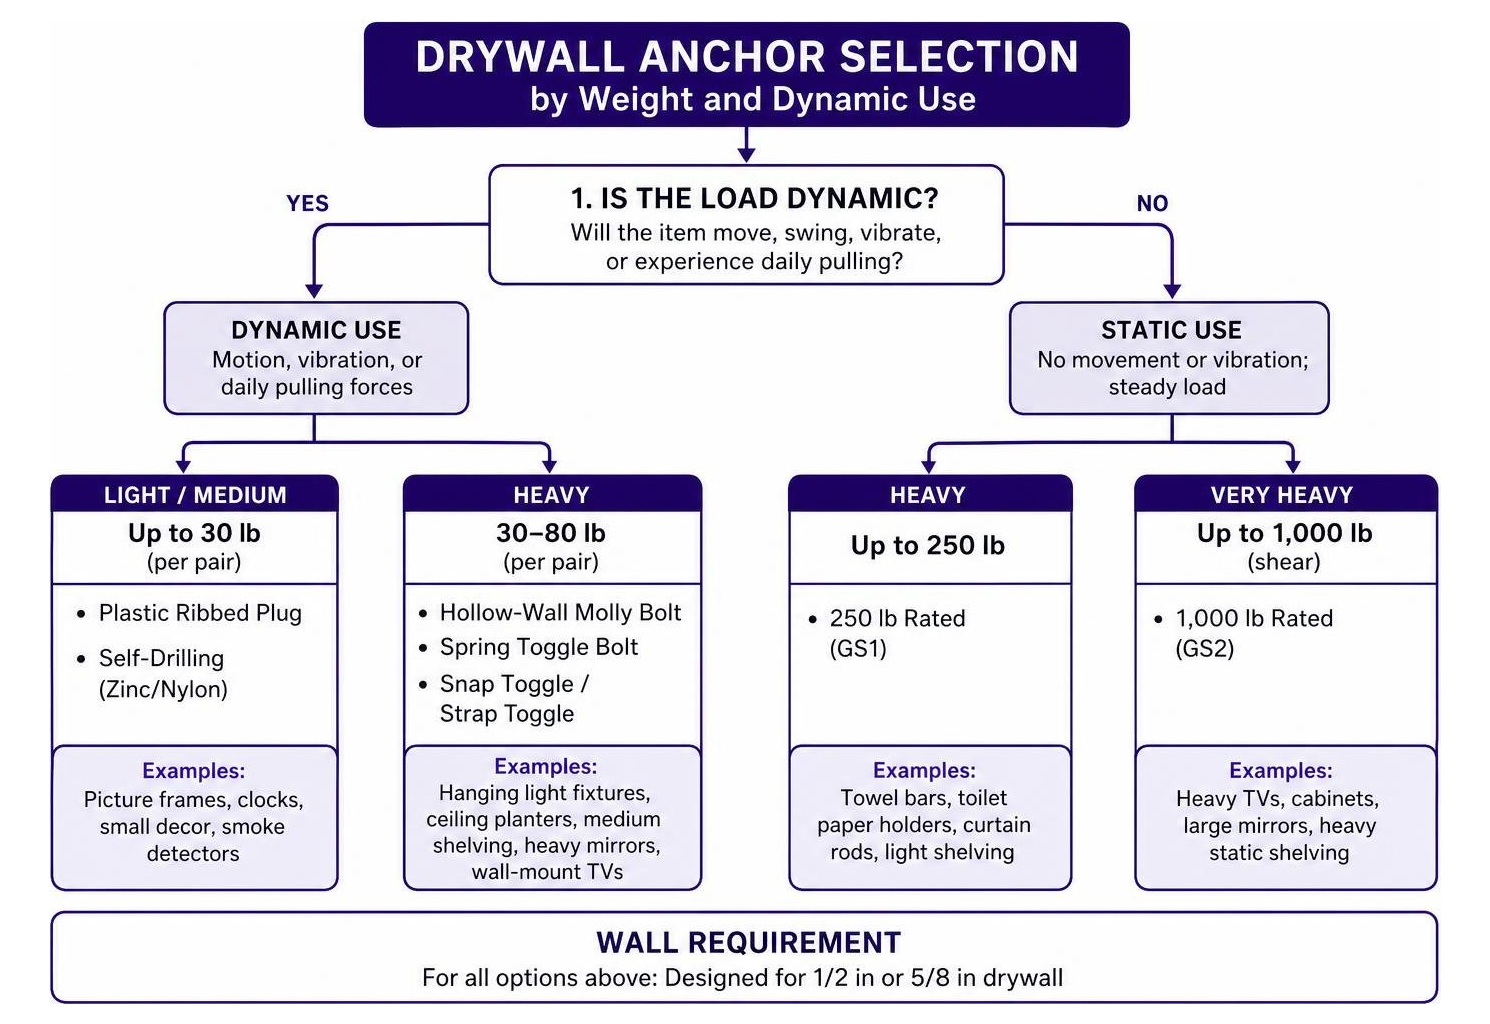
Selecting the correct fastener depends on the physical weight of the item, whether the load is static or moving, and the thickness of the drywall. Review this comprehensive breakdown of anchor designs to match your project to the right mechanism.
| Anchor Type | Drywall Thickness | Safe Working Load (Shear) | Ideal Application |
|---|---|---|---|
| Plastic Ribbed Plug | 1/2 in or 5/8 in | Up to 5–10 lb per pair | Lightweight picture frames, small clocks, smoke detectors |
| Self-Drilling (Zinc/Nylon) | 1/2 in or 5/8 in | Up to 15–30 lb per pair | Medium wall art, light decorative mirrors, clocks |
| Hollow-Wall Molly Bolt | 1/2 in or 5/8 in | Up to 25–40 lb per pair | Thermostats, electrical housings, small utility hooks |
| Spring Toggle Bolt | 1/2 in or 5/8 in | Up to 40–50 lb per pair | Hanging light fixtures, ceiling planters, medium shelving |
| Snap Toggle / Strap Toggle | 1/2 in or 5/8 in | Up to 60–80 lb per pair | Heavy mirrors, flat wall-mount TVs, storage racks |
| GHOSTUD GS1 | 1/2 in or 5/8 in | Rated up to 250 lb | Towel bars, toilet paper holders, curtain rods, light shelving |
| GHOSTUD GS2 | 1/2 in or 5/8 in | Rated up to 1,000 lb shear | Heavy TVs, cabinets, large mirrors, heavy static shelving |
Different designs handle mechanical strain in distinct ways; examine the mechanical holding differences between toggle bolts and self-drilling fasteners when choosing hardware for medium loads.
For high-demand installations where you cannot hit framing studs, we manufacture dedicated, load-distributed drywall anchors in the USA from 100% recycled plastic:
- GHOSTUD GS1: Installs with a 1-inch hole saw into 1/2 in or 5/8 in drywall. It is rated up to 250 lb, engineered specifically to handle the daily dynamic pulling forces that loosen towel bars, toilet paper holders, curtain rods, picture frames, and light shelving.
- GHOSTUD GS2: Installs with a 2-inch hole saw into 1/2 in or 5/8 in drywall. It is rated up to 1,000 lb shear, designed for heavy static loads including television mounts, wall cabinets, large utility shelving, and oversized mirrors.
Both models install using standard hole saws and are available on our website in convenient 2-packs and 20-packs. Note the trade-offs: GHOSTUD anchors require cutting a 1-inch or 2-inch hole and provide an effectively permanent installation. When mounting simple items under 5 pounds, basic plastic expansion plugs are completely sufficient and preserve your wallboard.
Troubleshooting and Wall Material Edge Cases
Common Failure Points and Fixes
- The Anchor Spins in the Hole: If you drill a pilot hole too large or over-torque a self-drilling anchor, the fastener will spin freely without gripping. Do not attempt to drive a screw into a spinning anchor. Pull the fastener out using needle-nose pliers. Upgrade to a larger toggle bolt or strap toggle that spans the wider hole, or patch the cavity with setting-type spackle and relocate your mount at least 2 inches away.
- The Screw Binds Halfway: If a screw stops turning before seating flush, the screw shank may be too long for the wall cavity, or the anchor sleeve may have collapsed prematurely. Back the screw out completely. Confirm the anchor collar is flush against the paper face, verify cavity depth behind the wall, and re-drive the screw manually.
Evaluating Studs vs. Hollow Walls
Before committing to drywall fasteners, compare framing studs versus hollow drywall anchors. Fastening directly into structural wood framing with a standard 2.5-inch or 3-inch wood screw delivers superior load capacity. Always use framing studs whenever they align with your layout.
Alternative Wall Materials
- Plaster and Lath Walls: Plaster is hard, brittle, and backed by horizontal wooden laths. Self-drilling anchors and standard plastic plugs will crack or pulverize old plaster. GHOSTUD anchors are strictly engineered for drywall only and are not suitable for plaster or lath. Use steel toggle bolts or pre-drill clean holes through the lath using carbide masonry bits.
- Masonry, Brick, and Concrete: Fastening into solid brick, poured concrete, or cinder block requires masonry-specific hardware. GHOSTUD is not suitable for concrete, masonry, brick, stucco, tile over backer board, or metal studs. Drill masonry pilot holes with a hammer drill and install zinc expansion shields, concrete sleeve anchors, or self-tapping concrete screws.
Prohibited Applications
Never use hollow-wall anchors—including GHOSTUD products—for grab bars, handrails, safety rails, ADA installations, aging-in-place modifications, fall-prevention equipment, or any application where human body weight rests on the fixture or must be caught during a slip or fall. Safety-critical hardware of this type must be lagged directly into structural solid-wood framing studs or structural backing plates tied into the building framework. Additionally, do not use hollow drywall anchors for anti-tip or child-safety furniture anchoring systems.
Frequently Asked Questions About Drywall Anchors
Can I reuse drywall anchors after removing the screw?
Standard plastic expansion sleeves, self-drilling anchors, and molly bolts cannot be reliably reused. Removing the mounting screw often strips the internal plastic threading or deforms the outer sleeve. Backing out a traditional spring toggle drops the metal wing into the bottom of the wall cavity. Modern strap toggles maintain their threaded channel behind the wall when you remove the bolt, allowing you to re-mount the fixture. For expansion anchors, extract the old sleeve with needle-nose pliers, patch the wall, and set a fresh anchor in sound drywall.
What should I do if a drywall anchor starts spinning freely in the hole?
A spinning anchor indicates stripped gypsum around the pilot hole. Grip the outer rim of the anchor with needle-nose pliers to hold it steady while backing the screw out counterclockwise. Once the screw is out, pull the anchor from the wall. Replace it with a toggle bolt or snap toggle, which anchors against the solid backside of the board rather than relying on radial hole friction. Alternatively, fill the damaged opening with fiberglass mesh and setting-type joint compound, allow it to cure, sand it smooth, and drill a fresh hole in undamaged drywall.
How many anchors do I need to distribute the weight of heavy items?
Load distribution does not scale linearly. Using four 50-pound-rated anchors does not guarantee a safe 200-pound capacity, because minor mounting bracket misalignments cause one or two fasteners to bear the majority of the weight (point loading). For wide fixtures like shelves and cabinetry, space anchors at least 12 to 16 inches apart along the mounting plate. Where vertical height permits, stagger fasteners in an alternating or V-shaped pattern across the bracket to distribute shear and tensile forces evenly across the drywall sheet.
Conclusion
The best way to install drywall anchors comes down to simple preparation: inspect your wall surface, check for hidden hazards, select an anchor matched to your load, and tighten hardware with care. Take time to drill accurate pilot holes and avoid over-torquing screws into soft gypsum cores.
Your immediate next step at the wall is to grab your stud finder and run it across your layout line. If you hit solid framing, drive your structural screws directly into the wood; if your mark falls in an open hollow cavity, measure your fixture weight, select the right anchor class, and follow our complete wall anchor installation guide to complete your project cleanly and securely. For a broader look at anchor selection and load limits, see our drywall anchor guides.