
Understanding Drywall Mechanics and Mounting Forces
Use heavy-duty hollow-wall anchors rated for static shear in 1/2-inch or 5/8-inch drywall paired with a low-profile fixed mount. Keep the bracket close to the wall and spread the load across at least four anchor points. Do not use a full-motion articulating arm on hollow drywall.
Drywall consists of a brittle gypsum core sandwiched between two layers of paper. A standard wood screw driven directly into hollow drywall holds only about 5 to 10 lbs before stripping out. When you mount a TV, the assembly exerts two distinct mechanical forces on the wall: downward static shear and outward tension pull-out force.
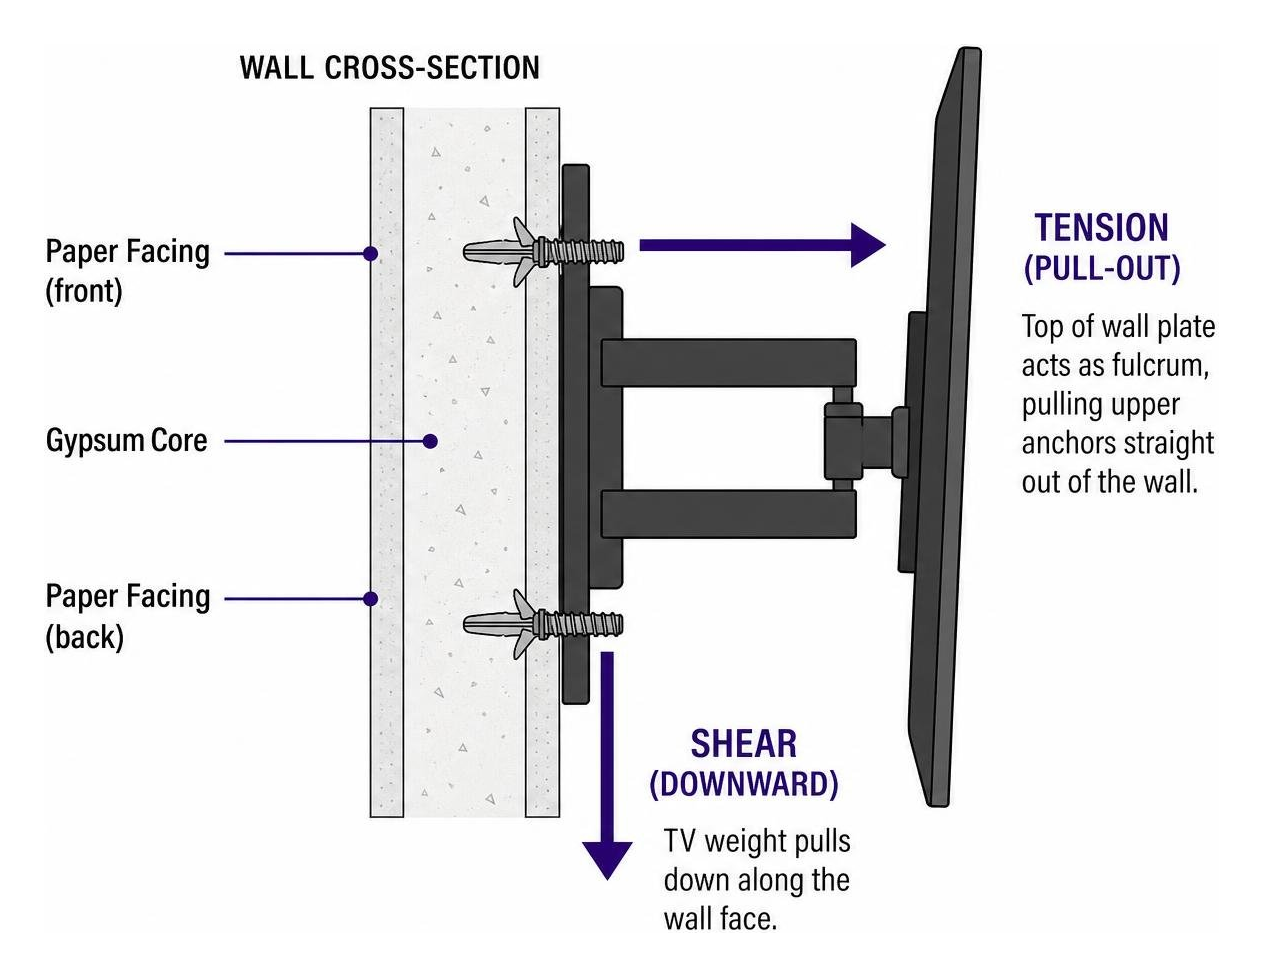
Modern flat-panel TVs weigh between 30 and 80 lbs. As the TV hangs, its mass pulls down along the wall face (shear load). At the same time, the bracket profile creates a cantilever effect. The top edge of the wall plate acts as a fulcrum, pulling the upper anchors straight out of the wall (tension force), while the bottom edge pushes inward against the gypsum core.
Standard 1/2-inch and 5/8-inch drywall boards handle shear force well when the load spreads over a wide surface area. However, point loads cause gypsum crush failure, where the core pulverizes and the fastener pulls straight through the paper facing.
When evaluating hollow-wall hardware, review our shear ratings explained to understand how capacity figures apply to downward vertical forces rather than pure tension pull-out.
Fixed vs. Full-Motion: Safe Bracket Choices for Hollow Drywall
The bracket style you choose determines the leverage exerted on the drywall.
- Fixed Mounts: Keep the screen parallel to the wall, usually within 1 to 1.5 inches. This setup maximizes downward shear and minimizes outward pull-out tension.
- Tilting Mounts: Introduce a slight downward angle. They increase tension slightly at the top anchors but remain safe when paired with heavy-duty hollow-wall hardware.
- Full-Motion (Articulating) Mounts: Extend the screen 15 to 25 inches away from the wall. This extended arm creates extreme mechanical leverage. When you extend or swivel a 50 lb TV, the dynamic pull-out force on the upper anchors multiplies significantly beyond the static weight of the television.
Do not install full-motion articulating mounts on hollow drywall without studs. For studless drywall installations, use only low-profile fixed or shallow-tilt brackets to keep the center of gravity close to the wall. Understanding how to hang a TV on a wall without studs safely begins with choosing this bracket style.
How to Hang a TV on a Wall Without Studs in 5 Steps
Before starting, gather the required tools:
- Measuring tape and pencil
- Bubble level (or digital torpedo level)
- Electronic wall scanner with live AC detection
- Cordless drill with the appropriate hole saw or drill bits
- Screwdriver or socket set matching your anchor hardware
- TV mounting bracket and hardware kit
If a wood stud is accessible and aligns with your viewing position, fasten directly into the wood framing with lag bolts. Never use hollow-wall anchors as a substitute for an accessible, properly positioned stud. For detailed hardware walkthroughs, follow our install guide.
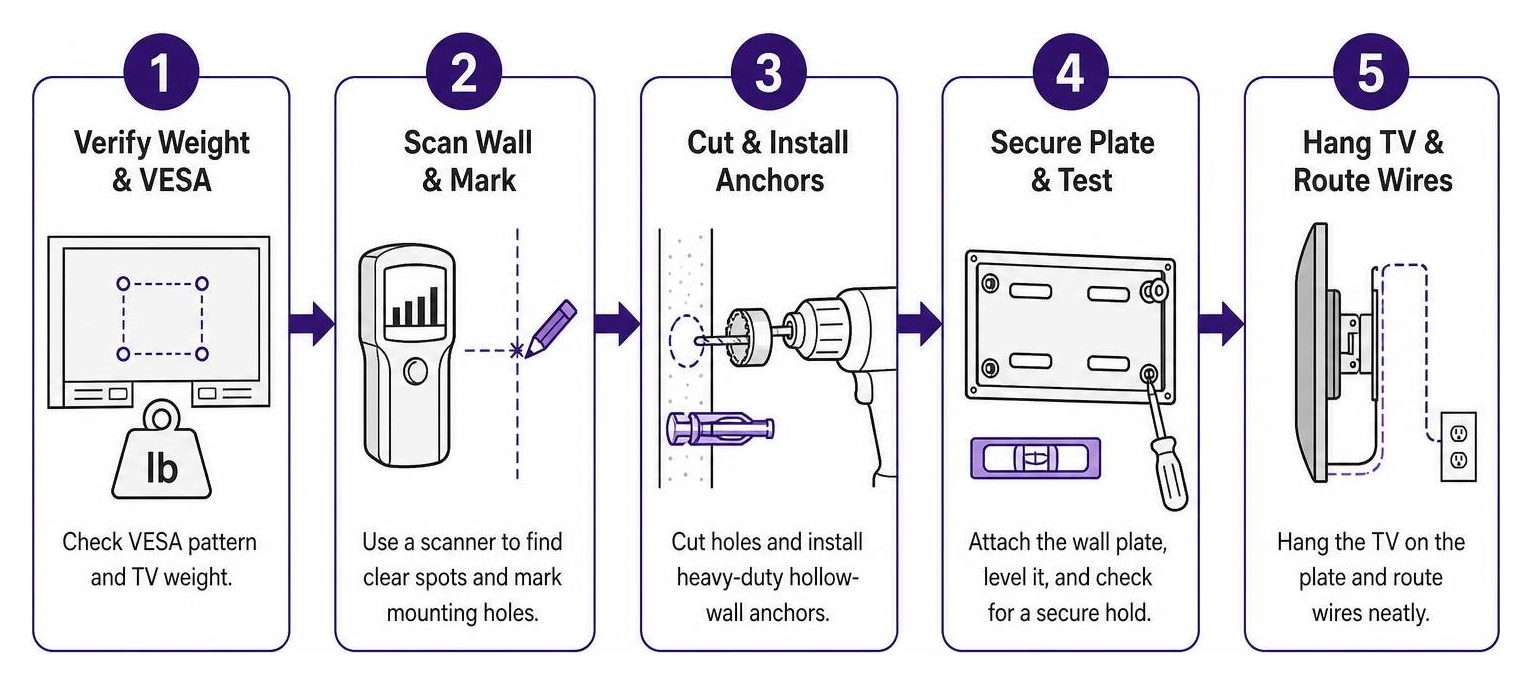
Step 1: Check VESA Pattern and TV Weight
Locate the four threaded mounting holes on the back of your television. Measure the horizontal and vertical distance between them in millimeters to find the VESA pattern (e.g., 200×200, 400×400).
Next, check the manufacturer’s label or manual for the exact weight of the screen. Ensure the bracket’s rating exceeds your TV’s weight. To determine the right hardware specifications, consult our guide on how to select the right drywall anchor for your load.
Step 2: Scan Wall and Mark Bracket Placement
Determine your viewing height. A standard comfortable screen center sits roughly 42 inches from the finished floor for seated viewing.
Run an electronic wall scanner across the target area to locate framing members, plumbing lines, and hidden electrical wires. Hold the wall bracket against the wall at the desired height. Place a bubble level across the top rail, level the bracket, and mark the anchor locations through the mounting slots using a pencil. Space the marks horizontally across the plate to distribute the weight across multiple drywall cavities.
Step 3: Cut Anchor Openings and Seat Hardware
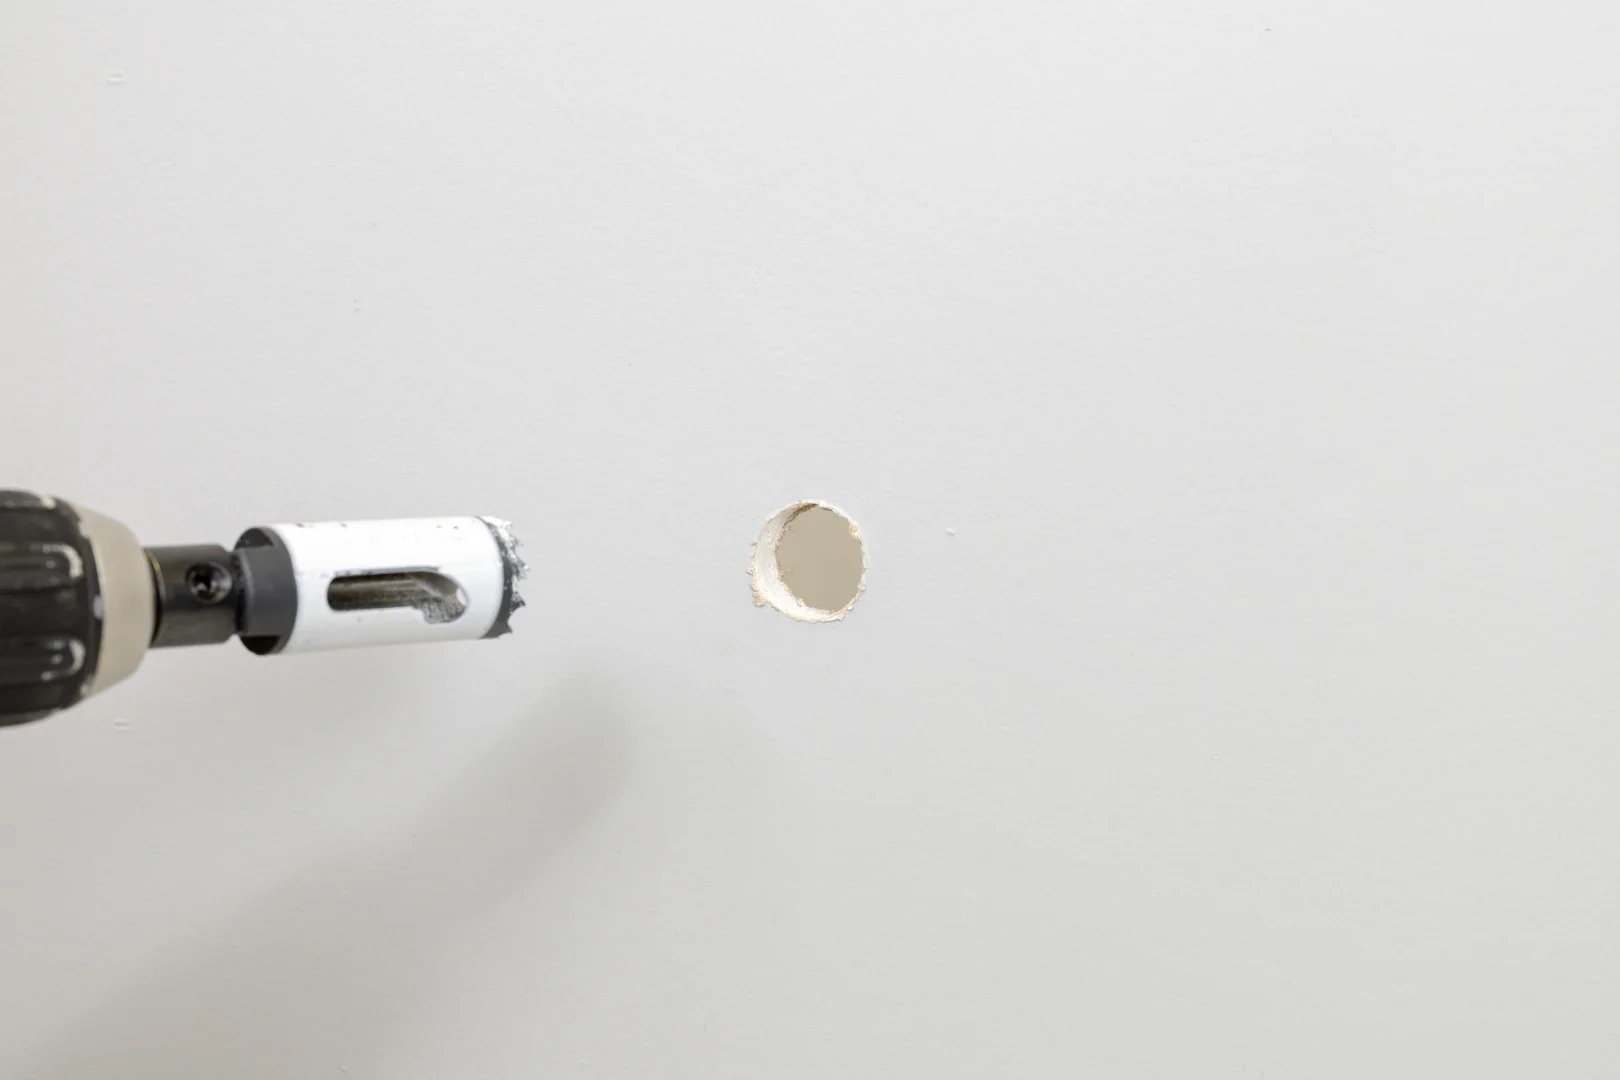
Set your drill to a steady speed. Chuck a 2-inch hole saw into your drill and cut cleanly through the drywall to seat heavy-duty GS2 anchors for heavy static loads.
Clear the drywall dust from inside the cavity. Insert the anchor body into the opening until the mounting flange sits flush against the outer wall paper. Ensure the internal mechanism engages securely against the rear surface of the 1/2-inch or 5/8-inch drywall board.
Step 4: Secure the Wall Plate and Test Load
Align the mounting bracket with the installed anchors. Thread the mounting bolts through the bracket slots and into the anchor receivers. Tighten the hardware in an alternating diagonal pattern to apply even pressure across the backplate. Do not over-torque, which can crush the drywall core.
Before hanging the television, test the wall plate. Grip the bracket with both hands and apply firm, downward, and outward hand pressure for 15 to 20 seconds. Check the surrounding drywall for movement, cracking, or surface deflection. Learn more about professional mounting standards in our guide on how to mount a large TV on drywall the right way.
Step 5: Hang TV and Route Cables
Attach the vertical bracket arms to the VESA holes on the back of the television using the machine screws and spacers provided with your mount.
With two people, lift the television and hook the bracket arms onto the top rail of the secured wall plate. Lower the TV until the lower hooks engage, then tighten the safety locking screws on the bottom of the arms to lock the unit in place. Route power cords and HDMI cables using a paintable surface raceway attached to the wall below the screen.
Best Anchors and Hardware for Studless Mounting
Hollow-wall fasteners work by distributing concentrated force over a wider surface area behind the drywall face. Lightweight commodity fasteners support 5 to 15 lbs and are suitable for small picture frames, but they fail under the static shear and cantilever pull of a mounted television.
Heavy-duty load-distributing anchors cut a clean circular aperture to mechanically engage both the front and back paper faces of the drywall, delivering substantial static shear resistance.
| Fastener Model | Hole Saw Size | Compatible Drywall Thickness | Rated Shear Capacity | Primary Applications |
|---|---|---|---|---|
| GHOSTUD GS1 | 1 in Hole Saw | 1/2 in or 5/8 in | Up to 250 lb shear | Towel bars, curtain rods, light shelving |
| GHOSTUD GS2 | 2 in Hole Saw | 1/2 in or 5/8 in | Up to 1,000 lb shear | Flat-screen TVs, wall cabinets, heavy mirrors |
Mounting something heavy where there’s no stud? GHOSTUD® spreads the load across the drywall with a wide backplate instead of relying on the gypsum core. GS1 holds up to 250 lb shear, GS2 up to 1,000 lb. Made in the USA from recycled structural plastic. Shop GHOSTUD® from $16.99 →
Our high-capacity anchors are manufactured in the USA from 100% recycled material, featuring patented load-distribution technology that provides lifetime strength. Both models install using a standard hole saw and are available in 2-packs and 20-packs in our shop.
GHOSTUD GS1 for Light-to-Medium Loads
The GS1 requires a 1-inch hole saw for installation. It is rated up to 250 lb shear in 1/2-inch or 5/8-inch drywall. We engineered this unit specifically for daily-use hardware that experiences regular pulling and vibration, including towel bars, toilet paper holders, curtain rods, picture frames, and light shelving.
GHOSTUD GS2 for TVs and Heavy Static Loads
The GS2 requires a 2-inch hole saw for installation. It provides up to 1,000 lb shear capacity in 1/2-inch or 5/8-inch drywall. We designed the GS2 to secure heavy static fixtures, including flat-screen TVs, wall cabinets, heavy shelving, and architectural mirrors. For a detailed breakdown of hardware options, read our guide on choosing a TV drywall anchor.
Critical Wall Limitations and Substrate Boundaries

Hollow-wall anchors have strict structural limits. GHOSTUD anchors are engineered for standard 1/2-inch and 5/8-inch gypsum drywall only.
Explicit Substrate Prohibitions:
- Plaster and wood lath
- Solid concrete, poured cement, and concrete masonry units (CMU)
- Solid brick or stone masonry
- Exterior stucco
- Tile installed over cement backer board
- Metal framing studs
If your wall consists of masonry or brick, use dedicated masonry fasteners. For plaster and lath walls, long structural screws driven directly into the underlying wood lath and studs are required. If you discover unexpected 3/4-inch plywood backing behind your drywall (common in commercial builds and high-end condos), fasten your mount directly into the wood using heavy-duty wood screws rather than hollow-wall anchors. The Consumer Product Safety Commission also publishes guidance on securing top-heavy furniture and electronics, which is worth reviewing alongside your mounting plan.
Compare structural framing versus hollow-wall methods in our drywall anchor vs stud support guide. For a broader overview of mounting options, see our guides.
Prohibited Use-Cases: Never use GHOSTUD products for grab bars, handrails, ADA safety rails, fall-prevention equipment, or any application designed to support human body weight. Do not use them for anti-tip furniture straps or child-safety restraint systems.
Rental Considerations: Mounting Without Major Wall Damage
Installing heavy-duty anchors like GHOSTUD GS1 or GS2 requires cutting a 1-inch or 2-inch hole into the wall. This installation is permanent and is not damage-free, temporary, or easily reversible.
If you live in a rental property with strict lease restrictions regarding drywall modifications, position the screen on a stand at the correct viewing height instead of mounting it to the wall.
If your lease allows drywall repairs, patch the mounting holes with a mesh drywall patch, spackle, and matching paint upon moving out.
Frequently Asked Questions About Studless TV Mounting
Can you hang a large TV on drywall without studs?
Yes, provided the total weight of the screen and bracket does not exceed the static shear rating of the installed anchors. For screens 55 inches and larger (which typically weigh 35 to 75 lbs), use at least four heavy-duty load-distributing anchors spread across a wide backplate. Always pair large screens with a fixed or low-profile tilt bracket to prevent excess tension pull-out forces.
Why does a TV mount need mechanical wall support?
Adhesive strips, velcro brackets, and suction cups are designed for flat picture frames under 20 lbs. A TV mount holds the screen out from the wall face, creating continuous cantilever leverage. Over time, temperature fluctuations and humidity degrade adhesives, causing the paint or top paper layer of the drywall to delaminate, dropping the TV. Mechanical fasteners that clamp securely against the drywall core are required.
How do I confirm my drywall can support a TV mount?
Check the thickness and condition of your wallboard. Standard interior partition drywall is 1/2-inch thick, while fire-rated walls are 5/8-inch thick. Inspect the area around your drill points: the drywall core should be firm and chalky white, not crumbly, soft, or water-stained. If the gypsum core shows signs of moisture damage, crumbling, or prior cracking, repair the wall before mounting any hardware.
Conclusion
Hanging a television on drywall without framing studs requires the right mechanical hardware. Assess your TV weight, select a fixed low-profile mount, and install heavy-duty anchors rated for static shear in 1/2-inch or 5/8-inch drywall.
Walk to your wall with an electronic scanner. Confirm your wall substrate, verify that no framing studs intersect your layout, and mark your drill points with a level. For full hardware details and advanced setups, explore our guides on mounting a TV without studs.
Mount it once, mount it right. Compare GS1 and GS2 →