
Drywall Mechanics: Why Direct Screws Fail in Hollow Walls
To set a drywall anchor, mark your location, check for studs, drill a pilot hole perpendicular to the wall, insert the anchor flush, and secure the fixture screw. This process works because drywall consists of a brittle gypsum chalk core sandwiched between two layers of paper facing. Drive a standard wood or drywall screw directly into standard 1/2-inch or 5/8-inch gypsum board without a stud, and the threads immediately crush the chalky core into fine powder.
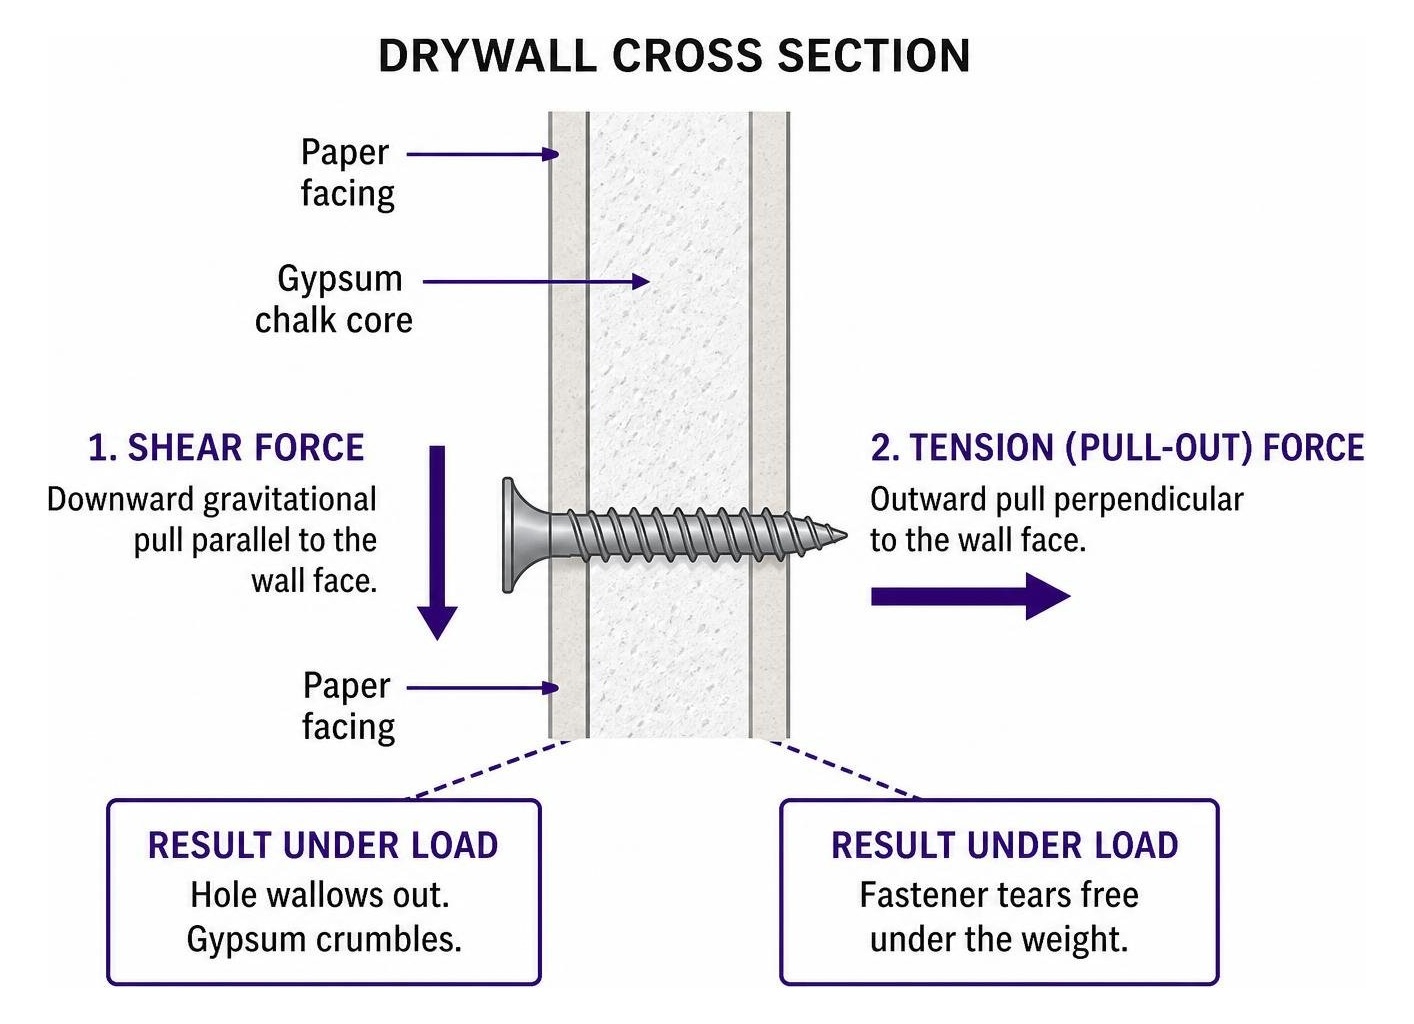
When you hang an object, two primary forces act on the fastener:
- Shear force: The downward gravitational pull parallel to the wall face.
- Tension (pull-out) force: The outward pull perpendicular to the wall face.
A screw alone provides zero clamping force against gypsum. Under minor loads, it experiences progressive failure: the hole wallows out, the gypsum crumbles, and the fastener tears free under the weight.
Drywall anchors solve this by expanding, threading, or clamping behind the wall to distribute stress across a broader surface area. Always apply an industry-standard safety factor: calculate your safe working load at 25 percent (1/4) of the manufacturer’s ultimate load rating. This margin accounts for dynamic movement, vibrations, and variations in drywall age. Before mounting any fixture, explore our drywall anchor guide to match your hardware to the intended weight.
How to Set a Drywall Anchor Step-by-Step
Setting anchors properly requires basic hand tools and controlled technique.
Gather these essentials before starting:
- Safety glasses
- Electronic stud finder
- Cordless drill/driver or variable-speed drill
- High-speed steel drill bits sized to your anchor
- #2 Phillips manual screwdriver
- Rubber mallet
- Torpedo level and pencil
Mastering step-by-step wall anchor installation techniques prevents damaged surfaces and loose hardware. For further reference, check out this How to Use Drywall Anchors: Easy Installation Guide.
Preparing the Wall and Drilling Accurate Pilot Holes
- Scan the wall: Run a stud finder over the target zone. In standard residential framing, wood studs sit 16 inches apart on center. If you locate a stud directly behind your mark, abandon the anchor and drive a wood screw directly into the framing.
- Mark your point: Hold your fixture or mounting bracket in place, level it with a torpedo level, and mark the screw locations with a pencil.
- Size the bit: Match your drill bit diameter exactly to the anchor manufacturer’s specification. A hole drilled even 1/16-inch too large destroys friction-fit anchors.
- Drill the hole: Hold your drill bit strictly perpendicular (90 degrees) to the drywall face. Drill at moderate speed without pushing hard. As soon as the bit punches through the hollow cavity (typically 1/2 inch to 5/8 inch deep), stop and pull the bit straight out. Alternatively, tap an awl through the wall to create a clean, dust-free pilot hole for light anchors.
How to Set a Drywall Anchor That Self-Drills
Self-drilling anchors (threaded zinc or nylon) cut their own path into gypsum without requiring a separate drill bit.
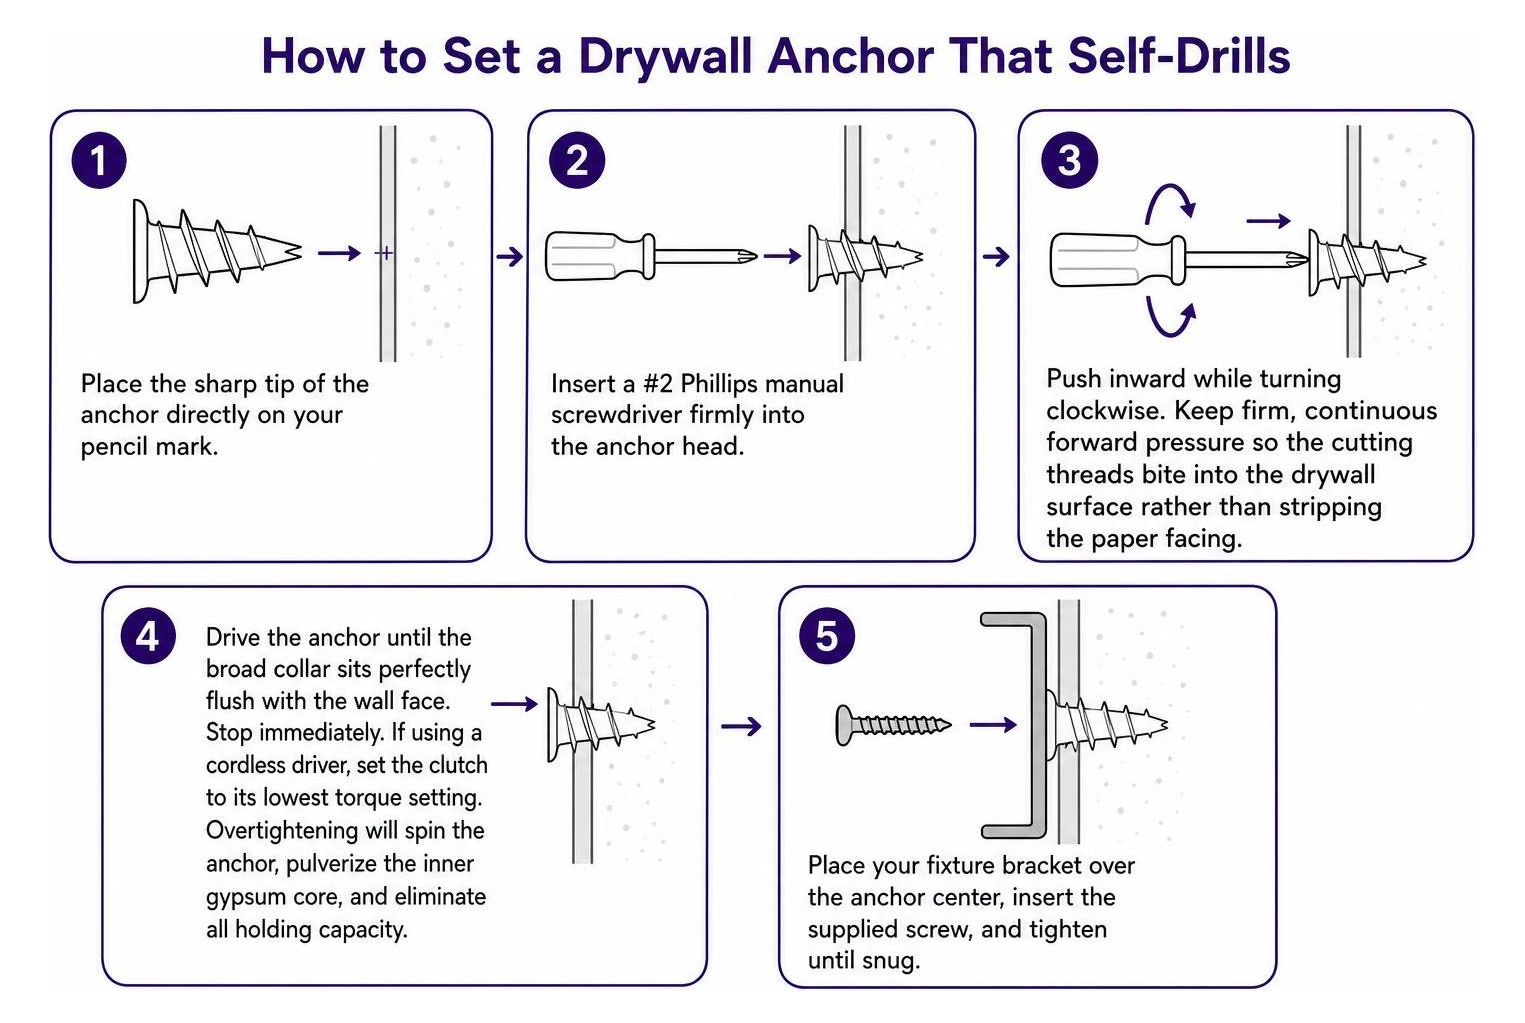
- Place the sharp tip of the anchor directly on your pencil mark.
- Insert a #2 Phillips manual screwdriver firmly into the anchor head.
- Push inward while turning clockwise. Keep firm, continuous forward pressure so the cutting threads bite into the drywall surface rather than stripping the paper facing.
- Drive the anchor until the broad collar sits perfectly flush with the wall face. Stop immediately. If using a cordless driver, set the clutch to its lowest torque setting. Overtightening will spin the anchor, pulverize the inner gypsum core, and eliminate all holding capacity.
- Place your fixture bracket over the anchor center, insert the supplied screw, and tighten until snug.
Installing Plastic Expansion Anchors Flush
Plastic expansion sleeves rely on outward radial expansion to grip the edges of the drywall hole.
- Drill a pilot hole matching the exact diameter listed on the anchor packaging (commonly 3/16-inch or 1/4-inch).
- Push the tapered tip of the plastic sleeve into the hole by hand.
- Tap the head gently with a rubber mallet until the lip rests completely flush against the drywall surface. Do not use excessive force, or you will bend the plastic neck.
- Position your fixture hole over the anchor opening.
- Drive the screw straight into the anchor sleeve. As the screw threads penetrate the plastic, the split wings expand outward, wedging firmly against the drywall core.
How to Set a Drywall Anchor in Hollow Cavities (Toggle Bolts & Molly Bolts)
Heavy loads demand mechanical clamping against the back of the drywall sheet rather than friction alone.
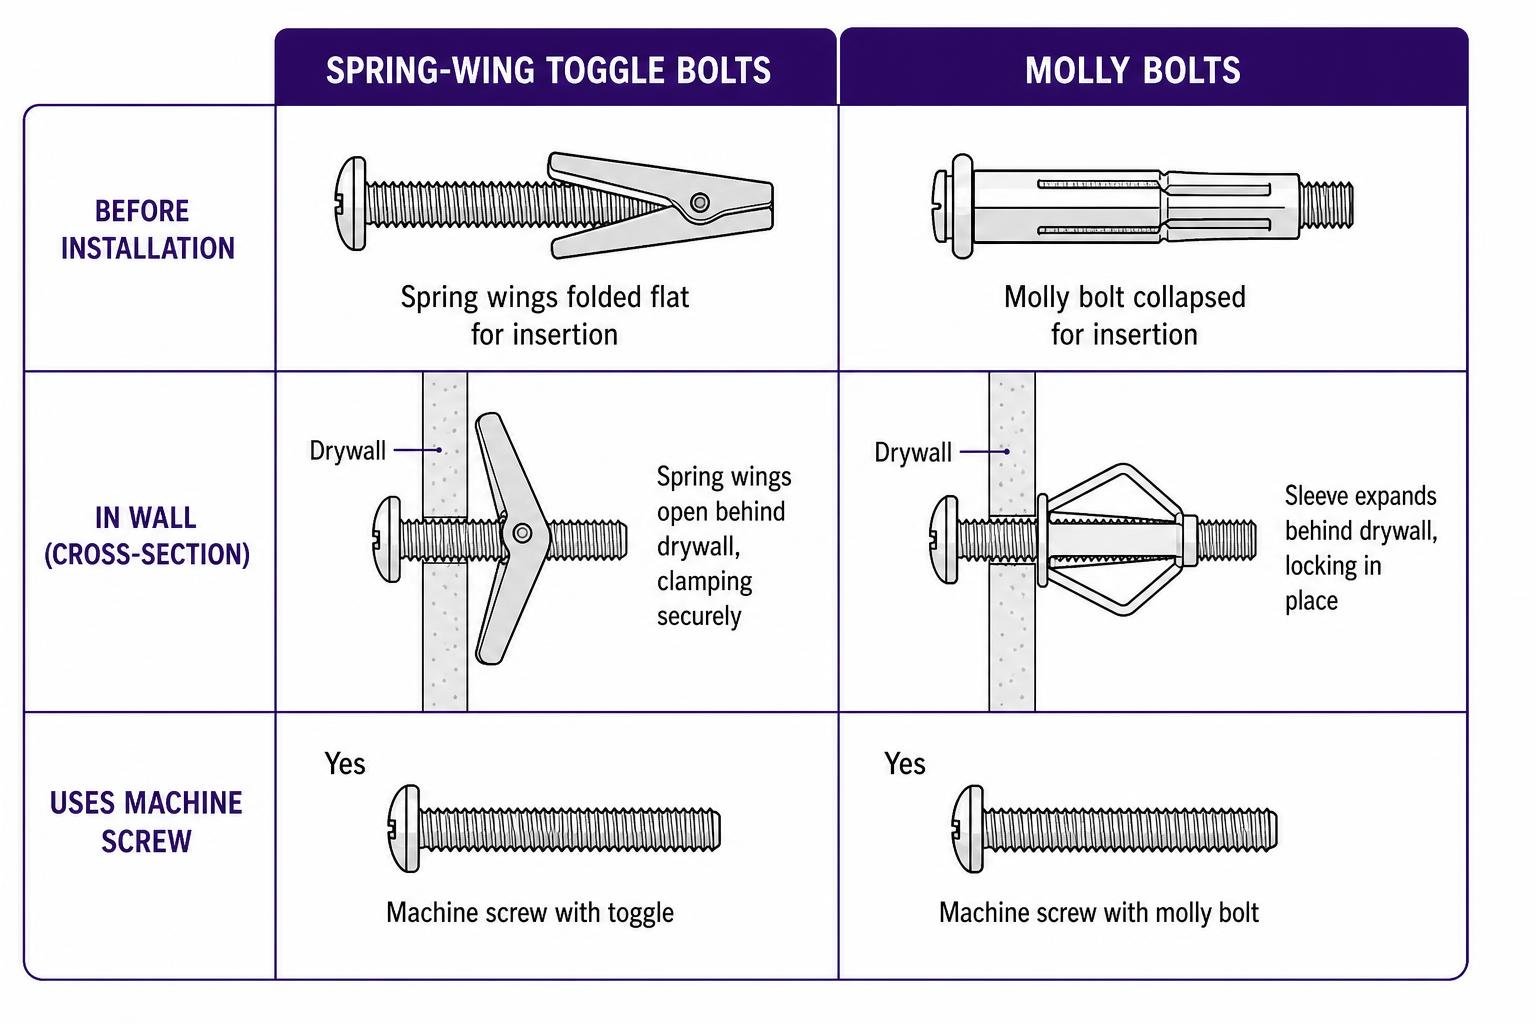
To install a traditional spring-wing toggle bolt:
- Drill a hole large enough to pass the collapsed spring wings (typically 3/8-inch to 5/8-inch).
- Disassemble the toggle bolt. Slide the machine screw through your fixture mounting bracket first.
- Thread the spring wings onto the end of the screw with the wing tips facing back toward the screw head.
- Squeeze the metal wings flat against the screw shaft and push the entire assembly through the drilled hole until the wings spring open inside the wall cavity.
- Pull the fixture gently toward you to create tension and prevent the wings from spinning.
- Tighten the machine screw with a screwdriver until the fixture is clamped firmly against the wall.
To install a molly bolt (hollow-wall anchor):
- Drill the manufacturer-specified pilot hole.
- Tap the metal molly casing into the wall until the prongs on the collar bite into the drywall face.
- Turn the central screw clockwise. This pulls the rear threaded nut forward, causing the slotted metal legs behind the wall to buckle and mushroom outward against the backside of the drywall.
- Back the screw out completely (the sleeve remains locked in place), position your item, and reinstall the screw firmly.
To compare different heavy-duty options, review this technical breakdown of Self-Drilling Anchors vs. Toggle Bolts: Which One Should You Use for Heavy Items.
Choosing the Right Anchor: Load Capacities from Light to Extreme Duty
Anchor selection must align with the weight of the object, the nature of the load (static vs dynamic), and the wall thickness.
| Anchor Type | Pilot Hole Size | Rated Shear (1/2″ Drywall) | Safe Working Load (25%) | Best Applications |
|---|---|---|---|---|
| Plastic Ribbed Plug | 3/16″ – 1/4″ | 10 lbs per pair | 2.5 lbs per pair | Small picture frames, smoke detectors |
| Threaded Self-Drilling | None (Self-drilling) | 25 – 50 lbs | 6 – 12.5 lbs | Clocks, small floating ledges |
| Molly Bolt (Hollow Wall) | 5/16″ – 3/8″ | 75 lbs per pair | 18.75 lbs per pair | Decorative mirrors, wall sconces |
| Spring Toggle Bolt | 3/8″ – 5/8″ | 50 – 100 lbs per pair | 12.5 – 25 lbs per pair | Wide-span shelving, chandeliers |
| Heavy-Duty Snap Toggle | 1/2″ | 143 – 155 lbs each | 35 – 38 lbs each | Heavy shelving, large framed mirrors |
| GHOSTUD GS1 | 1″ (Hole Saw) | Up to 250 lbs | 62.5 lbs | Towel bars, curtain rods, light shelves |
| GHOSTUD GS2 | 2″ (Hole Saw) | Up to 1,000 lbs shear | 250 lbs shear | TVs, heavy cabinets, dynamic shelving |
Before choosing hardware, review our guide to different drywall anchor types to evaluate structural options.
Light-Duty Fasteners (1–25 lbs)
For lightweight decorative items, plastic ribbed plugs and light threaded anchors are sufficient. Plastic ribbed anchors hold up to 10 pounds per pair for light items like small framed art and smoke detectors. Basic threaded plastic drywall anchors hold up to 25 pounds under static vertical load. Never use lightweight friction plugs for fixtures subject to vibration, pulls, or dynamic loads.
Medium-Duty Anchors (30–75 lbs)
Hollow-wall sleeve anchors support up to 30 pounds per pair on drywall and hollow panels. Metal molly bolts hold up to 75 pounds per pair on 1/2-inch drywall. As the metal legs expand, they create a wide footprint that resists shear failure. These work well for bathroom towel bars and hanging mirrors.
Heavy-Duty Toggle Systems (50–155 lbs)
Standard spring-loaded toggle bolts support up to 50 pounds per pair on drywall. Upgraded solid-channel toggles offer higher performance in 1/2-inch drywall, supporting 143 to 155 pounds.
While toggle systems provide high static holding power, daily cyclic movement can cause the narrow metal channel to crush the gypsum core over time, creating play.
High-Capacity Anchors for Maximum Static Loads (250–1,000 lbs)
When mounting heavy fixtures between studs, high-capacity mechanical anchors distribute the load across a broad structural perimeter to prevent localized punch-through failures.
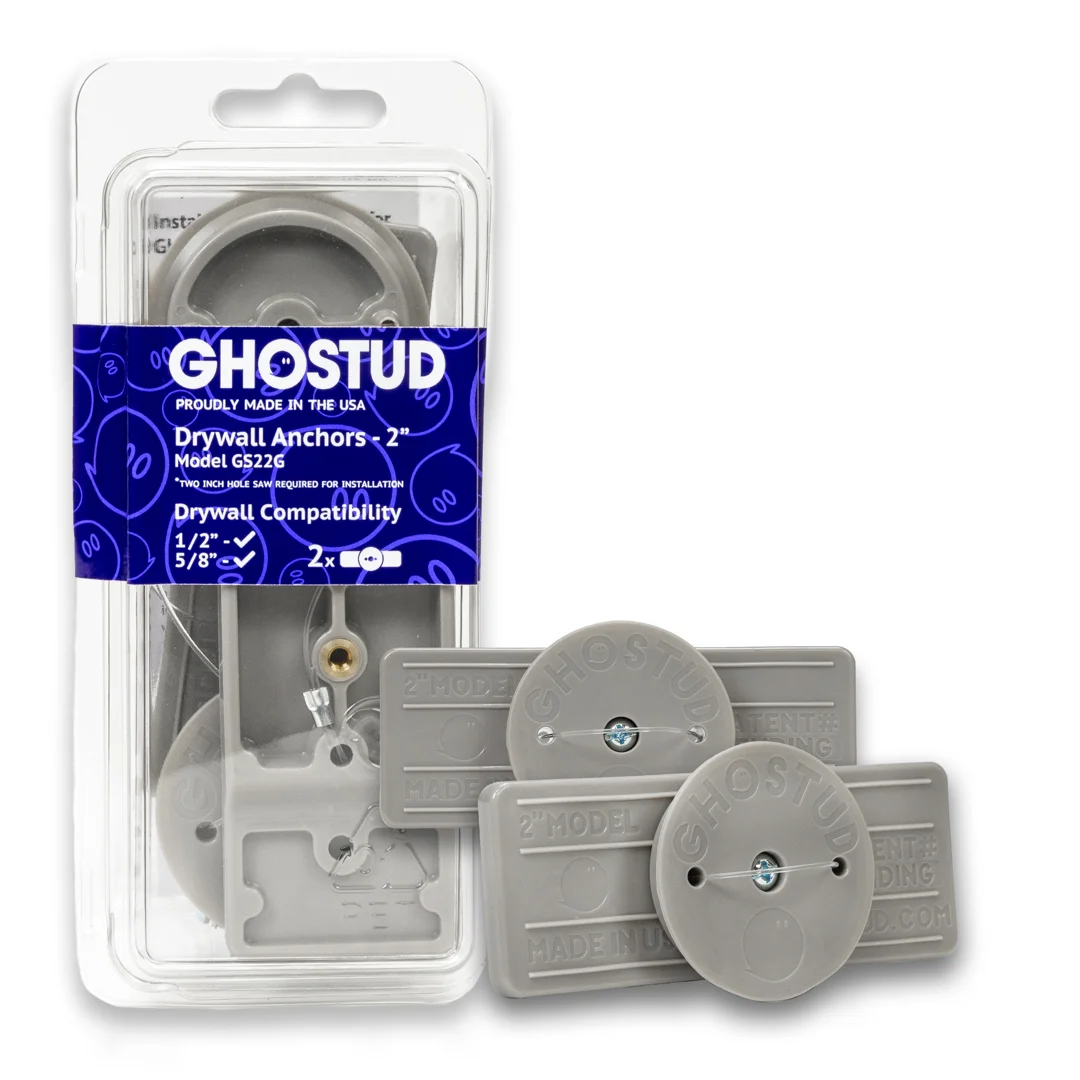
At GHOSTUD, we manufacture high-capacity drywall anchors engineered specifically for hollow drywall installations where structural framing cannot be reached:
- GS1 Model: Requires a 1-inch hole size (cut with a hole saw). It is rated up to 250 lb in 1/2-inch or 5/8-inch drywall. The GS1 is designed for daily dynamic items like towel bars, curtain rods, toilet paper holders, picture frames, and light shelving.
- GS2 Model: Requires a 2-inch hole size (cut with a hole saw). It is rated up to 1,000 lb shear in 1/2-inch or 5/8-inch drywall. The GS2 is designed for heavy static loads including flat-screen TVs, large cabinetry, utility shelving, and oversized mirrors. The 1,000 lb rating is strictly for shear load; pull-out forces must be accounted for separately via mechanical clamping.
Both models are made in the USA from 100% recycled plastic and sold at ghostud.com in 2-packs and 20-packs.
Trade-offs to note: GHOSTUD anchors require cutting a 1-inch or 2-inch hole into your drywall using a hole saw, carry a higher unit cost than commodity plastic anchors, and are permanent installations. Furthermore, GHOSTUD is strictly prohibited for grab bars, handrails, safety rails, ADA applications, aging-in-place installations, or child-safety furniture anti-tip straps.
Edge Cases, Safety Hazards, and Troubleshooting
Working behind closed walls requires awareness of hidden utility lines and substrate limitations.
Always review equipment installation requirements before fastening heavy mounting plates.
Avoiding Hidden Wiring and Plumbing
Electrical cables in residential walls typically run vertically from light switches and outlets straight up to the ceiling or down to the floor plate inside the stud bay.
- Trace vertical paths: Never drill directly above or below switches, receptacles, or plumbing fixtures.
- Use a voltage detector: Sweep the area with a non-contact voltage tester. Deep cables or shielded conduit may not register on basic sensors.
- Limit drill depth: Wrap blue painter’s tape around your drill bit exactly 3/4-inch from the tip as a depth stop. Drywall is 1/2-inch to 5/8-inch thick; never plunge a drill bit deeper into the stud cavity.
- Alternative spanning: If you must mount heavy items near dense electrical runs, span the studs with an external 3/4-inch plywood backer board fastened directly to the framing, then mount your fixture to the plywood.
Substrate Limits: Plaster, Tile, Masonry, and Metal Studs
Drywall anchors are designed exclusively for standard gypsum board (1/2-inch or 5/8-inch).
- Lath and Plaster: Self-drilling anchors and high-capacity hole-saw anchors will shatter old plaster and tear the wood lath behind it. Plaster requires pre-drilled masonry bits and steel toggle bolts or specialized plaster screws.
- Tile & Masonry: Never drive drywall anchors into tile, concrete, or brick. Tile requires diamond-tipped drill bits and expansion anchors rated for masonry (which hold up to 100 pounds per pair in solid concrete).
- Metal Studs: Hollow drywall anchors cannot drill through heavy-gauge steel studs. Use self-tapping framing screws or steel snap toggles through the metal flange.
GHOSTUD anchors are strictly for drywall (1/2-inch or 5/8-inch). If your wall surface is plaster, brick, concrete, masonry, or tile over backer board, choose an anchor designed specifically for those dense substrates.
Fixing Spinning Anchors and Clean Removal
If an anchor spins freely when driving the screw, the pilot hole is oversized or the gypsum core has stripped out.
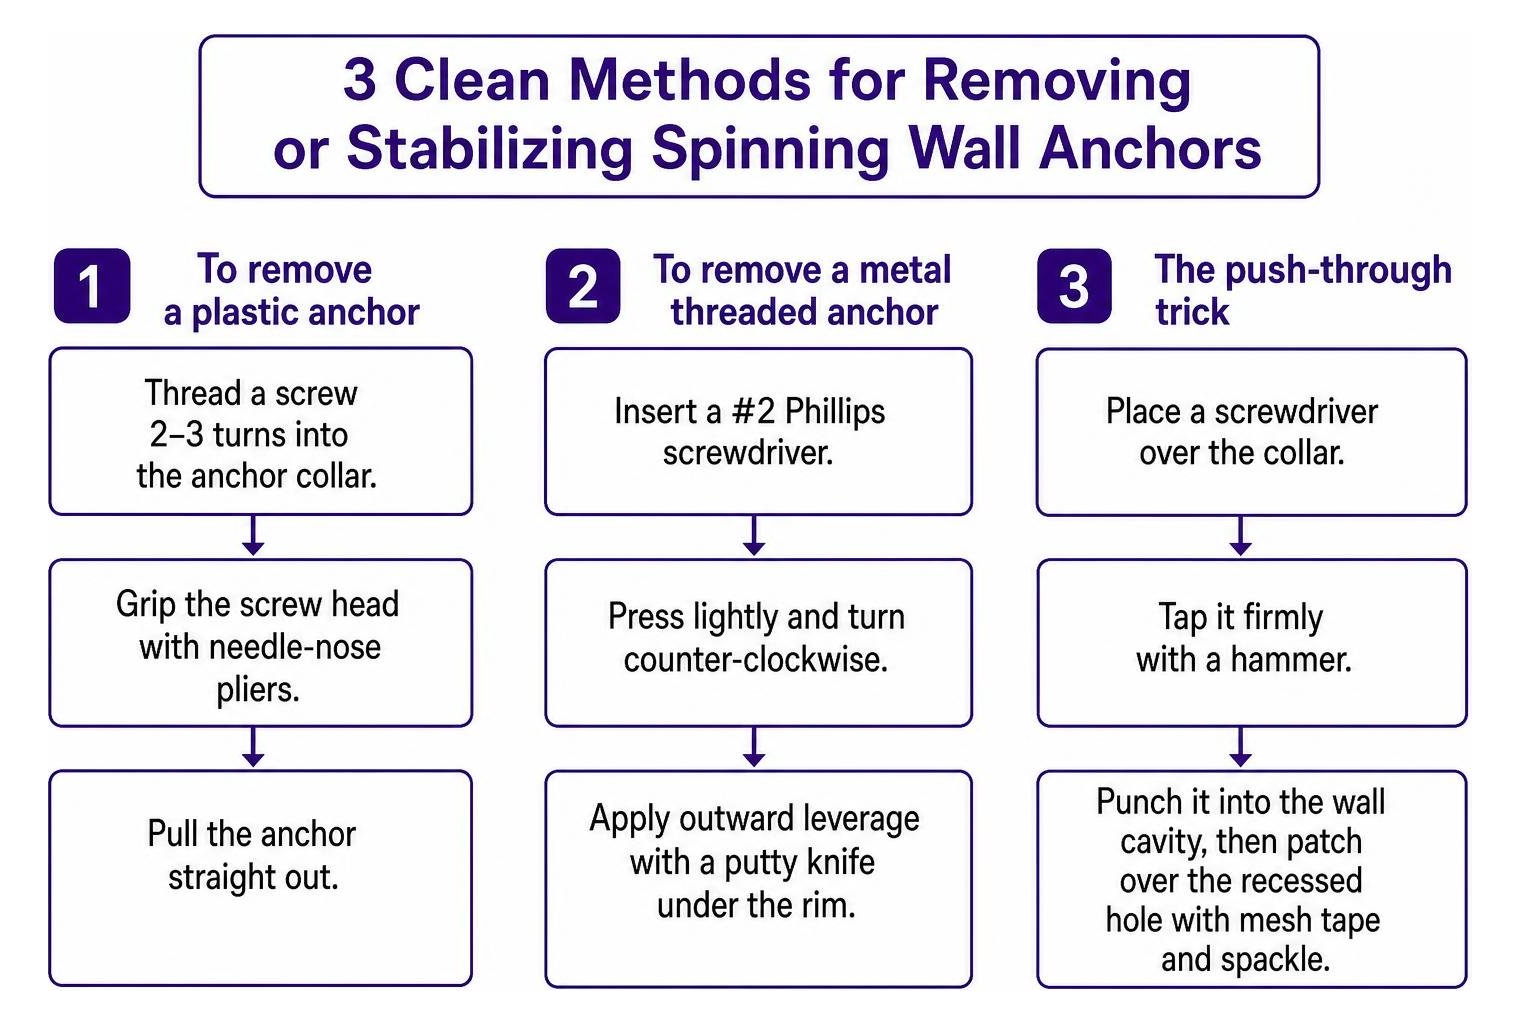
- To remove a plastic anchor: Thread a screw 2–3 turns into the anchor collar. Grip the screw head with needle-nose pliers and pull the anchor straight out.
- To remove a metal threaded anchor: Insert a #2 Phillips screwdriver, press lightly, and turn counter-clockwise while applying outward leverage with a putty knife under the rim.
- The push-through trick: If an anchor cannot be extracted cleanly without tearing the drywall paper, place a screwdriver over the collar, tap it firmly with a hammer to punch it into the wall cavity, and patch over the recessed hole with mesh tape and spackle.
Frequently Asked Questions About Drywall Anchors
Can I reuse an existing hole if a drywall anchor pulled out?
You cannot reuse a damaged hole with the same size anchor because the surrounding gypsum core has fractured. To reuse the mounting position, step up to a larger-diameter mechanical fastener like a 3/8-inch toggle bolt that bridges the damaged drywall and clamps against solid gypsum behind the breakout. Alternatively, patch the hole with setting-type compound, let it cure, and drill a fresh hole at least 2 inches away.
How much weight can drywall hold without hitting a stud?
Standard 1/2-inch drywall has minimal structural strength on its own. While high-grade mechanical anchors hold substantial weight, always derate the hardware: apply a 25-percent safe working load factor to manufacturer shear ratings. Heavy objects extending outward create cantilever tension forces that stress drywall significantly more than flat, static vertical loads.
Why does my drywall anchor keep spinning when driving the screw?
An anchor spins when the pilot hole is drilled too large, the drill bit wobbled during drilling, or a powered drill over-torqued the anchor head and pulverized the gypsum. Always use the specified drill bit size, drive anchors slowly, and finish tightening the final threads with a manual hand screwdriver.
Conclusion: Build Unshakeable Mounting Points in Drywall
Hanging fixtures securely comes down to accurate measurement, checking for studs first, and using the right fastener for your load.
Step up to your wall and take action:
- Locate your studs using an electronic scanner. If a stud aligns with your layout, drive directly into the wood.
- If mounting into hollow drywall, weigh your item and determine if the load is static (like a mirror) or dynamic (like a towel bar).
- Select an anchor rated for at least four times the item’s total weight to maintain the 25-percent safe working load.
- Drill your hole perpendicular to the drywall face using the exact bit diameter specified on the anchor packaging.
- Drive the anchor until it sits flush with the wall face, and tighten the screw by hand until snug.
For detailed hardware dimensions, hole patterns, and step-by-step drilling requirements, ensure your installation holds up over time.