
How to Support a Shelf Without a Stud Safely
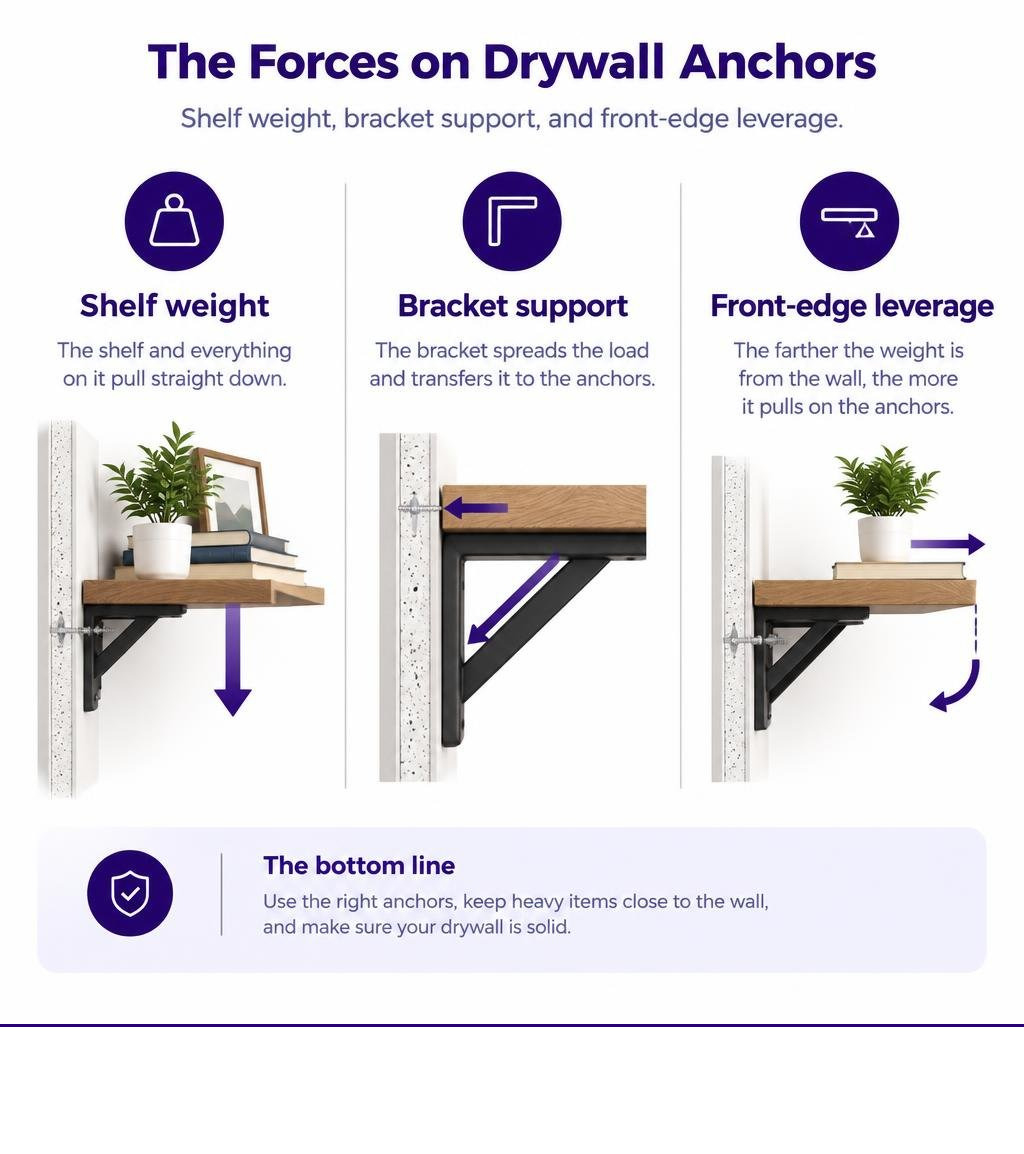
To support a shelf without a stud, add the shelf’s weight to the weight of everything you plan to put on it. Check that the drywall is sound, then use brackets and anchors suited to that load. If studs are nearby but not where you want the brackets, fasten a horizontal board across the studs and mount the brackets to the board. Keep heavy items close to the wall: weight at the front edge pulls harder on the fasteners.
For 1/2 in or 5/8 in drywall, choose hollow-wall anchors rated for the total load. For plaster, lath, concrete, masonry, brick, stucco, tile over backer board, or metal studs, choose hardware made for that surface. If a stud is properly located, fasten to it directly.
This guide covers the forces that can pull a shelf away from the wall, then walks through the installation steps and hardware choices. For a broader look at mounting options, see the guides section.
How to support a shelf without a stud vocabulary:
- best wall anchor for heavy shelf
- best way to hang shelves without studs
- how to mount a floating shelf on drywall
Understanding Drywall Mechanics and Shelf Load Forces
When you mount a shelf, two primary forces act on your fasteners: shear force and pull-out tension. Shear force pulls straight down toward the floor along the face of the wall. Pull-out tension pulls the top fastener horizontally straight out of the wall.
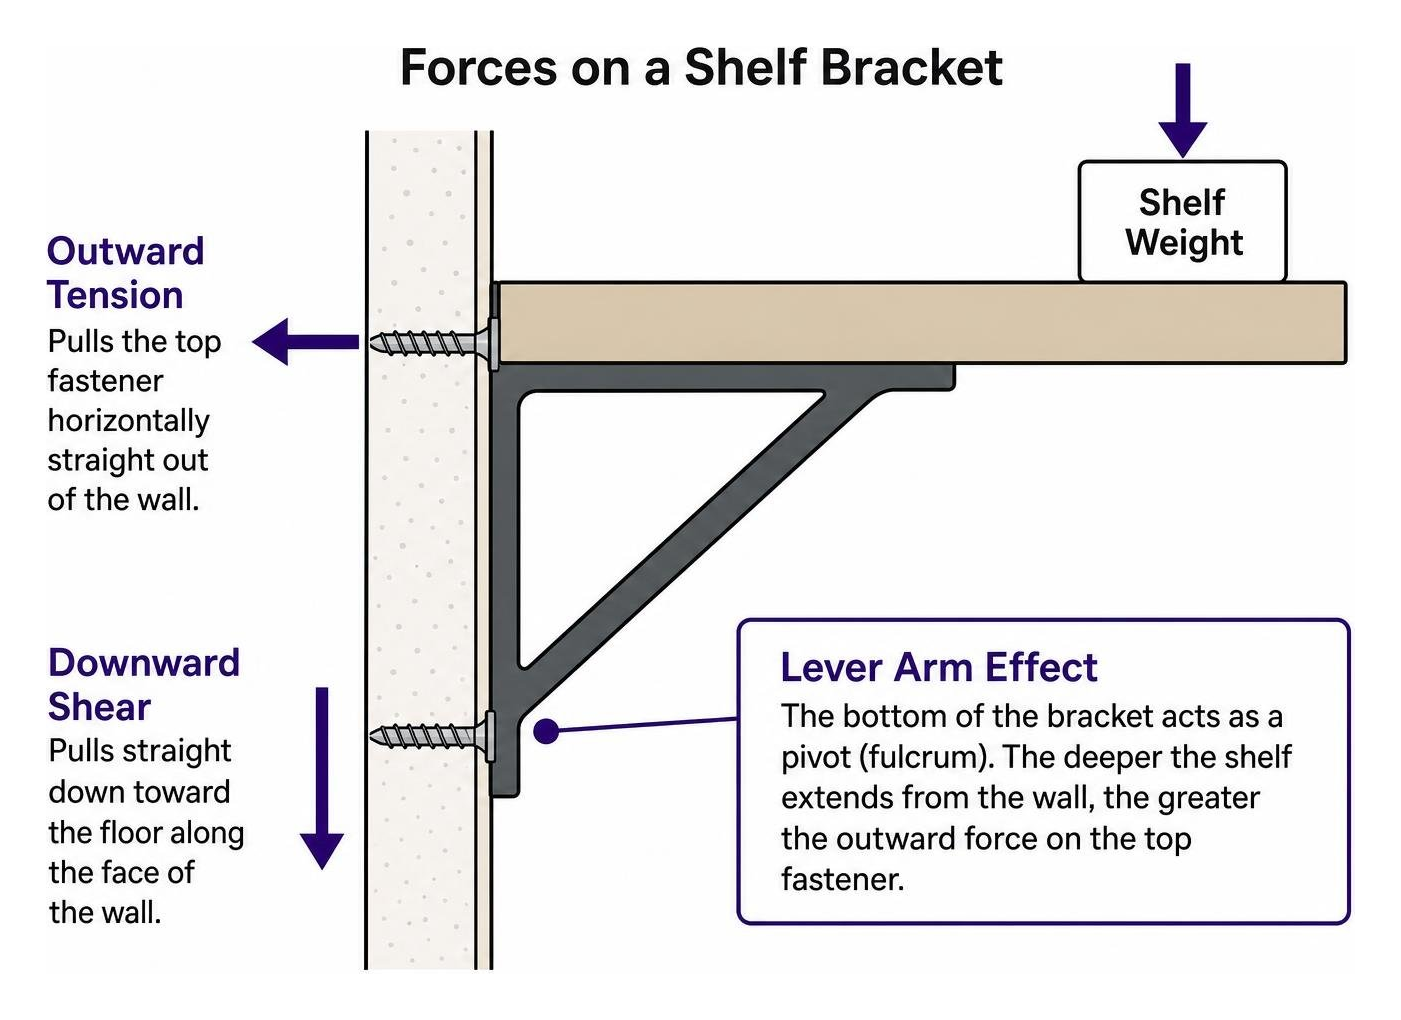
A shelf acts as a lever arm. The bottom of the bracket pushes inward against the gypsum board, acting as a pivot point (fulcrum). Meanwhile, the top screw endures severe tension trying to hold the bracket flat. The deeper your shelf extends from the wall, the greater this rotational leverage becomes. For instance, placing a stack of heavy ceramic plates on an 8-inch deep shelf applies manageable pull-out force at the top anchor. Moving those same plates to a 12-inch or 16-inch deep shelf multiplies that outward force significantly, even though the physical weight of the plates has not changed.
Understanding the difference between drywall anchors and studs comes down to how each material handles these forces. Standard interior residential walls use either 1/2-inch or 5/8-inch gypsum drywall. Gypsum has solid compressive strength when you press directly against it, but poor tensile strength.
When you overload a standard fastener without a stud, a specific failure mode occurs: progressive core crushing and tear-out. The steel screw pulls on the anchor, the anchor concentrates force on a tiny surface area behind the wall, the soft gypsum core pulverizes into chalk, and the top anchor pulls straight through the wall face. To keep your wall intact and prevent heavy shelf pull-out failure, you must distribute those cantilever loads across a broader section of drywall.
How to Support a Shelf Without a Stud: Step-by-Step Installation
Mounting a shelf securely without a stud requires exact layout marking, accurate pilot holes, and the correct fasteners.

Gather these required tools before starting:
- Tape measure
- Torpedo level (or 24-inch bubble level)
- Pencil
- Electronic stud finder
- Drill and hole-cutting bits or twist bits
- Painter’s tape
- Screwdriver
Follow these steps to complete the installation:
Preparing the Wall and Drilling Accurate Pilot Holes
- Scan for hidden studs and utilities. Run your electronic stud finder across the intended installation area. Standard North American wood studs sit 16 inches apart on center. If a stud falls directly where you want your shelf, drive your bracket screws straight into that wood framing instead of using drywall anchors. If no stud aligns with your desired design layout, check that the hollow cavity behind the drywall is free of electrical wiring and plumbing lines.
- Mark the level mounting line. Hold your level against the wall at your target shelf height. Draw a clean, light horizontal reference line with your pencil.
- Mark the fastener crosshairs. Hold your mounting bracket up to the reference line. Mark the exact center of each mounting hole. Double-check the distance between brackets using your tape measure so your shelf sits square.
- Attach a dust catcher. Fold a piece of painter’s tape lengthwise with the sticky side facing up along the bottom fold. Stick it directly beneath your pencil marks to catch falling gypsum dust as you drill.
- Drill the pilot holes. Select the exact bit diameter specified on your anchor hardware packaging. Hold the drill perpendicular to the drywall face. Drill slowly and steadily into the cavity. Never force the drill or wallow out the hole by tilting the bit, as an oversized opening reduces anchor grip.
Installing Hollow Wall Hardware and Securing Brackets
- Insert the drywall anchors. Insert your chosen hollow-wall anchors into the drilled openings. If you are using expansion plugs or self-drilling anchors, tap them gently until the collar sits completely flush with the drywall surface. If you are using our large-format GHOSTUD structural anchors, use a hole saw to cut the required round opening, insert the anchor body, and set the internal locking mechanism.
- Position the mounting bracket. Align the screw holes of the bracket directly over the center of each installed anchor.
- Drive the mounting screws. Insert the hardware screws through the bracket holes into the anchors. Drive them using a handheld manual screwdriver or a drill on low torque. Tighten until the bracket is firmly seated against the wall face. Do not over-torque the screws; excessive spinning can strip the anchor threading or crush the drywall paper face.
- Verify level. Place your torpedo level across the top surface of the mounted brackets. Ensure both arms sit perfectly level before setting the shelf board in place. For more general fastener techniques, review how to use wall anchors in drywall step-by-step.
- Mount and test the shelf. Fasten the shelf board to the brackets using short wood screws. Test the assembly by pressing down with moderate hand pressure before placing books, plants, or kitchenware on the surface.
Hardware Selection: Load Capacities for Studless Shelf Mounting
Selecting the right hardware depends entirely on the combined weight of your shelf and its intended contents. Standard plastic expansion plugs hold roughly 5 to 25 pounds in drywall and work fine for small spice racks, but they fail quickly under deeper shelf loads. Threaded self-drilling drywall anchors hold up to 25 to 50 pounds for basic decorative ledges. Traditional toggle bolts and snap toggles distribute force across the back of the drywall and hold 50 to 100 pounds for medium duties.
When you need maximum holding strength for substantial loads without a stud, our load-distributing GHOSTUD anchors provide engineered drywall support. Both models install with a standard hole saw, are manufactured from 100% recycled material in the USA, and are available at ghostud.com in 2-packs and 20-packs.
| Anchor Model | Required Hole Size | Drywall Thickness | Stated Rating | Recommended Applications |
|---|---|---|---|---|
| GHOSTUD GS1 | 1-inch hole | 1/2 in or 5/8 in | Up to 250 lb | Towel bars, curtain rods, picture frames, light shelving |
| GHOSTUD GS2 | 2-inch hole | 1/2 in or 5/8 in | Up to 1,000 lb shear | Heavy shelving, TVs, cabinets, large mirrors, static storage |
Always maintain a 2x safety factor when calculating hardware needs: if your loaded shelf weighs 50 pounds, choose hardware rated for at least 100 pounds. To evaluate hardware options across varying project types, see our guide on how to select the right drywall anchor for your load.
Light Shelving: Choosing the GHOSTUD GS1
The GHOSTUD GS1 requires a 1-inch hole saw for installation. It is rated up to 250 lb in 1/2 in or 5/8 in drywall. The GS1 is built from tough recycled plastic and is designed for dynamic household hardware such as towel bars, curtain rods, toilet paper holders, and light decorative wall shelving.
Heavy Shelving: Choosing the GHOSTUD GS2
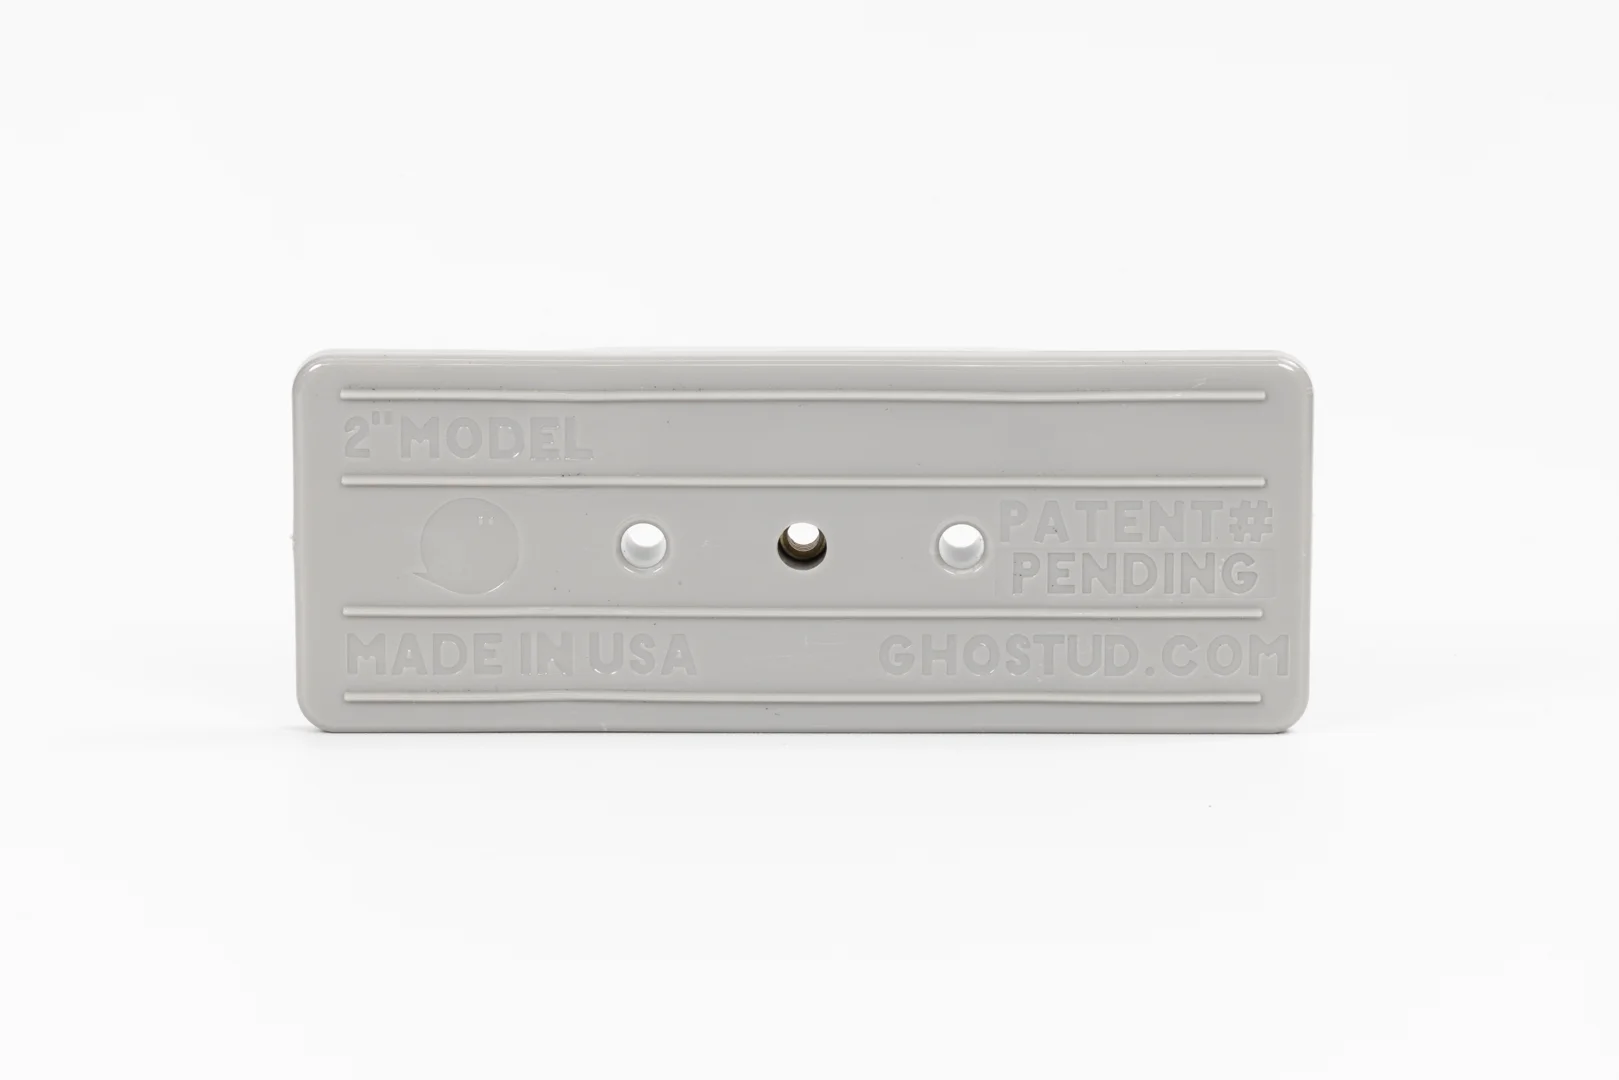
The GHOSTUD GS2 requires a 2-inch hole saw for installation. It is rated up to 1,000 lb shear in 1/2 in or 5/8 in drywall. The GS2 is engineered specifically for heavy static loads including solid-wood bookshelves, kitchen pantry shelving, wall cabinets, and large flat-screen displays. Because the GS2 distributes downward shear loads across a wide internal surface area, it prevents the localized tear-out common with small-diameter hardware. For deeper details on weight ratings and testing distinctions, read our drywall anchor shear ratings guide.
Special Considerations for Floating Shelves and Deep Brackets
Floating shelves present the toughest mechanical challenge for studless mounting. Because they lack diagonal under-shelf braces, floating shelves rely entirely on concealed internal steel rods or hidden backer plates.
This structure magnifies downward cantilever leverage. A 24-inch wide floating shelf mounted into solid studs can support 25 to 50 pounds. However, when mounted entirely into hollow drywall using standard aftermarket anchors, that safe capacity drops to 15 to 25 pounds total.
To mount floating shelves securely without studs:
- Limit shelf depth. Keep floating shelf depth between 6 and 8 inches. Deeper 10-inch or 12-inch shelves create high pull-out leverage that will cause the shelf to tilt forward over time.
- Distribute weight toward the rear. Place heavy books, glass containers, and solid decor pieces along the back edge against the wall. Never stack heavy items along the front unsupported lip.
- Use structural hollow-wall fasteners. Standard friction-fit plastic anchors will pull loose under floating shelf leverage. Use toggle mechanisms or GHOSTUD structural drywall anchors to clamp firmly against the rear drywall face. For detailed installation steps on concealed brackets, consult our guide on how to mount a floating shelf on drywall.
When Not to Mount Without Studs: Limits and Safety Boundaries
Hollow-wall anchors are dependable when used correctly, but they have clear structural limits. Respect the following application boundaries:
- Wall material limits: GHOSTUD anchors are designed for drywall only, in 1/2 in or 5/8 in thickness. Do not install GHOSTUD on plaster, lath, concrete, masonry, brick, stucco, tile over backer board, or steel studs. For plaster walls or masonry, purchase specialty masonry expansion sleeves, sleeve anchors, or concrete screws rated for those substrates.
- Prohibited safety applications: Never use drywall anchors or GHOSTUD for grab bars, handrails, safety rails, ADA fall-prevention fixtures, or any application where human body weight will rest or be caught in a fall. Fixtures intended for personal physical support must be anchored directly into solid structural wood framing.
- Heavy dynamic furniture: Do not rely on hollow drywall anchors for anti-tip furniture straps or child-safety furniture ties. Secure tall bookcases, dressers, and heavy dynamic furniture straight into studs.
- Accessible studs present: Never use hollow-wall anchors as a substitute for anchoring directly into a stud when a wood stud is accessible and properly positioned. Direct wood engagement is always the strongest connection. If you are mounting large utility shelves or heavy workshop storage, review how to mount heavy shelves safely without sagging.
Frequently Asked Questions About Studless Shelf Installation
Can drywall alone hold floating shelves?
Yes, but with strict weight and depth limits. Drywall alone can support floating shelves weighing 15 to 25 pounds total when using heavy-duty hollow-wall anchors. Because floating shelves create strong forward leverage, keep shelf depth under 8 inches and place heavier display items along the rear wall edge.
What should I do if a drywall anchor spins freely in the hole?
A spinning anchor means the pilot hole was drilled too large or the internal gypsum core stripped out. Back the mounting screw out and gently extract the damaged anchor with needle-nose pliers. Patch the stripped hole with spackling compound or joint compound, let it dry completely, and sand it smooth. Drill a fresh, correctly sized hole at least 1.5 to 2 inches to the left or right along your level line.
Conclusion
Hanging shelves safely without wood studs comes down to basic physics: calculate your total weight, account for shelf depth leverage, and install hardware matched to that load. For comprehensive walkthroughs, bracket diagrams, and step-by-step project plans, explore our complete floating shelves without studs guide.
Your next step at the wall is simple: measure your shelf dimensions, weigh the items you intend to store, and mark your level installation line. Match your fasteners to that total load, drill clean pilot holes, and secure your brackets firmly into place.