
Strongest Drywall Anchor Guide – Shear Ratings Explained
Strongest Drywall Anchor: Start With Shear, Not a “Holds” Claim
For heavy items mounted flat against drywall, the strongest drywall anchor is usually a high-capacity anchor that spreads weight across a wide area behind the panel. The true holding capability of an anchor depends on whether the load pulls parallel down the wall or straight out away from the face. Published shear ratings apply strictly to weight pulling down the wall, not to an object levering out from it.
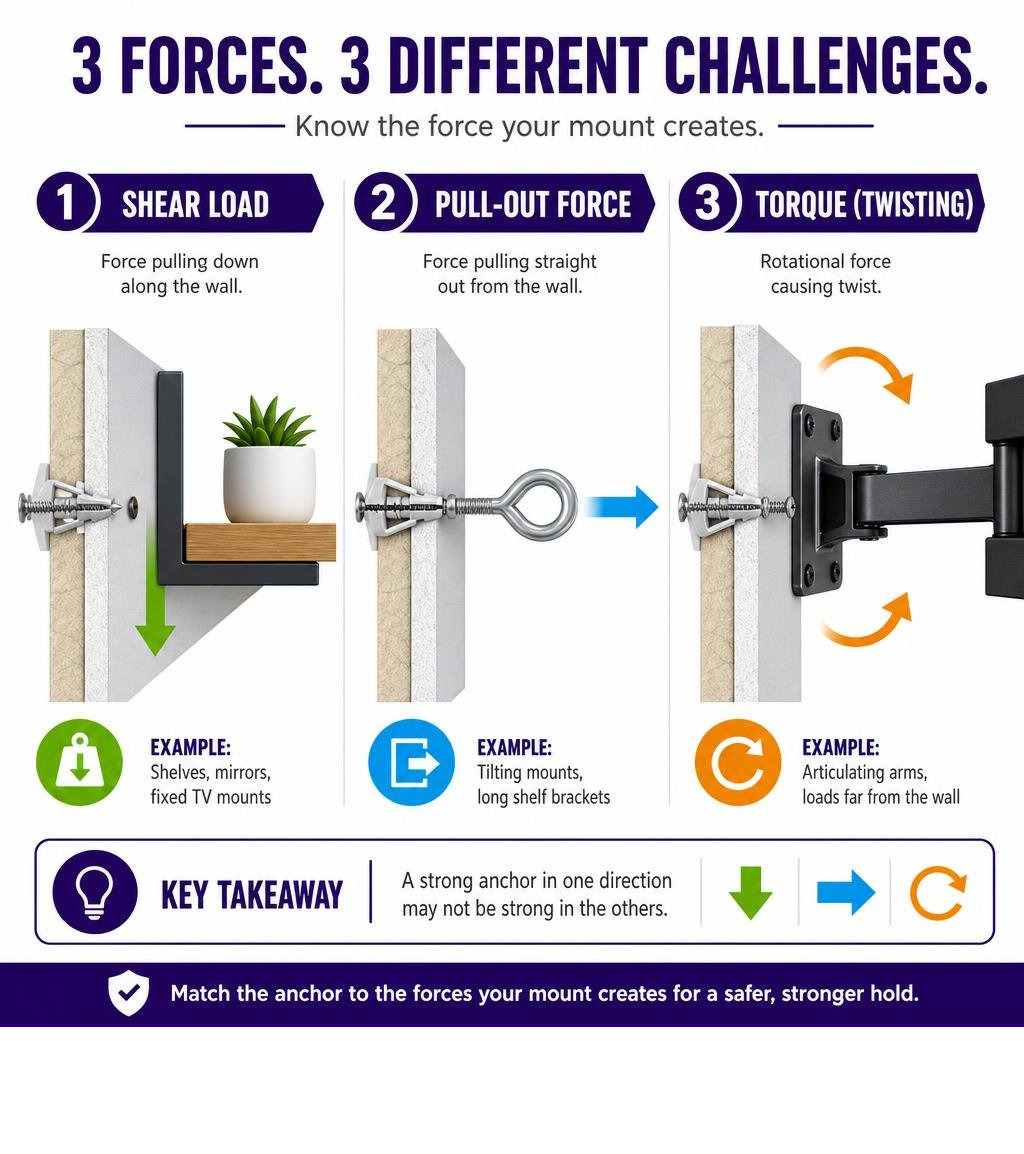
Choose by the force your mount creates:
- Flat mirrors, fixed TV mounts, and shelves with short brackets: Mostly shear force.
- Tilting mounts and long shelf brackets: Add pull-out force and twisting torque. Do not treat a shear rating as a pull-out rating.
- Articulating TV arms or loads far from the wall: Create much higher leverage. Use a stud whenever one is conveniently located.
Drywall thickness matters, too. A 5/8 in panel generally gives an anchor more material to bear against than 1/2 in drywall, while double drywall may require hardware designed for the added wall thickness and cavity depth. Before drilling, confirm the panel thickness, clear space behind the wall, hole size, screw size, and the manufacturer’s stated rating for that exact wall condition.
In this strongest drywall anchor guide, you will learn how to separate real shear ratings and installation limits from vague “holds up to” claims to protect your walls.
Basic strongest drywall anchor terms:
Understanding Holding Power: Shear Force vs. Tensile Pull-Out
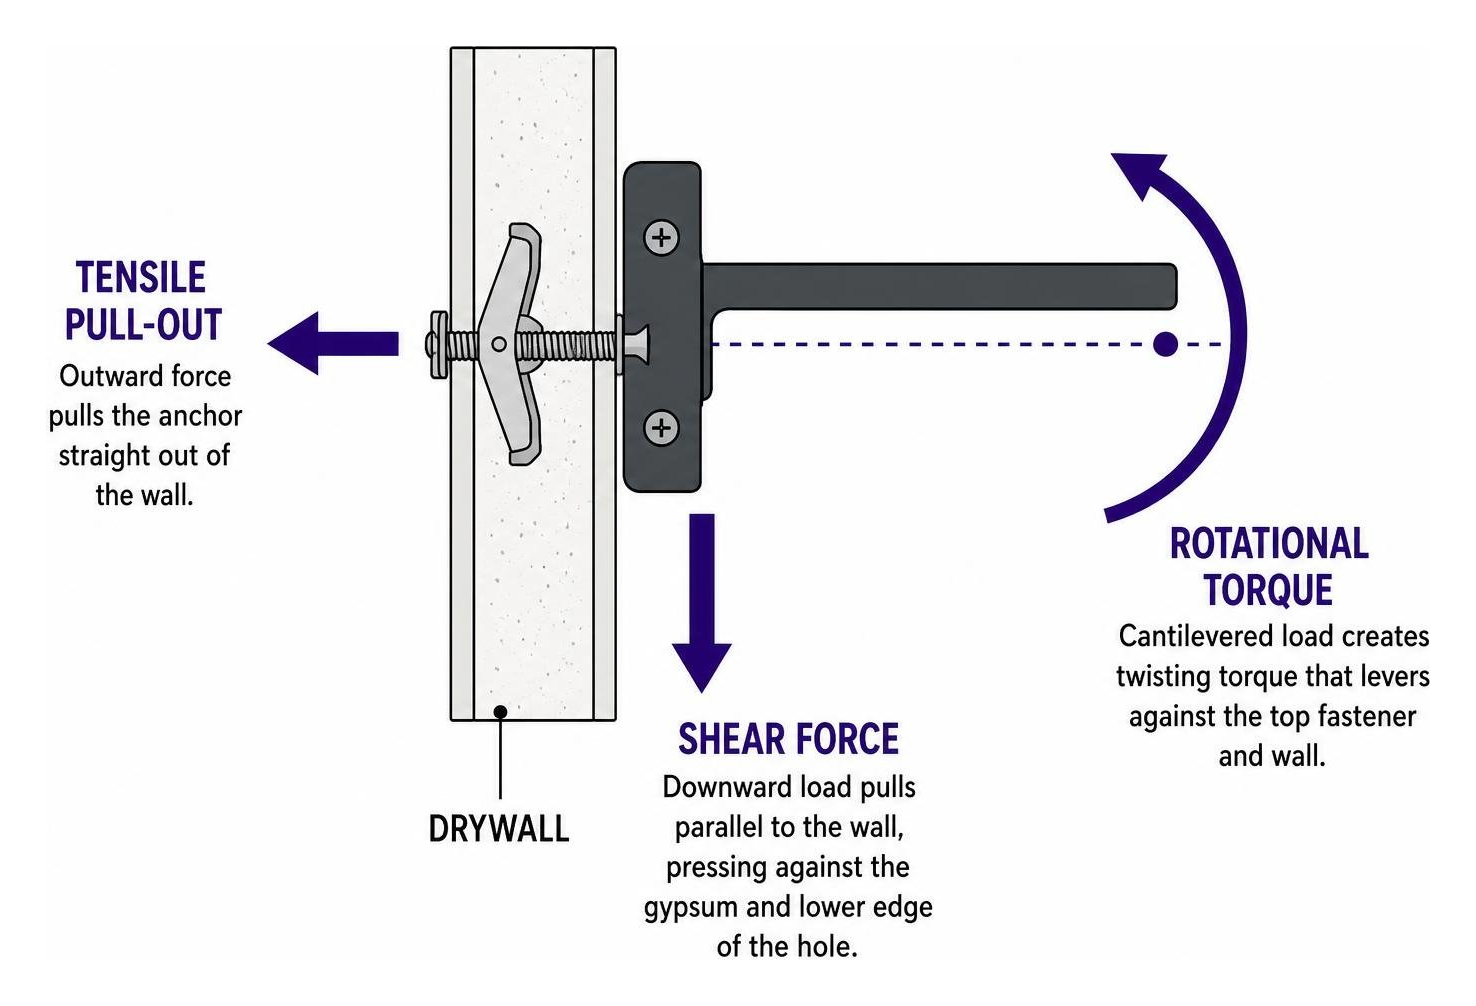
Drywall consists of a brittle gypsum core encased between two layers of paper facing. Understanding the physical mechanics of this substrate prevents catastrophic mounting failures. Drywall possesses reasonable compressive resistance but weak internal tensile strength. When you hang an object, the load exerts two primary forces: shear load and tensile pull-out force.
Shear load acts parallel to the wall surface, pulling downward. In pure shear, the fastener pushes down against the solid gypsum core and the lower edge of the drilled hole. Because the force is distributed across the vertical plane of the panel, drywall can sustain higher loads in shear before crushing.
Tensile pull-out force acts perpendicular to the wall, pulling the fastener straight out of the cavity. Gypsum provides minimal resistance to direct outward tension. If an anchor relies purely on friction against the gypsum core, tensile force will strip the soft chalky material and pull the fastener free.
Cantilevered loads complicate this dynamic by introducing rotational torque. When a shelf bracket extends 10 inches from the wall or an articulated TV mount extends into the room, the fixture acts as a lever:
- The bottom of the bracket pushes inward against the drywall face, acting as a fulcrum under compressive force.
- The top mounting screw experiences intense tensile pull-out force, attempting to lever the anchor straight out through the wall.
- Downward gravitational pull simultaneously applies vertical shear across all fasteners.
Drywall thickness directly influences holding capability. Standard residential walls use 1/2-inch gypsum panels, whereas fire-rated walls, ceilings, and commercial partitions frequently utilize 5/8-inch panels. The thicker 5/8-inch panel increases the surface bearing area, reducing local crushing under shear and stiffening the wall against flexure. Double-layer drywall (two 1/2-inch sheets) doubles the bearing depth, though it requires fasteners with longer shafts and deeper grip ranges.
For safe installation planning, apply an engineering safety factor of at least 2:1 to 4:1 against ultimate failure limits. If a manufacturer publishes an ultimate shear limit of 200 lbs, limit your working static load to 50–100 lbs to account for minor gypsum inconsistencies, vibration, and dynamic loading.
To see how standard hollow-wall fasteners compare when handling these forces, review our A Practical Guide to Molly Bolt vs Toggle Bolt Comparisons.
The Strongest Drywall Anchor Types Compared
Different mounting jobs require matching fastener mechanics to the load. Light loads do not require heavy structural fasteners, while high-load installations demand mechanical backing behind the drywall sheet.
| Anchor Type | Typical Drill / Hole Size | Mechanism Behind Wall | Best Load Profile | Ease of Install | Foolproof Rating |
|---|---|---|---|---|---|
| GHOSTUD GS2 | 2-inch hole saw | Patented wide structural plate | High static shear (up to 1,000 lb shear in 1/2 in or 5/8 in drywall) | Moderate | High |
| GHOSTUD GS1 | 1-inch hole saw | Patented wide structural plate | Medium-heavy shear (up to 250 lb shear in 1/2 in or 5/8 in drywall) | Easy | High |
| Heavy-Duty Snap Toggle | 1/2-inch drill bit | Solid metal channel pivoting flat | Tensile & shear | Moderate | High |
| Spring-Wing Toggle Bolt | 3/8-inch to 3/4-inch bit | Spring-loaded folding wings | Tensile & shear | Moderate | Low (drops if unscrewed) |
| Expanding Interlocking Anchor | 20 mm / 3/4-inch bit | Curved polypropylene fins | Moderate shear | Moderate | Medium |
| Steel Molly Bolt | 5/16-inch to 3/8-inch bit | Collapsing metal slotted sleeve | Light-to-medium shear | Hard (needs setting tool) | Medium |
| Self-Drilling Zinc Anchor | No pre-drill (self-tapping) | Deep external threads | Light static shear | Very Easy | High |
| Plastic Expansion Plug | 3/16-inch to 1/4-inch bit | Radial expansion in hole | Very light shear | Easy | Low (pulls out easily) |
Choosing the Strongest Drywall Anchor for Extreme Weight Loads
Standard expansion hardware concentrates load onto a tiny cross-section of gypsum, causing the core to crumble under extreme weight. Extreme-load fasteners solve this by distributing weight across a wide structural footprint on both sides of the panel.
At GHOSTUD, we manufacture high-capacity drywall anchors designed for residential and commercial mounting when studs are blocked or out of reach. Our anchors use patented, load-distributed geometry that clamps the gypsum securely to deliver lifetime strength. They are engineered from 100% recycled plastic in the USA and available in 2-packs and 20-packs.
For heavy static installations, the GS2 Drywall Anchor provides verified holding capability of up to 1,000 lb shear in 1/2 in or 5/8 in drywall. Installing the GS2 requires cutting a clean opening with a 2-inch hole saw. The anchor body inserts through the cut opening, and the internal clamping assembly locks flat against the interior gypsum face, creating an immovable anchor point. For intermediate static applications, our GS1 model installs with a 1-inch hole saw and is rated for up to 250 lb shear in 1/2 in or 5/8 in drywall.
These load ratings strictly apply to static shear forces running parallel to the wall face. They do not represent tensile pull-out limits for cantilevered loads extending far into the room.
Heavy-Duty Toggle Bolts and Snap-Style Toggles
Toggle bolts use a mechanical wing or solid metal bar that bridges across the back of the drywall.
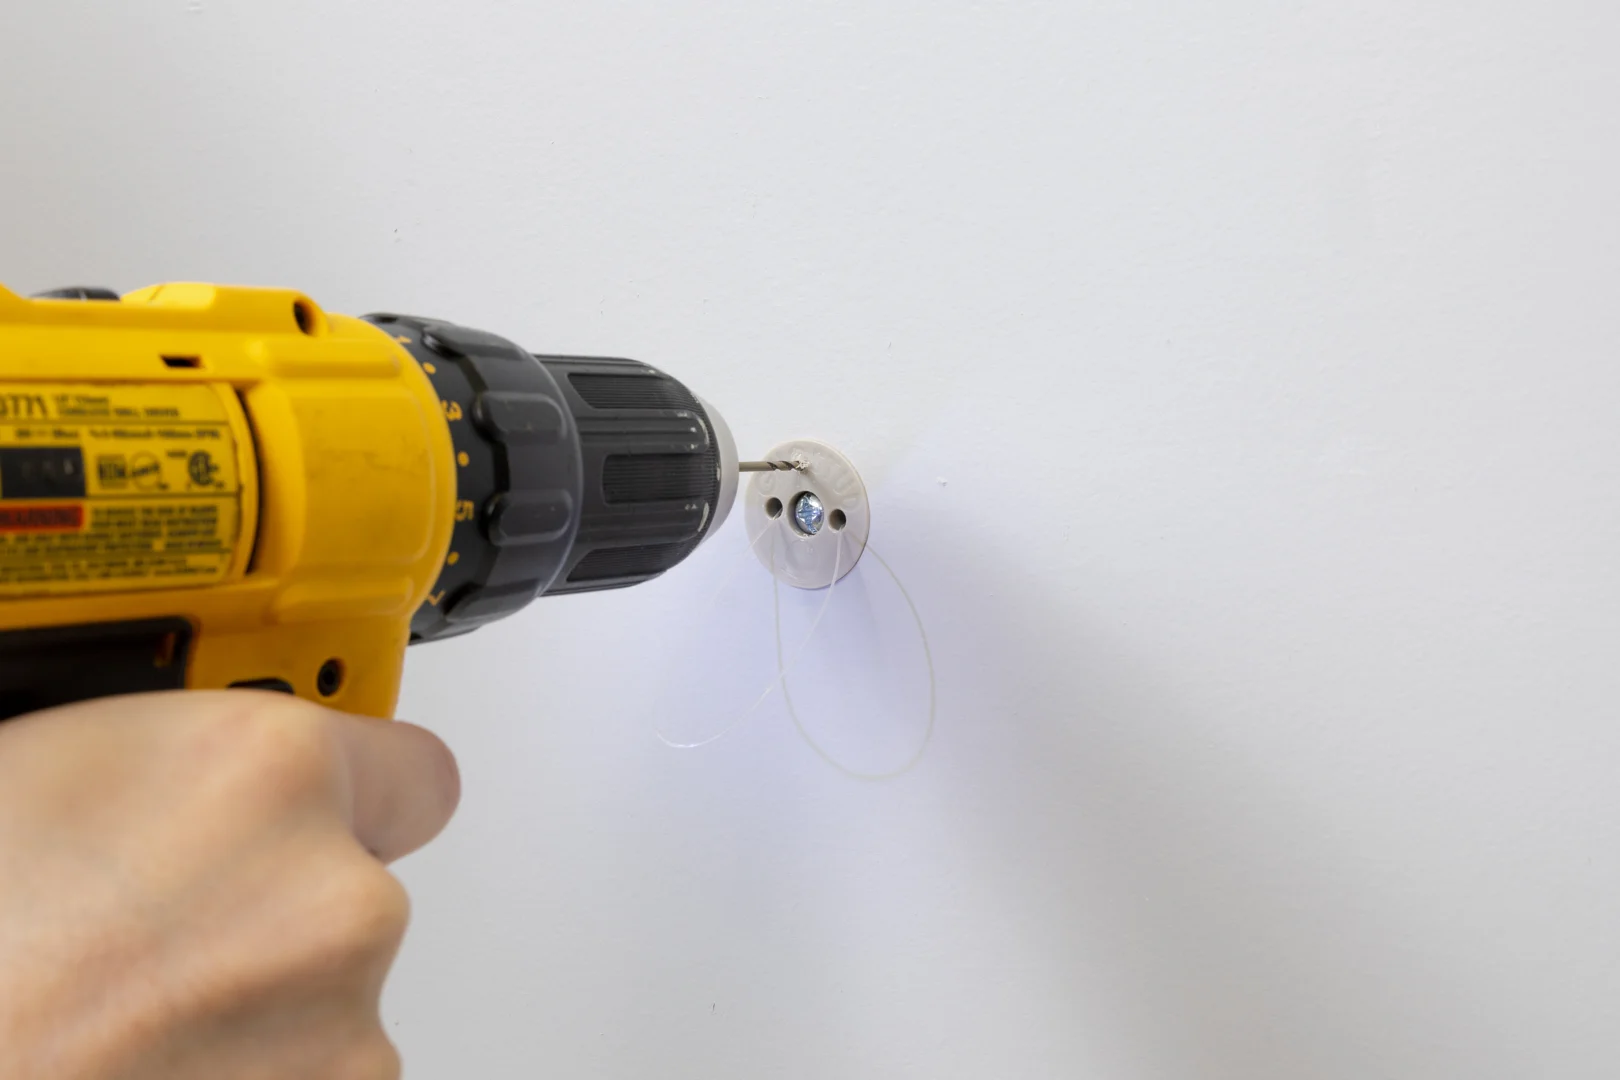
Spring-wing toggle bolts use two stamped-steel wings joined by a spring-loaded hinge. To install one:
- Drill a large hole (often 1/2 inch to 3/4 inch).
- Pass the machine screw through the fixture bracket first.
- Thread the spring wing onto the screw tip.
- Compress the wings and push them entirely through the wall cavity until they pop open behind the panel.
- Pull backward on the fixture to maintain friction while tightening the screw.
The failure mode of a spring toggle occurs if the user unscrews the bolt after installation: the spring wing immediately falls into the bottom of the wall cavity, leaving an empty, oversized hole.
Solid-channel snap toggles improve this design by attaching a solid steel threaded channel to flexible plastic straps and a sliding face collar. You slide the metal channel through a 1/2-inch hole, pivot it flat against the drywall rear face, slide the plastic collar tight against the front face, and snap off the excess straps. This retains the threaded metal channel permanently in place, allowing you to remove and reinstall the machine screw whenever needed.
Solid metal toggles require at least 1-7/8 inches of unobstructed hollow cavity depth behind the drywall to allow the metal bar to pivot. If insulation or plumbing blocks the channel, the toggle cannot turn flat, leaving it crooked and unable to support its rated load.
To master toggle installation techniques on open spans, read How to Anchor a Shelf Without Studs Fast by Using Toggle Bolts.
Patented Interlocking and Expanding Anchors
Patented expanding anchors utilize molded polymer bodies that insert into pre-drilled holes (typically 3/4 inch / 20 mm) and extend lateral wings inside the wall cavity.
- High-load expanding anchors require sufficient hollow cavity depth behind the drywall to allow their structural wings to swing open fully.
- Universal variants designed for narrower cavities work in tighter wall spaces but provide a smaller rear bearing area.
- Standard T-shaped polymer anchors rely on precise panel fit, making them prone to loose engagement if the drywall gauge does not match the anchor collar gap.
- Dual-wing expansion anchors handle light-to-medium decorative items but struggle under heavy downward shear.
The critical installation requirement for interlocking polymer anchors is complete wing deployment. If the anchor body is driven into a cavity with insufficient clearance, the wings fail to deploy fully. Driving the screw into an un-deployed anchor spreads the core inside the hole, cracking the gypsum and causing the anchor to spin out.
For practical mounting steps to protect drywall integrity during high-load installations, see How to Secure a Heavy Shelf Without Pull Out Failure.
Steel Molly Bolts and Hollow Wall Anchors
Molly bolts (expanding hollow wall anchors) rely on a slotted metal sleeve surrounding a central machine screw. When you tighten the screw, the sleeve collapses outward into four wide legs that clamp hard against the back of the drywall.
A standard molly bolt requires an exact hole size (commonly 5/16 in or 3/8 in) matching the sleeve diameter. Once expanded, the outer collar remains locked to the drywall face. This allows the machine screw to be removed and re-inserted repeatedly without disturbing the anchor body. Light-duty friction-fit molly bolts handle smaller decorative loads, while heavy-gauge steel versions support medium-heavy shear loads.
The most common failure mode with molly bolts is casing spin:
- The small anti-rotation prongs on the face collar can tear through the surface paper of soft drywall.
- Once the prongs lose traction, the entire metal sleeve spins in place with the screw, preventing the legs from collapsing.
- Using a dedicated molly setting tool eliminates this issue by pulling the screw head straight outward mechanically without relying on thread torque to collapse the legs.
For a complete breakdown of hollow wall sleeve hardware, explore our Step-by-Step Guide to Drywall Anchor Types.
Threaded Self-Drilling Anchors: Metal vs. Plastic
Self-drilling drywall anchors feature coarse, wide-pitch external threads and a sharp cutting tip. They are designed to screw directly into drywall using a hand screwdriver or power driver without pre-drilling.
- Die-Cast Zinc Anchors: Zinc anchors cut cleanly through drywall paper and gypsum core without flexing. The metal threads bite securely into the gypsum, providing reliable shear resistance for light-to-medium wall decor in 1/2 in or 5/8 in drywall.
- Nylon / Plastic Self-Drilling Anchors: While inexpensive, plastic versions have blunt cutting tips that tend to tear the surface paper rather than slicing it cleanly. They are prone to twisting off or shearing at the drive head if they strike dense gypsum or fiberglass tape.
The primary failure point of all self-drilling anchors is thread stripping:
- When installed with a high-speed power drill, the wide threads quickly mill the gypsum core into fine, loose chalk dust.
- Once the gypsum core is stripped out, the anchor loses all mechanical friction and will slide straight out under minor tension.
- Always drive threaded anchors by hand using a manual #2 Phillips screwdriver once the head approaches the wall surface.
For drill-free installation techniques, check out How to Install Anchors into Drywall Without a Drill.
Real-World Applications: Selecting Anchor Types by Task
Selecting the correct anchor requires calculating the fixture’s weight, its center of gravity, and the direction of load.
Mounting Flat-Screen TVs and Floating Entertainment Consoles
Modern 55-inch to 75-inch flat-screen televisions weigh between 30 and 75 lbs. When mounted flat against the wall on a fixed, low-profile bracket, the TV’s center of gravity remains close to the drywall, applying almost pure shear force downward across the bracket’s mounting holes.
When mounting a flat bracket where studs are unreachable:
- Space high-capacity fasteners along the top and bottom rails of the bracket plate.
- Ensure the top fasteners possess robust shear resistance to carry the static downward weight.
Tilting brackets and articulated swing-out arms change the load mechanics completely. When a 50 lb TV extends 18 inches away from the wall on an articulated arm:
- The assembly acts as a continuous lever arm.
- Rotational torque magnifies the tensile pull-out force at the top bracket fasteners up to several hundred pounds of direct outward tension.
- Any dynamic movement (adjusting the TV angle or bumping the screen) creates shock loading that pulverizes hollow drywall.
Never mount an articulating TV arm solely to hollow drywall. Secure the mounting plate directly into solid wood framing studs.
For budget-conscious mounting strategies on non-articulating TV hardware, see The Cheapest Ways to Install a TV Without Studs.
Hanging Heavy Mirrors and Floating Shelving Units
Large framed glass mirrors and vanity mirrors place heavy static shear loads directly against the wall surface. Because a mirror hangs flush against the drywall, the load generates virtually zero outward cantilever torque:
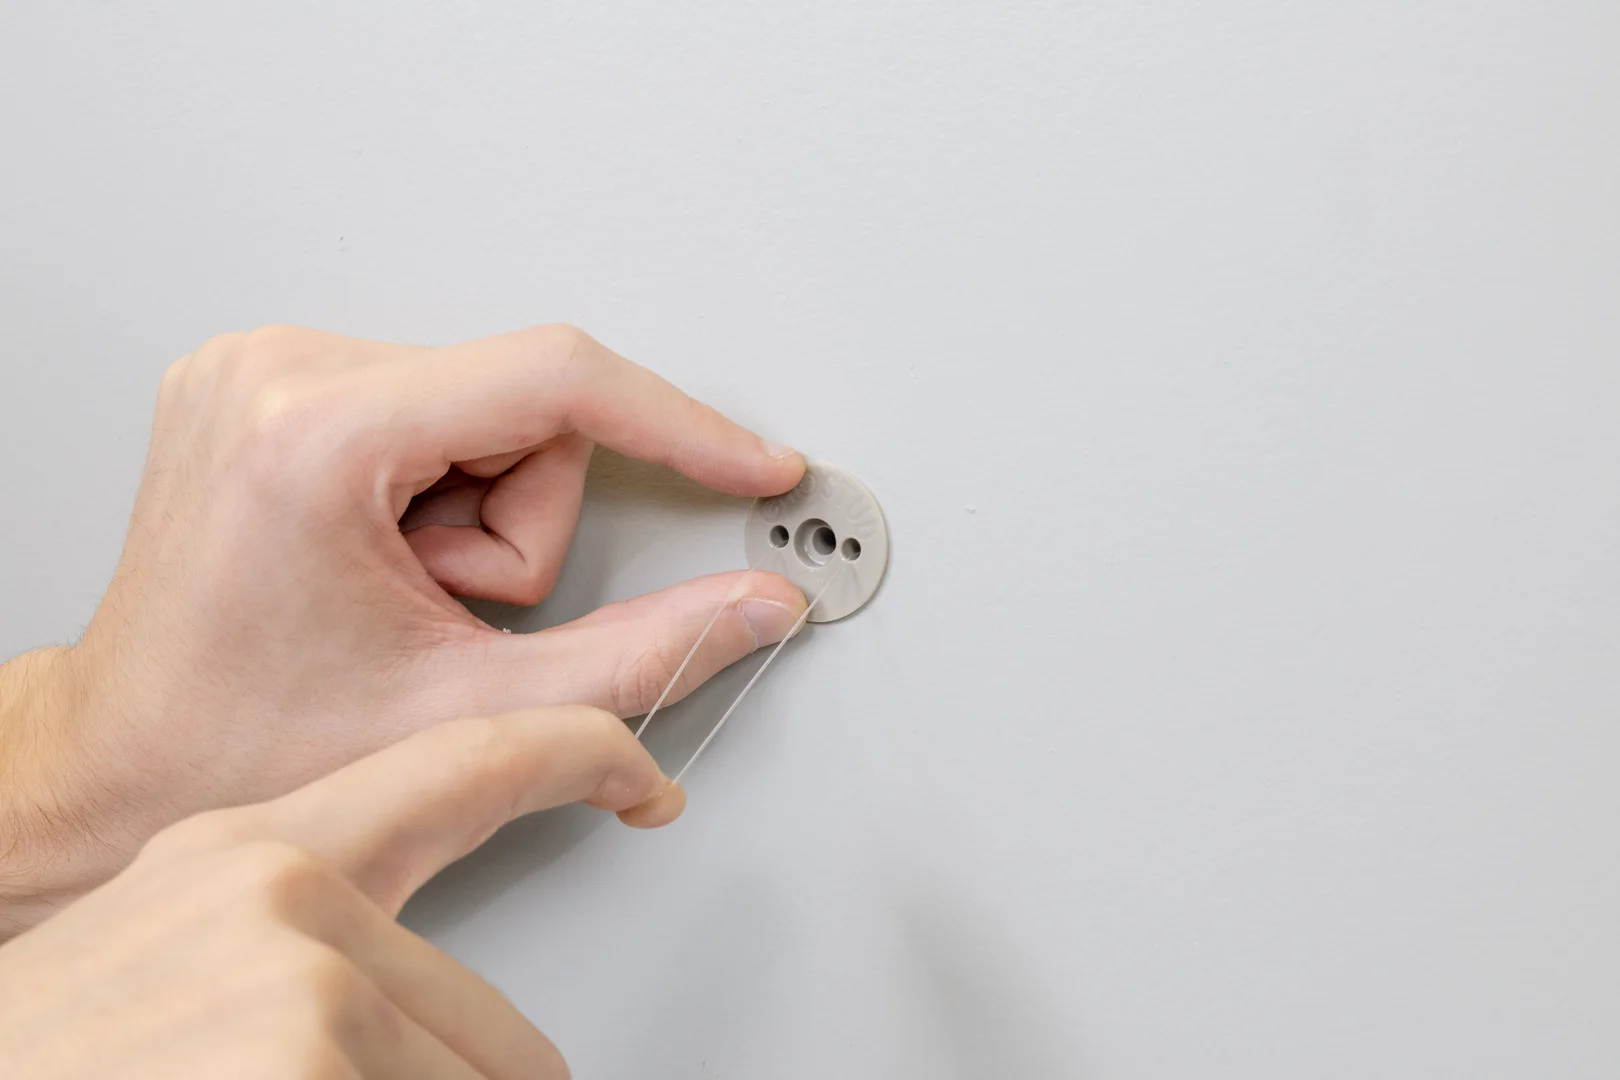
- Use two high-shear drywall anchors spaced along the top hanging wire or mounting brackets.
- Distribute the weight evenly to prevent localized panel stress.
- Verify that the anchor heads seat tightly against the mirror bracket to prevent sliding.
Floating shelving units present a different structural challenge. Because a floating shelf projects outward (typically 8 to 12 inches) without diagonal support struts, items placed along the outer shelf edge generate high rotational torque. The top fasteners inside the concealed mounting bracket experience intense tensile withdrawal forces, while the bottom of the bracket crushes inward against the drywall surface.
To prevent floating shelf pull-out failure:
- Keep shelf depth as shallow as possible when mounting to hollow drywall.
- Place heavier items close to the back wall rather than near the outer edge.
- Utilize wide-bearing structural backing hardware to clamp the wall panel firmly.
For step-by-step instructions on securing large glass fixtures, read How to Anchor a Heavy Mirror to the Wall.
Best Practices to Prevent Drywall Blowouts and Installation Failures
Proper installation technique ensures fasteners achieve their full engineered load capacity without damaging the wall.
Drywall core blowout occurs when high drill pressure or blunt bits punch through the rear paper facing, causing gypsum to crumble away in a conical cone around the hole. This rear blowout dramatically reduces the drywall’s effective bearing thickness:
- Drill with Light Forward Pressure: Use sharp, high-speed steel (HSS) twist bits, brad-point wood bits, or clean hole saws. Let the tool cut the paper facing cleanly without forcing the bit through the sheet.
- Back-Spur Hole Saws: When cutting 1-inch or 2-inch holes for large-diameter anchors, run the hole saw in reverse for 2 seconds to scribe the front paper facing before switching to forward rotation. This prevents paper tearing around the outer rim.
- Control Driver Torque: When using a cordless drill/driver, set the mechanical clutch to a low setting (1–3). Never drive anchors or machine screws at full tool torque. Stop driving 1/8 inch before flush, and finish tightening by hand with a manual screwdriver.
- Tactile Verification: For toggle and expanding hardware, lightly pull the fastener outward by hand after inserting it. You should feel solid mechanical contact against the rear gypsum face without spongy give or rotation.
Avoiding Common Installation Mistakes with the Strongest Drywall Anchor Options
- Using the Wrong Drill Bit Diameter: Match the drill bit diameter precisely to the anchor specification. Drilling a 1/2-inch hole for a 3/8-inch sleeve creates play that allows the fastener collar to slip into the wall cavity under load.
- Ignoring Obstructions in the Wall Cavity: Standard interior 2×4 stud walls provide 3-1/2 inches of cavity depth. However, shallow furring strips on masonry walls provide only 3/4 inch to 1-1/2 inches of clearance. Toggle bolts and expanding anchors will bottom out against masonry or pipes in shallow cavities, failing to deploy. Always measure depth with a probe wire before inserting hardware.
- Overtightening Screws in Drywall: Driving a screw past its stopping point strips the gypsum core, crushes the surface paper, and weakens the structural sandwich panel. Tighten screws until the fixture base is clamped firmly without indenting the surface paper.
- Failing to Account for Double Drywall: Double 1/2-inch drywall panels (1 inch total thickness) prevent standard-length toggle channels and self-drilling anchors from engaging properly. Measure total wall thickness through a test pilot hole and select long-reach hardware engineered for multi-layer assemblies.
Frequently Asked Questions About Heavy-Duty Drywall Anchors
Can drywall anchors hold a heavy TV without finding a stud?
Yes, high-capacity drywall anchors can support a heavy flat-panel TV on a fixed, low-profile wall bracket that keeps the weight flush to the wall. This setup exerts almost pure downward shear force, which high-capacity fasteners can handle in 1/2 in or 5/8 in drywall. However, if you are using an articulated swing-out arm or a heavy tilting bracket, the extended leverage creates strong outward tensile forces that hollow drywall cannot support safely. For articulated mounts, always secure the bracket into solid wood studs.
What is the main difference between plastic and zinc anchors?
The primary difference lies in material rigidity and thread strength. Zinc self-drilling anchors cut cleanly through drywall paper and gypsum core without flexing, providing superior shear resistance and lower risk of head breakage. Plastic and nylon screw-in anchors have blunter tips that can tear wall paper and are prone to stripping their drive sockets or snapping under torque. However, zinc anchors are brittle under cyclic bending loads, whereas engineered polymers (such as heavy-duty expanding anchors) can distribute static loads broadly without corroding.
Can you reuse the hole after removing a drywall anchor?
It depends entirely on the anchor mechanism. With traditional spring-wing toggle bolts, the wing falls behind the wall when the screw is removed, leaving an open hole that can be reused only by inserting a new toggle fastener of equal or larger diameter. Solid-channel snap toggles and steel molly bolts maintain their collar and internal threaded sleeve permanently, allowing you to remove and reinstall machine screws indefinitely. Once an expanding or threaded anchor is completely pulled from the drywall, the hole must be repaired using fiberglass mesh tape and setting-type joint compound before redrilling nearby.
Conclusion
Achieving a secure installation on hollow drywall depends on understanding the mechanics of your wall and selecting hardware that matches your specific load. Downward shear forces created by flush mirrors, artwork, and low-profile brackets are readily managed by high-capacity fasteners that clamp across a wide surface area. In contrast, heavy cantilevered loads and dynamic fixtures produce high tensile pull-out forces that demand direct attachment into structural wood framing.
Take time to measure your drywall thickness, confirm cavity clearances, control your driver torque, and avoid over-tightening. By pairing the correct fastener mechanism with proper installation technique, you can safely mount fixtures with lasting structural stability.